by Mark Nemtsas | Jun 9, 2009 | Tips and Tricks
Time Clock MTS operates in two main modes. Normal mode, which is used by employees to clock in and out, and Administrator mode, which is used by the administrator to configure the software and run payroll reports. This Time Clock MTS How To Article covers normal mode.
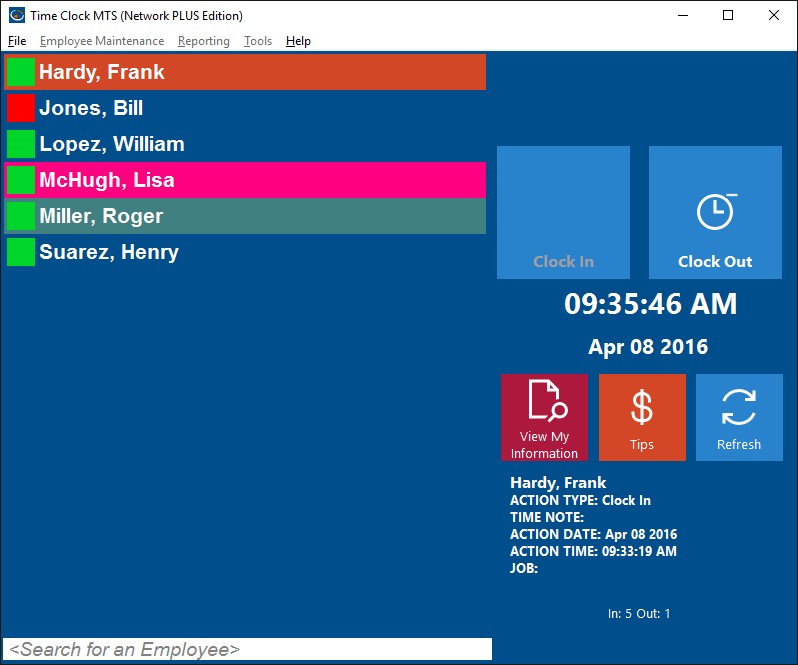
Employee List Interface in Normal Mode
The normal mode of operation in Time Clock MTS is the mode in which it will operate almost all of the time. By far the most common activity that will be carried out in the normal mode of operation is employees clocking in or out. A key indicator that Time Clock MTS is currently in normal mode of operation is that all the menus at the top are disabled apart from the File menu and the Help menu. When operating in Normal mode with the employee list interface enabled Time Clock MTS will look like the image above. Note that most of the menus are disabled. Using the employee list interface employees may also be able to view their own time cards and you can see the last activity each employee carried out.
The Keypad Interface
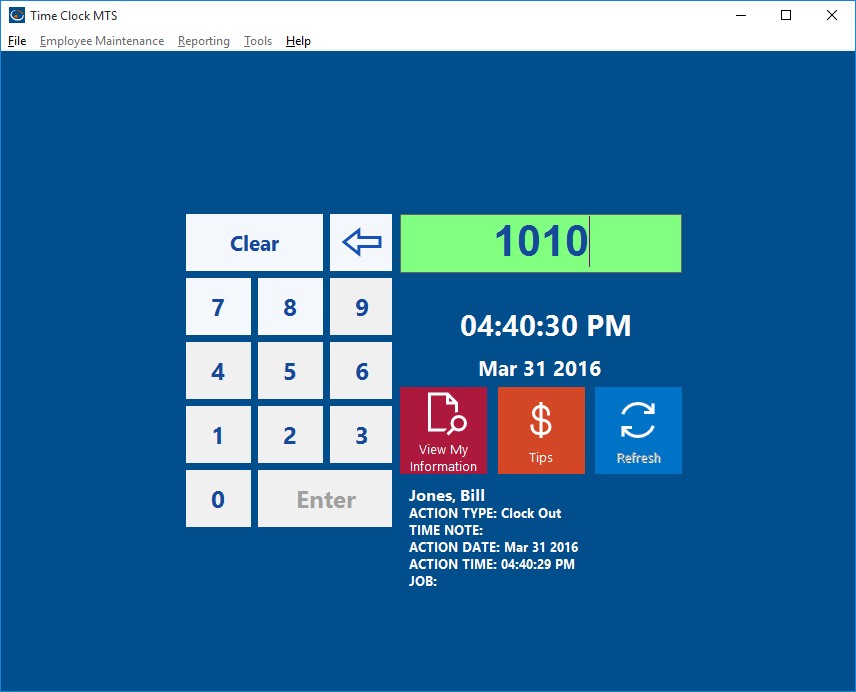
When using the keypad interface employees can only clock in and out using the numeric keypad. There are no other activities available to them while operating in normal mode. You can see what the keypad interface looks like while operating in normal mode in the image above. Note again that most of the menus are disabled.
by Mark Nemtsas | Jun 9, 2009 | Tips and Tricks
The Keypad Interface
Time Clock MTS provides two different interfaces to allow employees to clock in and out. The first of these is the Employee List interface designed to be used with a computer mouse, the second is the Keypad interface designed to be primary be used with a touchscreen. Like the Employee List Interface the keypad screen can also be used with an input device such as a bar code reader, magnetic swipe card reader, or RFID reader. This article discussed was the keypad interface and how it can be used.
The Keypad interface is selected by the Time Clock MTS Administrator on the Tools->Options->Interface Settings page (read about it in the help file). To turn on the Keypad Interface select the Keypad option from the Data Entry Mode dropdown box. Note that the Keypad interface is ONLY active in normal mode, that is when the time clock administrator IS NOT logged in.
The keypad interface comprises two main areas. The keypad (which can be used with a computer mouse or touch screen) on the left, and the entry text box and employee status area on the right. To use the keypad interface to clock in or out an employee simply enter their employee ID (or badge number) using the keypad and clicks Enter when they are ready to clock in or out. Time Clock MTS will clock the employee in or out depending on what their last action was. When they are successfully clocked in or out the details of the action will be displayed in the status area.
The Keypad interface can be used with data readers such as bar code readers or magnetic card readers. All you need to do is encode your barcode badges or magnetic cards with the Time Clock MTS employee badge ID’s and scan in the data. The data reader will populate the entry text box with the employee Badge ID and at the end of the data read (usually) a data reader sends the return code (the same as pressing the return key on the keyboard). This will press the Enter button on the Keypad interface and clock the employee in or out. There are more detailed guides to setting up the software with bar code scanners, magnetic card readers, and RFID readers elsewhere on the site.
by Mark Nemtsas | Jun 9, 2009 | Tips and Tricks
Employee List Interface
Time Clock MTS provides two different interfaces to allow employees to clock in and out. The first of these is the Employee List interface designed to be used with a computer mouse, the second is the Keypad interface designed to be used with a touchscreen. Both interfaces allow the use of data input devices such as magnetic card readers, bar code scanners, and RFID scanners. This article covers the Employee List interface.
The Employee List interface is selected by the Time Clock MTS Administrator on the Tools->Options->Interface Settings page (read about it in the help file). You can see what the employee list interface looks like above. The screen is split into two main sections, an alphabetically sorted list of the active Time Clock MTS employees on the left, and the clock in / out buttons and current employee status area on the right.
The sorted employee list contains a line for each active Time Clock MTS employee along with a status icon next to each name. An employee with a green icon is clocked in and with a red icon clocked out. To save on network traffic the Time Clock MTS Client only maintains the status icons for each employee for 60 seconds before the icons all change to gray. As you select an employee in the list the status light will update automatically showing you the most up to date status for that employee. The clock in / out buttons on the right side will be enabled or disabled depending on the status of the selected employee, so an employee that is clocked in will only be able to clock out and vice versa. The status of the employee will also be updated showing the time and date (and any note) for the last action performed by the selected employee. At the bottom of the employee list is a light blue search box that allows you to enter a few letters and be quickly taken to that employee in the employee list. This is a quick way of finding employees if you have a very long employee list.
On the right hand side of the screen the employee selected in the employee list can clock in or out using the Clock In or Out buttons. The current date and time is shown below the Clock In / Out buttons. If the Time Clock MTS administrator has enabled it, the employee may also be able to view their own time cards by clicking the View My Information button. Note that on the Time Clock MTS Client there is an additional button entitled ‘Refresh’ that will update the status icons in the employee list. The status area shows the name of the currently selected employee and the details of the last action that employee performed.
The Employee List Interface can be used with data readers such as bar code readers or magnetic card readers. This how-to-guide
covers exactly how to use Time Clock MTS with any of these devices.
by Mark Nemtsas | Jun 9, 2009 | Tips and Tricks
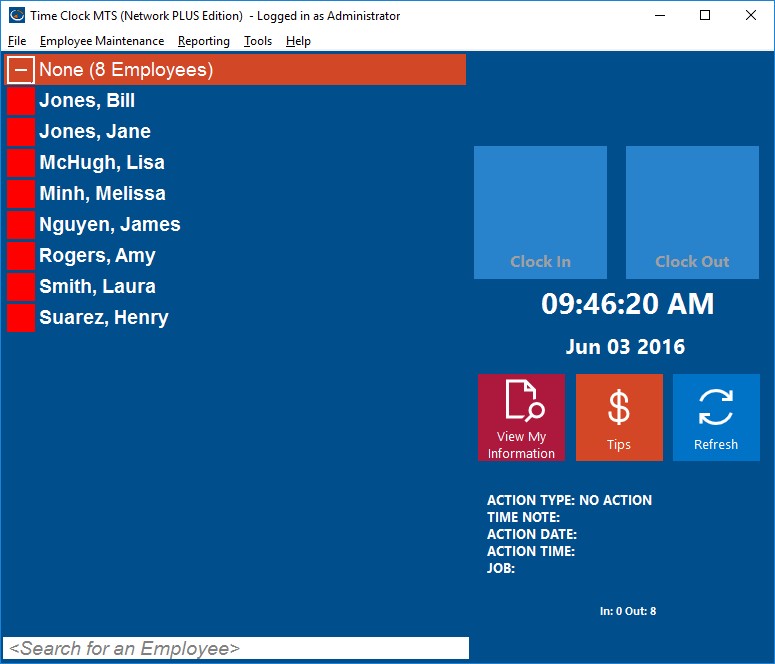
Time Clock MTS in Administrator Mode
Time Clock MTS operates in two main modes. Normal mode, which is used by employees to clock in and out, and Administrator mode, which is used by the administrator to configure the software and run payroll reports. This Time Clock MTS How To Article covers administrator mode.
You can get into the Time Clock MTS Administrator by logging in as the administrator via the File->Log In As Administrator menu (covered in this article). Once you’re logged in as the administrator you’ll have access to all the menus in Time Clock MTS. In the image above you can see that all menus are enabled. Note that in the Time Clock MTS Client, most of these menus are not available. While you’re operating Time Clock MTS in the Administrator mode you can perform all of the reporting and maintenance functions of the software, a short list of the sorts of things you can do follows. Please note that this is by no means a full listing of all the things you can do within Time Clock MTS!
- Create, edit, disable and delete employees using the Employee Maintenance page.
- Setup fingerprint security for employees using the Employee Maintenance page.
- Run payroll reports using the Report menu.
- Search, backup, and restore the Time Clock MTS database using the Tools menu.
- Setup employee bulletin notices using the Tools menu.
- Configure the software using the Tools->Options menu.
- Access help resources and register the software using the Help menu.
by Mark Nemtsas | May 24, 2009 | How To, Tips and Tricks, Using the Software
Changing the Windows System Time
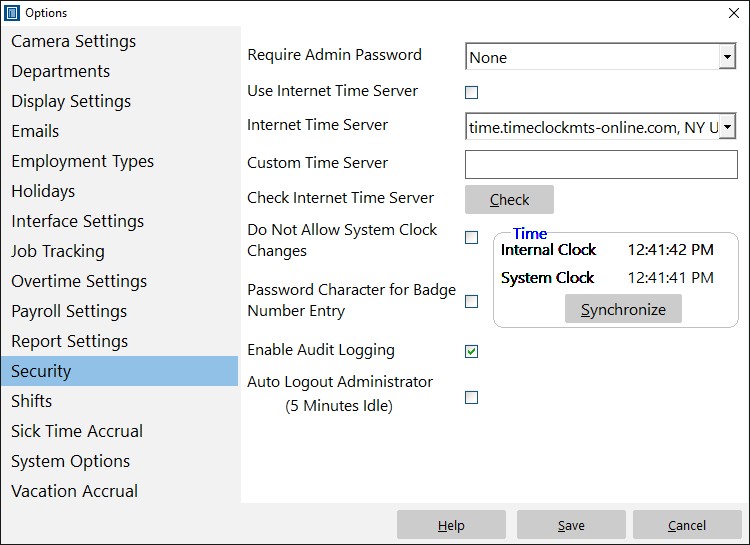
You may well know that Time Clock MTS can determine the internal time used for clocking in and out from an Internet time server. This is a pretty foolproof way of preventing time clock fraud as the times recorded are completely independent of the local PC clock setting. You can turn on this feature in the Time Clock MTS administrator program on the Tools->Options->Security Settings page. Just tick the Use Internet Time Server checkbox, then pick our dedicated time server (time.timeclockmts-online.com) from the dropdown box and click SAVE to save the change. You can read about how to do this in more detail in this blog entry
The above works well, but for whatever reason very infrequently it doesn’t work in a fool-proof fashion. This won’t result in incorrect employee attendance data but it can prevent employees from clocking in or out. Time Clock MTS will actually prevent employees from clocking in and out if it cannot contact the Internet time server for an hour (this is to stop employees just pulling a network cable to get around the Internet Time Server setting). Sometimes the reason Time Clock MTS cannot contact the time server can’t easily be determined, it may be network congestion, it might be firewall problems, or it might be problems with the time server itself. When these sorts of problems occur frequently it may be adopting a different solution to setting the system time using Windows itself. Here’s what you’ll need to do:
- Turn off the Use Internet Time Server setting in Time Clock MTS. This will result in Time Clock MTS determining all times from the local PC clock.
- Change the Windows settings to have the local pc clock time determined from an Internet time server. How you do this will depend on the version of Windows you are running. For example, in Windows Vista/7/8 you can do it by simply right clicking on the Taskbar clock and then selecting Adjust Date/Time from the popup menu.
- Change the Windows user account permissions that Time Clock MTS is run from to prevent changing the Windows System time. How you do this is well beyond the scope of this entry as it will vary tremendously depending on the version of Windows you are running and any sort of network management software you happen to be using.
That’s all there is to it. What you’ve done is set the local PC clock to get accurate time from an Internet time server and Time Clock MTS will get it’s clock in and out times directly from this. By adjusting the Windows user account permissions you’ve prevented employees from changing the system clock of the PC in an attempt to provide fraudulent time clock data.
by Mark Nemtsas | May 21, 2009 | Tips and Tricks, Using the Software
Update 24 November 2014 – This setting was removed from Time Clock MTS with the release of version 5. The content of this blog only apply to versions of Time Clock MTS BEFORE version 5.
I’ve had a couple of Time Clock MTS users send in emails about the same thing in the last week and it worth covering the issue here. Basically the symptom is this, when running reports (say for a week), sometimes it appears that the reports pick up a time or two from the next weeks report. When they run the next weeks report it is missing these times that show up on the previous weeks report. When you examine these times that seem to mysteriously appear on the wrong weeks report it turns out that the clock in time was before the usual clock in time for the day. The reason this is happening is because employees are clocking in BEFORE the First Day Starts At setting used by Time Clock MTS to determine when the work day (and thus work week) starts.
So, for example, lets say you have the First Day Starts At setting in Time Clock MTS (set on the Tools->Options-> Payroll Settings page) set to 8:00am. Now lets say an employee clocks in at 7.30am on Monday AND you dont have report rounding time turned on. Time Clock MTS considers the time worked between the clock in and the time when the employee clocks out to OCCUR ON SUNDAY rather than Monday. The time of clock in determines the day on which the recorded time occurs. This is complicated a little if you have report rounding turned on. If you have report rounding set to, say 15 minutes, then an employee can clock in up to 15 minutes prior to 8:00am on Monday to have their time to be reported on Monday. If they clock in more than 15 minutes prior to 8:00am then the time will be reported on Sunday.
There’s a couple of ways of preventing this sort of thing happening in Time Clock MTS.
- Examine if you need to actually use the First Day Starts At setting. It is really only useful if you run shifts or if you want to restrict clock in times to stop employees clocking in early. If you dont need to use the setting leave it set to 12:00am (again you can change this setting on the Tools->Options->Payroll Settings screen.
- Turn on report rounding and restrict clock in times to the same period as you’ve set report rounding for. So, for example, if you set report rounding to 15 minutes set the clock in restriction to 15 minutes before shift start. To restrict clock in times you must assign an employee to a shift and then set the clock in restriction on the Tools->Options->Shifts screen.