by Mark Nemtsas | Apr 23, 2008 | Tips and Tricks, Using the Software
In Part 1 of this entry we had a look at the directory where Time Clock MTS stores all of it’s local configuration and logging information. Now we’ll take a quick look at the files in this location and what they are used for.
- clientlog.txt – contains all the logging information for the client version of Time Clock MTS
- log.txt – contains all of the user interface logging information for the administrator version of Time Clock MTS
- logdll.txt – contains all of the business logic logging for both the client and administrator versions
- timeclock.ini – contains all the local configuration options for both versions of the software
- timeclock.mdb – found in the Database sub directory this is the MS Access version of the Time Clock MTS database. If you cant see this file then it’s because it has been moved.
Just a quick final tip. If you are having problems with Time Clock MTS and you’re emailing us about them it’s always a good idea to attach the log.txt and logdll.txt files to the email as they can contain a lot of useful information that helps us get to the bottom of your problems.
by Mark Nemtsas | Apr 16, 2008 | Tips and Tricks, Using the Software
Time Clock MTS stores all of its’ local configuration and log files in the common program data directory on the computer that it is installed on. It can be useful to know where this directory is for several reasons, you might want to move the Time Clock MTS database, you might want to copy the main configuration file to share it among other computers, or you may need to send the log files to us to help sort out problems you are having. The exact location of the directory depends entirely on the version of Windows that you happen to be running. To determine where your information is take a look at this list:
Windows 10, Windows 8/8.1, Windows 7, Windows Vista
c:\ProgramData\Time Clock MTS\
Windows XP / Windows 2003 Server / Windows 2000
C:\Documents and Settings\All Users\Application Data\Time Clock MTS
Windows Me / Windows 98 SE
C:\Windows\All Users\Application Data\Time Clock MTS\
Usually you can just navigate directly to this directory using Windows Explorer but in some cases Windows can be configured to hide system files and folders (of which this is one) by default. If this is the case then you’ll need to use Windows Explorer to change some settings to allow you to find this directory. You can learn how to do this on your version of Windows by taking a look here.
In part 2 I’ll take a look at the files in this directory and run through what they are and what they are used for.
by kathryn@timeclockmts.com | Mar 28, 2008 | Tips and Tricks
Of course being a Time and Attendance software package Time Clock MTS focuses primarily on Employees. Each employee can be classified by Employment Type. When Time Clock MTS was designed these employment types were thought to be things like ‘full time’, or ‘seasonal’, or ‘contract’ or whatever sorts of employment types you might need. This classification is of course useful for reporting and sorting purposes.
As time has progressed our users have found that it is also very useful for setting up of Vacation and Sick Time Accruals. These accruals, rather than being set by employee, are set by employee type. This allows you to have just a few accrual policies that cover all of your employees. This sort of ease of use is great, except where companies have unusual accrual schemes, or many different schemes. While Time Clock MTS cannot handle every different accrual scheme automatically, it does have the flexibility to allow you to handle them manually. An accrual scheme that we have been asked about is one that allocates vacation time based on years of service. This is different to the assumed scheme in Time Clock MTS which assumes a basic accrual over time calculation system, and cannot handle the years of service based system automatically. However, it can handle it through creative use of Employee Types.
Let’s say you have a scheme that allocates 1 week of yearly vacation time for each year of service up to a maximum of 4 weeks. All you need to do is create 4 different employee types, perhaps calling them ‘1 Year of Service’, ‘2 Years of Service’, ‘3 Years of Service’,and ‘4+ Years of Service’. Create a vacation accrual scheme for each employment type to have an initial amount of 1, 2, 3, and 4 weeks accordingly. Then you can go ahead and assign your employees to the correct employment type and they’ll now all be allocated the correct vacation time. Each year at the same time (the end of the fiscal year would be good) work your way through your employee list and make sure to allocate each of them to the correct employment type again.
For more information you might find our Setting Up Vacation Accruals article helpful. The Employment Type Help Topic is also worth a look.
by Mark Nemtsas | Mar 17, 2008 | How To, New Releases, News, Tips and Tricks, Using the Software
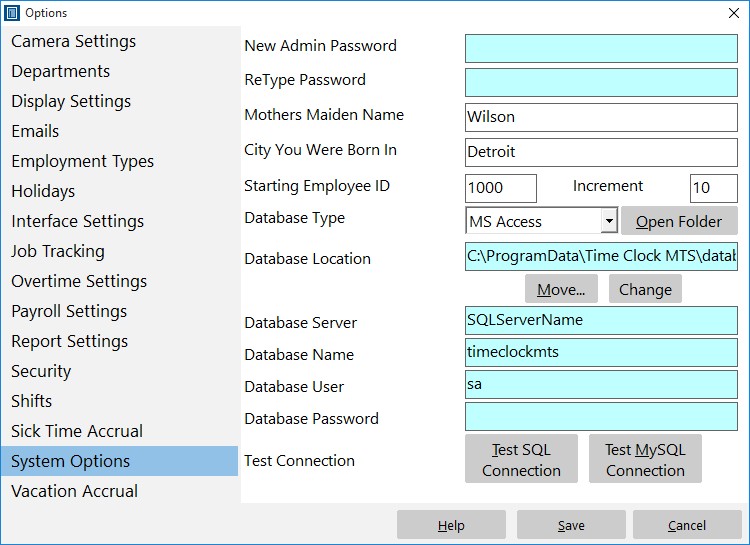
The System Options Screen
Version 1.6.2 of Time Clock MTS was released today. It contained a couple of minor bug fixes and added one very important security feature, support for Microsoft Access database passwords.
Users finding and manipulating the back end database of Time Clock MTS has always been a problem. Time Clock MTS has always included a series of internal checks to try to detect this sort of manipulation, but of course no system is perfect. By including support for Access database passwords we have added one additional layer of security to ensure that your time and attendance information is accurate. Using a database password with a Microsoft Access database encrypts the data it contains and prevents non authorized access to the database when someone tries to open it with MS Access.
To setup Time Clock MTS to work with an Access database that is password protected follow these simple steps:
- Password protect your Access database using MS Access. How this is done depends largely on the version of MS Access that you have. Consult your MS Access help documentation for detailed instructions.
- Run the Time Clock MTS administrator program, the software will detect that the database back end is password protected and prompt you to enter the password.
- Once entered click OK and re-start the software as prompted. If you entered the information correctly then you’ll connect directly to the database. If you didn’t enter the password correctly you’ll be prompted to enter it again.
- You’ll need to repeat the password entry process for every client installation you have.
That’s all there is to it. If you’re wondering, the MS Access database password you enter into Time Clock MTS is stored locally on each computer (which is why you need to enter the password for every Time Clock MTS Client you have). The password itself is stored in an encrypted format for extra security.
by Mark Nemtsas | Mar 4, 2008 | How To, Tips and Tricks, Using the Software
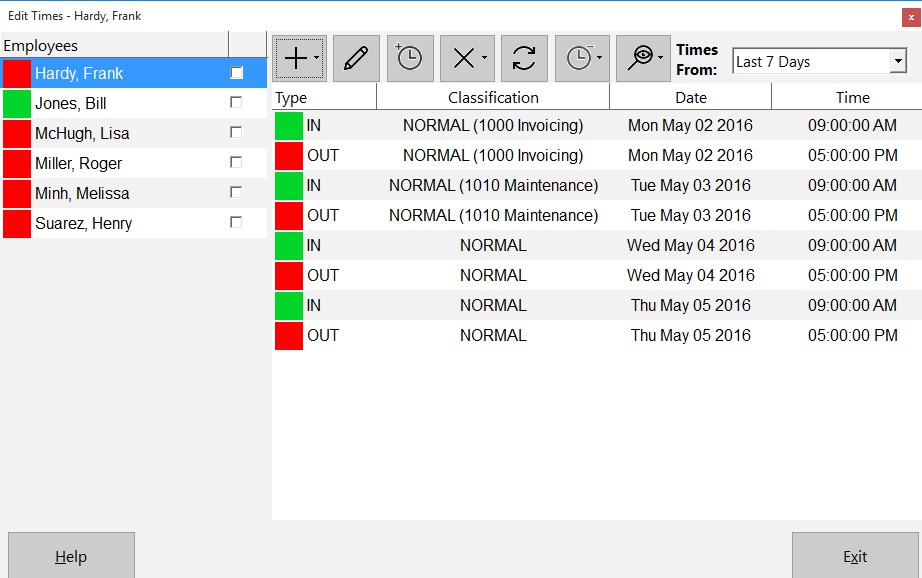
The Edit Times Screen
Employees forgetting to clock is a common problem that all employers have to deal with. Today we received an email from a Time Clock MTS user asking the best way to deal with this situation. Here’s the users question:
What I am trying to do is to clock in employees while they are working, because sometimes they forget to clock in at the beginning of the shift and they tell me about 2 hours later to clock them in, but I can’t because it won’t let me clock them in without giving them a clock out time as well, and well the times they leave varies because we work in the restaurant business
Solving the problem is easy. Here’s how in just a few simple steps:
- Log into Time Clock MTS as the Administrator.
- Go to the Tools->Edit Times menu.
- Select the employee you want to add the time for and click
 to clock one or more employees in or out (see image above) and select clock in selected employee.
- Click yes to confirm the clock in.
- Select the clock out time for the time you have just added on the list of times.
- Select that time from the list and you can now click
 to edit the selected time to adjust the time back to clock in when the person arrived at work. Click to save the time.
So now the employee is clocked in, with the time added manually and they can clock out normally at the end of the day. You can also add forgotten clock out punches in this way for one employee or all employees. This process takes just under a minute and really couldn’t be easier.
Page 23 of 23« First«...10...1920212223