by Mark Nemtsas | Jan 7, 2011 | How To, Tips and Tricks
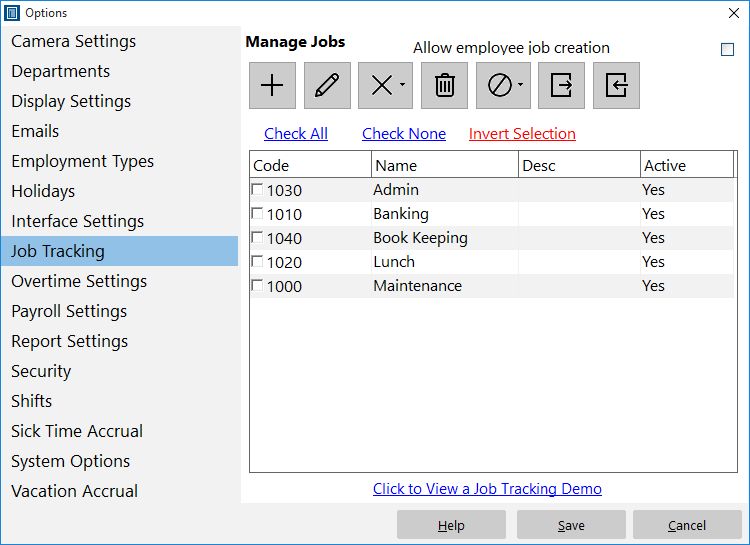
Job Tracking Setup Screen
Generally you’d want a time clock administrator to setup new jobs for the Time Clock MTS Job Tracking System but sometimes it’s useful to allow employees to create their own jobs on the fly during the work day. If you work from daily job sheets that have many small jobs that might just run to a few hours you would quite likely find this useful because of the lower administrative overheads. This Time Clock MTS How To Article covers how to allow your employees to create new jobs.
To allow employees to create new Time Clock MTS jobs just follow follow the steps shown below.
- Log into Time Clock MTS as the administrator. How you log in as the administrator was covered in this Time Clock MTS How To Article.
- Go to the Tools->Options->Job Tracking screen and you’ll be shown the screen at the top of this article.
- Check the Allow Employee Job Creation checkbox.
Once checked employees entering a new job code when clocking or switching jobs will automatically create new job with that job code. Of course the time clock administrator will need to then name and manage the jobs appropriately via the Tools->Options->Job Tracking screen.
by Mark Nemtsas | Oct 22, 2010 | Tips and Tricks
Prior to the release of Time Clock MTS Version 3 all the Time Clock MTS job based reports were run for all jobs. A common request we had was to allow reports to be run for a single job to allow for simple cost tracking on a job by job basis. This has now been accomplished simply by placing a job selection drop down on the Report Configuration screen which you can see above. It’s a simple matter now to select a job from this drop down and then choose a job based report to run (like the Job Punchcard Report or the Job Time Report). The data on the report will then be restricted to the job you selected from the drop down.
If you’re not sure what job tracking in Time Clock MTS is or you just want to know how to make it work then you should try watching the Time Clock Job Tracking Demo.
by Mark Nemtsas | Oct 22, 2010 | Tips and Tricks, Using the Software
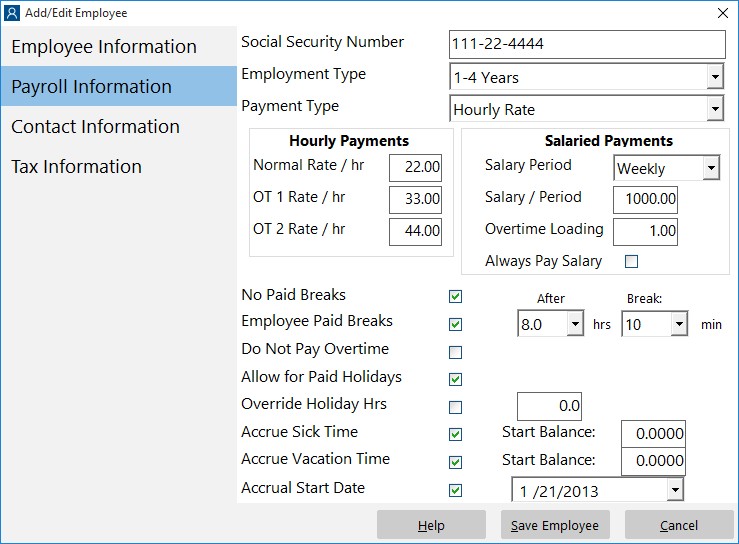
The Payroll Information Screen
A common issue that the new user to Time Clock MTS has is dealing with bringing employees into Time Clock MTS that have existing sick and vacation accrual balances. Prior to the release of Time Clock MTS Version 3 the only real solution was to set the hire date of the employee to the day they were entered into Time Clock MTS. Then their accrual starting balance (either the employment type starting balance or the employee starting balance) could be set to their actual balance. This worked fine but not having the hire date set correctly could affect on going accrual calculations or lead to confusion when manually setting those employees to different accrual schemes as their years of service increased.
This has all changed, though, as of version 3 of Time Clock MTS. A couple of innocuous little settings (seen in the screenshot above) allow you to set an accrual start date for employees with existing accrual balances. When the Accrual Start Date checkbox is checked and a date set that date is used as a starting date for that employees accruals and the employees starting balance used as a starting balance. This ensures that the accrual calculations are accurate and that no confusion arises because of an incorrect employee hire date.
So, here’s how to setup an existing accrual balance for an employee being entered into the Time Clock MTS software for the first time.
- Setup the Vacation Accrual Scheme and Sick Time Accrual Scheme and assign them to the employee as required.
- Transfer the sick time and vacation accrual balances from your existing attendance system into the Starting Balances text boxes on the Time Clock MTS Employee Payroll Information screen.
- Check the Accrual Start Date checkbox on the Employee Payroll Information screen and select the accrual start date.
That’s all there is to it. The Accrual Start date will now be used as the start date for all accruals for that employee all accruals from that point forward will use the starting balance as the starting point for all calculations.
by Mark Nemtsas | Sep 29, 2010 | How To, Tips and Tricks
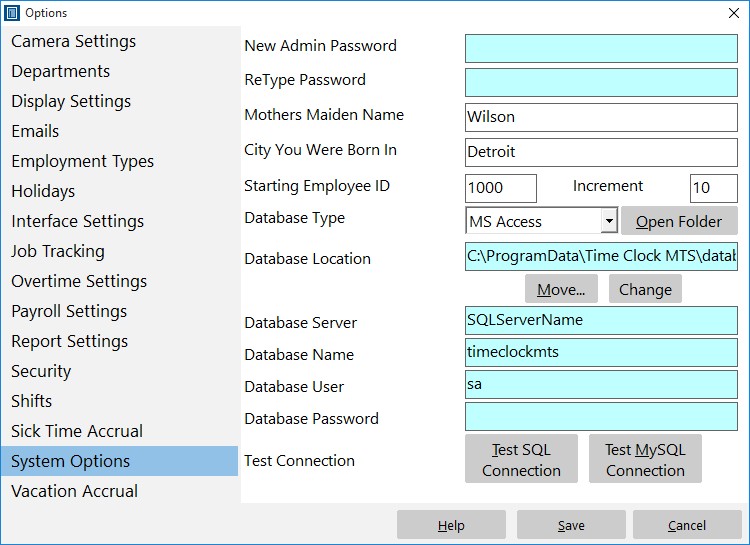
The System Options Screen
It’s a common misconception that the only way to reset your Time Clock MTS password is to use the File->Reset Administrator Password menu. But this menu is for resetting forgotten administrator passwords. If you still know your password and just want to set it to something different here’s what to do.
- Log into the Time Clock MTS Administrator program as the administrator using your password.
- Go to the Tools->Options Menu.
- Go to the System Options Screen (shown in the image above).
- Enter your new password into the Admin Password field.
- Confirm your new password by typing it again into the Re-Type Password field.
- Save the password by clicking the Save button.
Once you’ve done that your Time Clock MTS administrator password will be set to the new value and you’ll have to use the new password to log into Time Clock MTS as the administrator.
by Mark Nemtsas | May 7, 2010 | How To, Tips and Tricks, Using the Software
Control and define Time Clock MTS jobs here.
A common question I get asked is “How do I track paid breaks for my employees?”. I’ve never really had a good answer to this question until earlier this week in a flash of inspiration (yes I do have them very occasionally) I realized that anyone could easily make use of the Time Clock MTS Job Tracking features to easily track paid breaks. Here’s how I’d set it up:
- Go to the Job Tracking screen and define a job for each paid break type that you want to track. This might be ‘lunch break’ or ‘coffee break’ or whatever suits your needs.
- Go to the Employee Information screen and set the Job Tracking setting for each employee to “Optional”. When this is set, employees will be shown the “Enter Job Code” screen when they clock in or out but they won’t actually have to enter a code.
- When employees come to work, just have them clock in as normal without entering a job code. When they take a paid break, have them clock out and switch jobs to one of your paid break codes which you defined in step 1 above. When they return from a paid break, have them switch jobs again but not enter a job code (they are back on normal time).
- You can then use Job Time Report to monitor how much time your employees are spending on their paid breaks and ensure there is no time clock fraud occurring.
I hope you find that little tip helpful, it will certainly give employers much tighter monitoring on what their employees are up to with almost no extra administrative overhead being added to the business!
by Mark Nemtsas | Apr 28, 2010 | Tips and Tricks, Using the Software
Here’s a question we got from a Time Clock MTS user recently.
I have downloaded the trial version of the time clock, which I find very useful. I don’t understand how is this calculating the time. I need it to calculate time on hourly basis (60 minutes) on the reports. But the reports calculation don’t match my calculations. Can you please tell me where do I fix this? I will really appreciate your help.
Of course reports can be configured in Time Clock MTS to show times in decimal hours (for example 1.1 hours) or hours and minutes (for example 1 hr, 6 minutes). A lot of users prefer decimal hours because it makes payroll and overtime calculations a lot easier, some others are just interested in attendance times and like the easier to understand hours and minutes reports. Here’s my reply to the above email:
Do you have the reports setup to show in hours and minutes? If not you can change this on the Tools->Options-> Report Settings page. If that’s not the problem perhaps you can give me some more detail on what the specifics of your issues are?
The user got back to me and the report settings was indeed their problem. If you’re not exactly sure of what I’m talking about try taking a look at the report settings help topic.