by Mark Nemtsas | Jun 30, 2017 | How To, Tips and Tricks
This How-To Article explains how the time clock administrator can force Time Clock MTS to run the database update routine against the time clock data file. Typically Time Clock MTS performs this routine when you install a new version of the software. This should happen automatically but under certain circumstances it can be useful to force the process. To force Time Clock MTS to run the database update routine follow the steps below:
-
- This process can only be performed using the Time Clock MTS Stand Alone Edition or the Time Clock MTS Administrator software (if you're using the Network or Network PLUS Editions). It also cannot be used in versions of the software prior to Version 6.1.1.
- Once Time Clock MTS is running Log in as the Administrator.
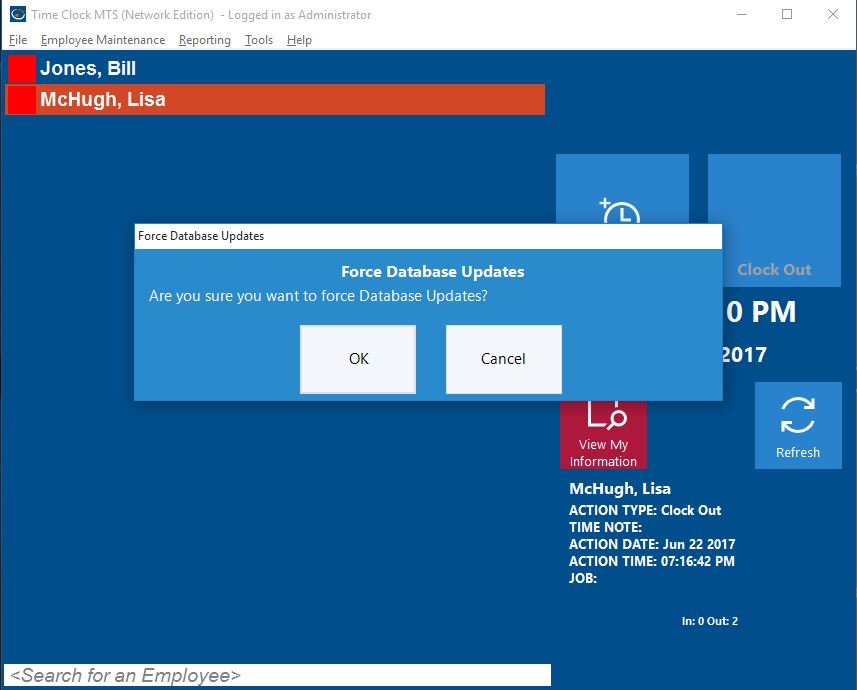
- Hold down the ALT and the U key on your keyboard. You'll then be shown the screen below:
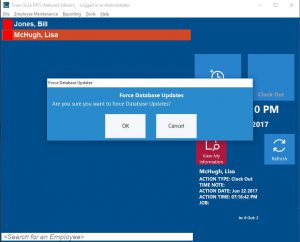
Forcing Time Clock Database Updates
- Click the OK button and Time Clock MTS will then perform the required updates.
by Mark Nemtsas | Jun 30, 2017 | New Features, News
The release of version 6.1.1 of Time Clock MTS included a couple of brand new reports. One is aimed at users of the job tracking system, the other useful for working out what employees have (and have not) worked during a given time period.
Job Labor Breakdown Report
If your business tracks time employees spend on jobs, whether that be because you charge your customers to perform those jobs, or because you simply like to know what your employees are working on then the cost of labor is a key piece of information you need to know. The new Job Labor Breakdown Report produces a single table of information showing the time worked on each active job in in Time Clock MTS. The report further breaks the time down into normal hours, OT1 hours and OT2 hours. You can see an example of the report below.
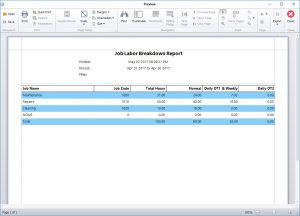
The Job Labor Breakdown Report
This information was certainly available previously in Time Clock MTS, albeit in a much more verbose fashion via the Job Cost Report. However, we’re sure you’ll agree that the new Job Labor Breakdown Report gives a more concise summary of your real job labor costs.
Active in Period Report
It can be useful as an employer to be able to quickly determine who has (or has not) worked during a given period. This might be to determine eligibility for public holidays, to help even out shift work hours, or to simply determine the size of your workforce during a given time period. The new Active in Period simply checks to see if an employee has or has not recorded any time during the reporting period and presents the information in an easy to understand table. You can see the report in the image below.
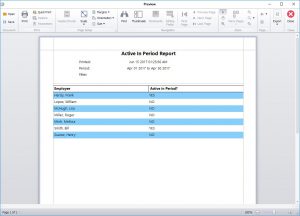
The Active in Period Report
These new reports are configured using the same report configuration screen used for all other reports. You can read more about them (and all the other reports in Time Clock MTS) in our online help system.
by Mark Nemtsas | Jun 29, 2017 | Tips and Tricks
One question we get asked occasionally is from users wanting to use Public Holidays in Time Clock MTS. They setup their holidays using the Tools->Options->Holidays screen, run a payroll report for the time period the holiday should apply, but cannot see that the holiday has been paid to the employee. There are three reasons that this might be the case:
- The most common reason is that employee is not setup to get paid holidays. Each employee must be setup to get paid holidays by checking the Allow for Paid Holidays checkbox on each employee’s Payroll Information screen.
- The employee hire date (set on the Employee Information screen) falls AFTER the date on which the the holiday occurs. So, if for example your employees get paid for the 4th of July and an employee has their hire date set to 10 July then they will not get paid for the preceding July 4th holiday.
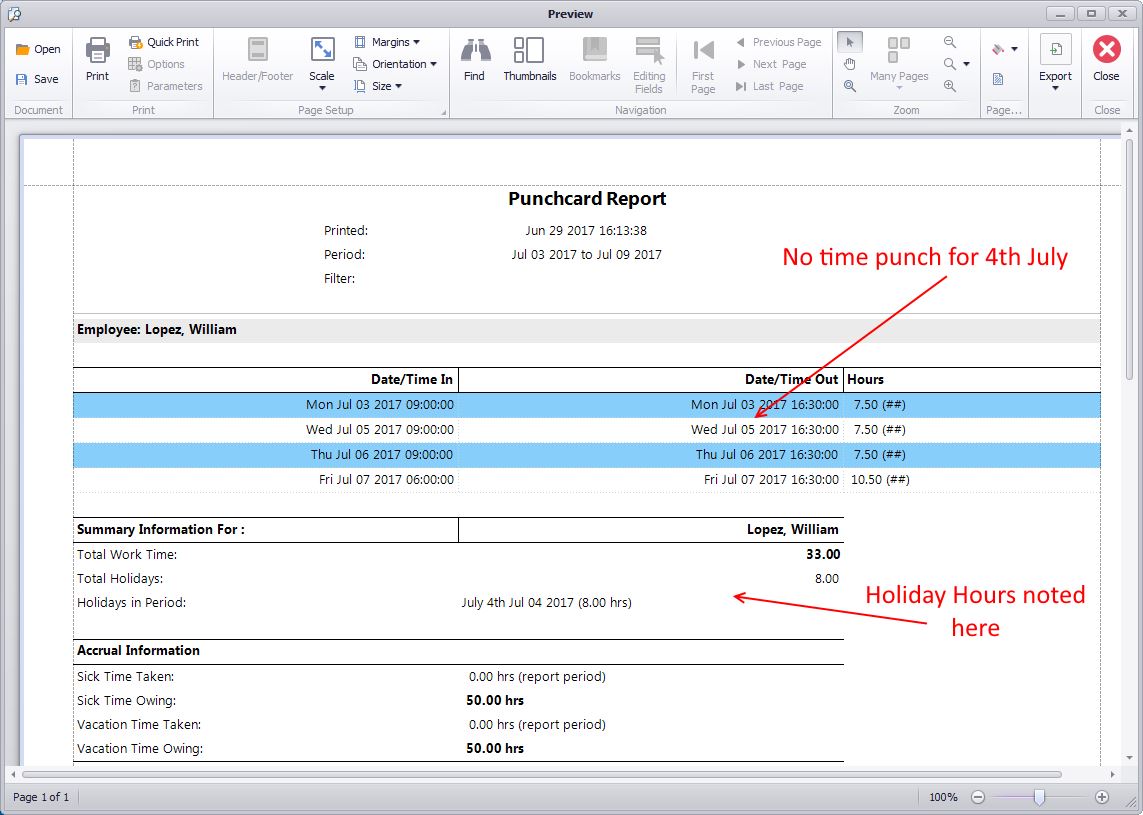
- The last reason isn’t actually a reason, it’s a mis-interpretation of the payroll reports. Time Clock MTS does not add time punches for public holidays, so if you’re running (for example) a Punchcard Report you won’t see a time punch for the July 4th Holiday. What you will see is holiday hours broken out in the Payroll Information (or Summary) section of the report. See below for an example of what this might look like.
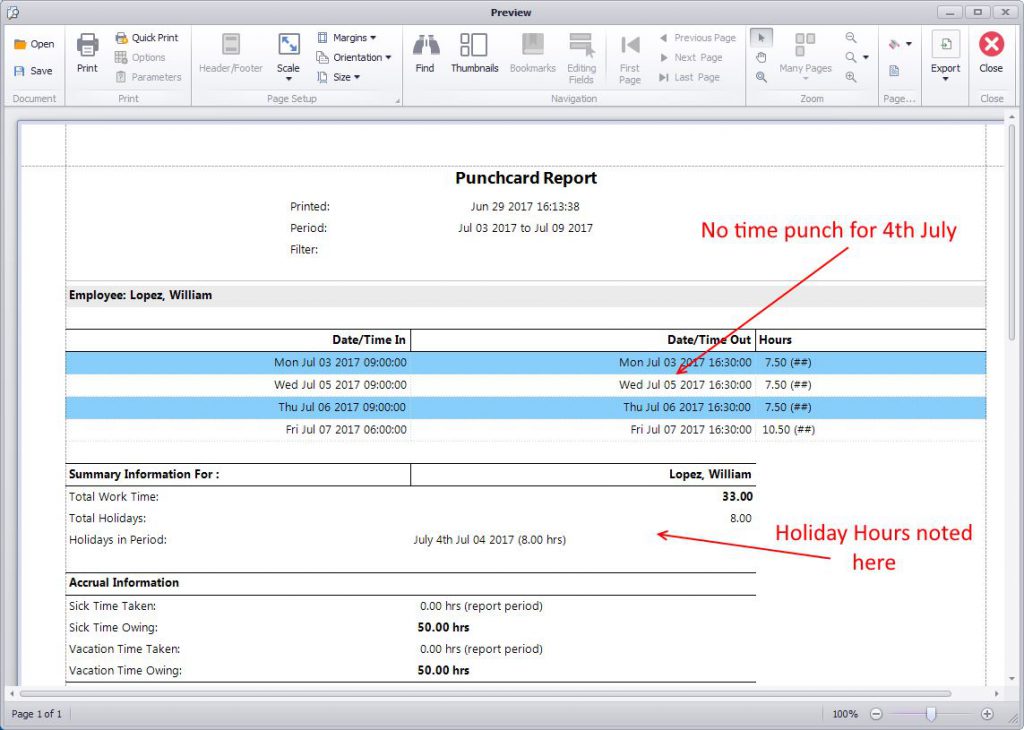
Holiday Hours noted in Payroll Summary Section
by Mark Nemtsas | Jun 28, 2017 | New Features, Tips and Tricks
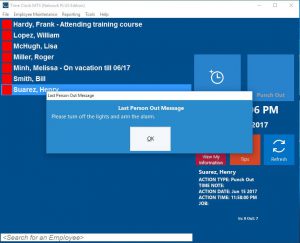
Whether you’re a store, a doctor’s practise, a dentist, a mechanic, or a factory you need to make sure your alarm is armed each day, the back door is locked, your POS system is shut down, and (of course) the lights are switched off. Recently an astute user of Time Clock MTS suggested that the software could help him make sure that all those routine end-of-day tasks that each and every business needs actually get done. How? By showing the last person to punch out a message. Great idea we thought, so we’ve gone ahead and implemented what we’re calling the Last Person Out Message.
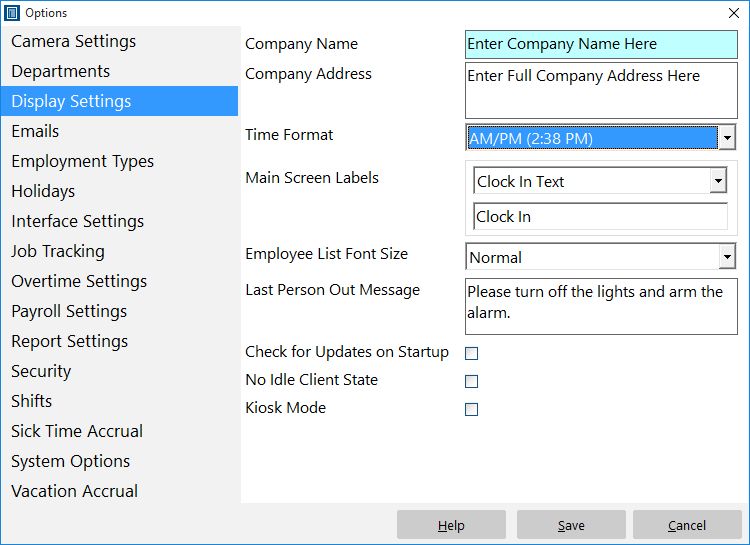
Setting the Last Person Out Message
The Last Person Out Message is set on the Display Settings screen. See the image below and look for the Last Person Out Message text box.

Setting the Last Person Out Message
Showing the Last Person Out Message
Display of the Last Person Out Message is simple, the last person who punches out will be shown the message. See what that looks like below:
Showing the Last Person Out Message
Be aware that EVERY time the last person punches out this message will be shown, so it could be shown multiple times a day, not just once.
That’s all there is to it, make use of the Time Clock MTS Last Person Out Message to remind your employees of tasks that need to be completed when you’re closing up for the day. It really couldn’t be much easier.
by Mark Nemtsas | Jun 26, 2017 | New Features, Tips and Tricks
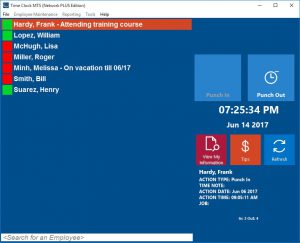
We’ve spoken previously about using Time Clock MTS as an Employee In/Out Board. Using it this way is particularly useful for two main reasons, firstly, your employees will know at a glance if someone is currently at work or not, and secondly, in the case of an evacuation due to fire or other emergency you can easily print a list of employees that are at work. However, what happens if an employee is punched in but they are on vacation and you need to know when they are back? Or what if there is an emergency and an employee is punched in but they are off-site doing a client visit or attending a training course? To handle that situation we’ve got a system called Employee List Messages. These are neat little messages that can be displayed next to an employee’s name if you’re using the Employee List Interface. Those same messages will also be displayed on the Employee Status Report which can be printed quickly in the event of an emergency.
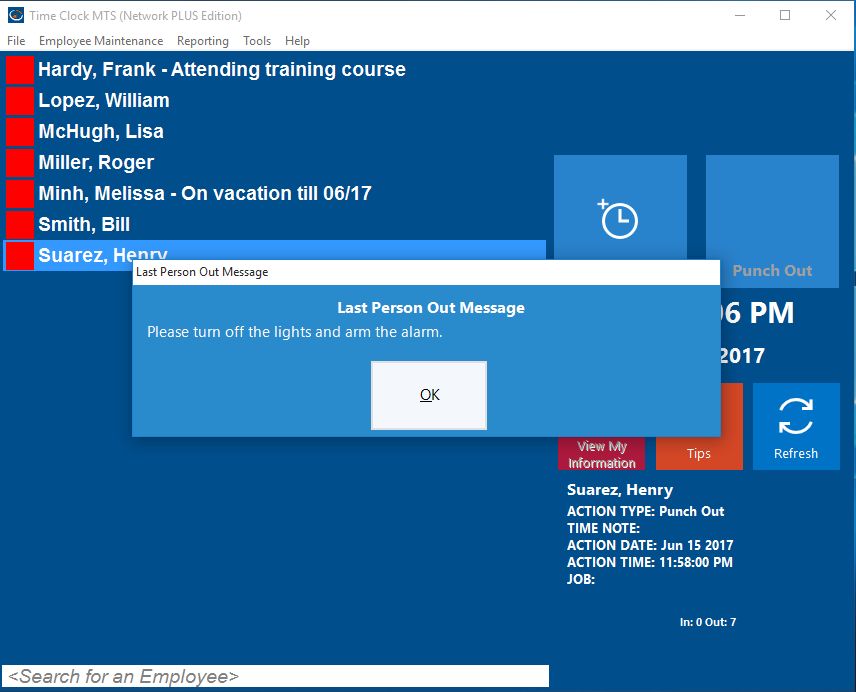
Employee List Messages in Action
Above you can see what employee list messages might look like in action. Note that Frank Hardy has a message next to his name as does Melissa Minh. You’ll see those same messages next to to the employee names when you print the Employee Status Report.
Entering Employee List Messages
Employee List Messages are controlled from the Time Clock MTS Administrator software from the Tools->Employee List Messages menu. You must be logged in as the administrator to access the menu.
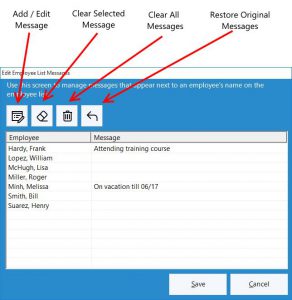
The Employee List Messages Screen
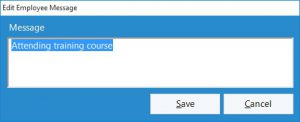
Above you can see the Employee List Messages screen annotated to explain what the toolbar buttons do. Adding a message for an employee is dead simple, just click on the employee’s name in the list and then click the Add/Edit Message button and you’ll be able to enter message for that employee using the screen below:
Entering a Message
Note that you can just double click on an employee’s name and you’ll be able to add or edit the message without needing to click the toolbar button first. There are some other useful buttons that make editing messages a bit easier. The Clear Selected Message button will clear the message for the selected employee, the Clear All Messages button will clear the messages for all employees. The Restore Original Messages will reload all messages if you happen to make an unfortunate mistake with the Clear All Messages button.
That’s all there is to it. Employee list messages are a great way of keeping your employees informed of the whereabouts of each other, they are also a great way of keeping an up-to-date employee location list in the case of an emergency. It’s easy to use and something that will prove to be useful to almost any Time Clock MTS user.