by Mark Nemtsas | Apr 16, 2008 | Tips and Tricks, Using the Software
Time Clock MTS stores all of its’ local configuration and log files in the common program data directory on the computer that it is installed on. It can be useful to know where this directory is for several reasons, you might want to move the Time Clock MTS database, you might want to copy the main configuration file to share it among other computers, or you may need to send the log files to us to help sort out problems you are having. The exact location of the directory depends entirely on the version of Windows that you happen to be running. To determine where your information is take a look at this list:
Windows 10, Windows 8/8.1, Windows 7, Windows Vista
c:\ProgramData\Time Clock MTS\
Windows XP / Windows 2003 Server / Windows 2000
C:\Documents and Settings\All Users\Application Data\Time Clock MTS
Windows Me / Windows 98 SE
C:\Windows\All Users\Application Data\Time Clock MTS\
Usually you can just navigate directly to this directory using Windows Explorer but in some cases Windows can be configured to hide system files and folders (of which this is one) by default. If this is the case then you’ll need to use Windows Explorer to change some settings to allow you to find this directory. You can learn how to do this on your version of Windows by taking a look here.
In part 2 I’ll take a look at the files in this directory and run through what they are and what they are used for.
by Mark Nemtsas | Mar 29, 2008 | New Features
The information in this old article is now superseded. If you want to learn how to setup the Time Clock MTS Network PLUS Edition with SQL Server you should read these instructions.
Introduction
Time Clock MTS is now ready to be tested using MS SQL Server as a database rather than the standard MS Access database. This will result in a program that is more responsive, more reliable, and able to cater for more client computers than ever before. If you are interested in taking part in this beta then all the usual disclaimers apply. The software *is* beta and the setup is reasonably complex at the moment. The setup will improve a lot when we get to the final release.
Download and Install the BETA Verions of Time Clock MTS
If you are a current user of Time Clock MTS then you will only need to download and install the update versions of the client and admin programs. If you’re new to Time Clock MTS or want to try a fresh install then you’ll need to download the full installation packages. Go to our Time Clock Downloads Page to download Time Clock MTS.
Create Your SQL Server Database
The first setup is to create your SQL Server database using the Time Clock MTS Access database as a template. You must have installed the admin version of Time Clock MTS first, and can use your existing populated timeclock.mdb file as a template.
- The best method of creating the SQL Server database is to use the built in database upsizing wizard within MS Access. You’ll need to do this in Access 2000 or better and the wizard can usually be found on the Tools->Database Utilities->Upsizing Wizard menu within MS Access.
- Before upsizing make sure to install Time Clock MTS on one computer and run it at least once on the default database that ships with the software. This will update the database with all the latest fields and tables. If you have any existing data in your MS Access database this will be exported to the SQL Server database during this process.
- When you’re ready to upsize open the timeclock.mdb database (found in C:\Documents and Settings\All Users\Application Data\Time Clock MTS\Database unless you’ve moved it) in MS Access and run the database upsizing wizard. Choose to Create a New Database and click Next.
- On the next screen enter your SQL Server details here such as your server name, UID, password and the name of the database you want to store your information in. Note this information down and when you’re happy click next.
- On the next screen you want to choose to export ALL tables to SQL Server. Click Next when you’re done.
- On the next screen you’ll be given the option to export table attributes to SQL Server. Leave all the default options here and just click Next.
- On the next screen you’ll be given the opportunity to make application changes, just leave all the default options and click next.
- On the next screen you’ll be told the the wizard is now ready to do the upsize, just click Finish and let it do its work.
Connecting the Time Clock MTS Admin Program to the SQL Server Database
You’ll need to have installed the Time Clock Admin program with the normal MS Access database before connecting to the SQL Server database.
- Find your timeclock.ini file. This should be in C:\Documents and Settings\All Users\Application Data\Time Clock MTS\. Note that you may have to show hidden files and folders in Windows Explorer to seet his file.
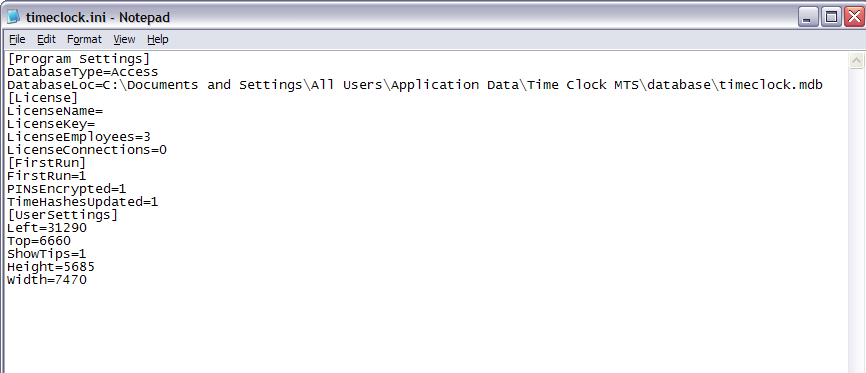
- Open the timeclock.ini file in Windows Notepad and look for the [Program Settings] section. There should be a setting or two in here already, containing the location of your MS Access database and one called ‘DatabaseType’ that says ‘Access’. It should look something like this:
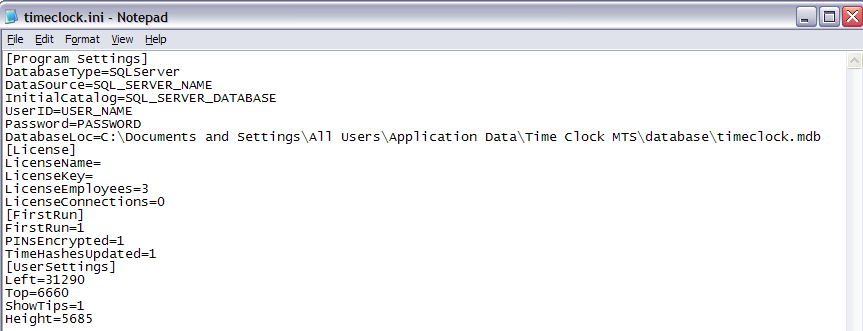
- Now we’re going to edit the file to look like:
 Explanation of Settings
Note that the DatabaseType setting has changed to SQLServer, make sure you get the spelling and case of this correct
SQL_SERVER_NAME = your SQL Server
SQL_SERVER_DATABASE = the database you created above (by default Access will have called this timeclockSQL)
USER_NAME = the SQL Server user name you have setup for Time Clock MTS
PASSWORD = the password for the SQL Server USER_NAME
- When you’re happy with the timesheets.ini file save it. Try running the Time Clock MTS admin program, if you’ve entered all the details above properly then it will connect to your SQL Server database.
Connecting the Time Clock MTS Client Program to the SQL Server Database
You’ll need to have installed the Time Clock Client program and connected it to an MS Access database first.Once this is done you’ll then need to make the changes required to connect it to the SQL Server database. The changes are EXACTLY THE SAME as those described above for the Admin program. Just open and edit the timeclock.ini file as described above.
by Mark Nemtsas | Mar 17, 2008 | How To, New Releases, News, Tips and Tricks, Using the Software
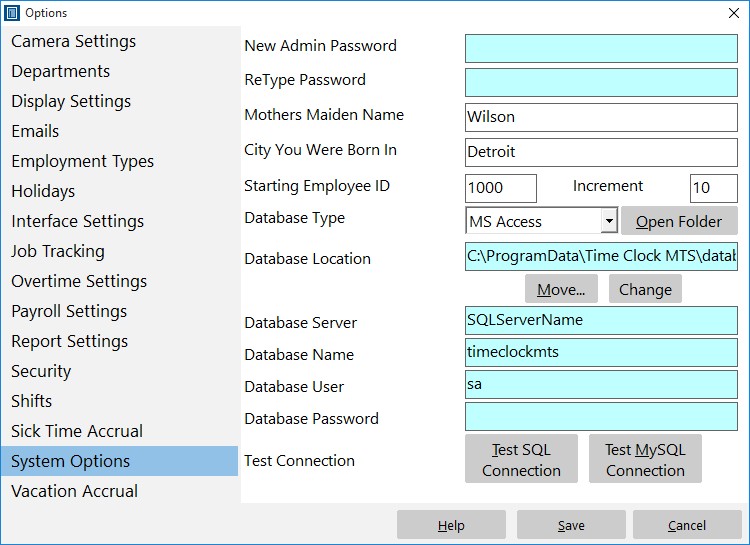
The System Options Screen
Version 1.6.2 of Time Clock MTS was released today. It contained a couple of minor bug fixes and added one very important security feature, support for Microsoft Access database passwords.
Users finding and manipulating the back end database of Time Clock MTS has always been a problem. Time Clock MTS has always included a series of internal checks to try to detect this sort of manipulation, but of course no system is perfect. By including support for Access database passwords we have added one additional layer of security to ensure that your time and attendance information is accurate. Using a database password with a Microsoft Access database encrypts the data it contains and prevents non authorized access to the database when someone tries to open it with MS Access.
To setup Time Clock MTS to work with an Access database that is password protected follow these simple steps:
- Password protect your Access database using MS Access. How this is done depends largely on the version of MS Access that you have. Consult your MS Access help documentation for detailed instructions.
- Run the Time Clock MTS administrator program, the software will detect that the database back end is password protected and prompt you to enter the password.
- Once entered click OK and re-start the software as prompted. If you entered the information correctly then you’ll connect directly to the database. If you didn’t enter the password correctly you’ll be prompted to enter it again.
- You’ll need to repeat the password entry process for every client installation you have.
That’s all there is to it. If you’re wondering, the MS Access database password you enter into Time Clock MTS is stored locally on each computer (which is why you need to enter the password for every Time Clock MTS Client you have). The password itself is stored in an encrypted format for extra security.
by Mark Nemtsas | Mar 4, 2008 | How To, Tips and Tricks, Using the Software
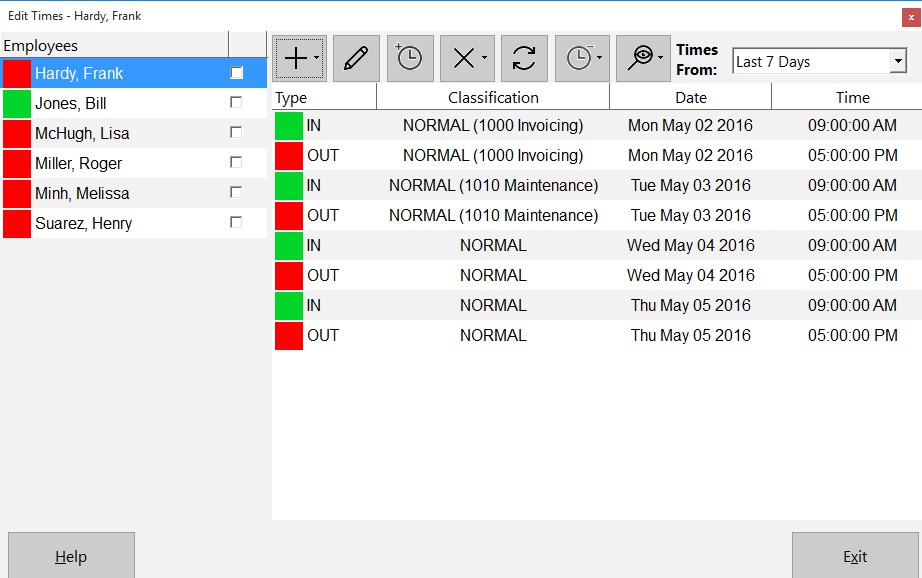
The Edit Times Screen
Employees forgetting to clock is a common problem that all employers have to deal with. Today we received an email from a Time Clock MTS user asking the best way to deal with this situation. Here’s the users question:
What I am trying to do is to clock in employees while they are working, because sometimes they forget to clock in at the beginning of the shift and they tell me about 2 hours later to clock them in, but I can’t because it won’t let me clock them in without giving them a clock out time as well, and well the times they leave varies because we work in the restaurant business
Solving the problem is easy. Here’s how in just a few simple steps:
- Log into Time Clock MTS as the Administrator.
- Go to the Tools->Edit Times menu.
- Select the employee you want to add the time for and click
 to clock one or more employees in or out (see image above) and select clock in selected employee.
- Click yes to confirm the clock in.
- Select the clock out time for the time you have just added on the list of times.
- Select that time from the list and you can now click
 to edit the selected time to adjust the time back to clock in when the person arrived at work. Click to save the time.
So now the employee is clocked in, with the time added manually and they can clock out normally at the end of the day. You can also add forgotten clock out punches in this way for one employee or all employees. This process takes just under a minute and really couldn’t be easier.