by kathryn@timeclockmts.com | Jul 26, 2011 | Using the Software
I’ve just had an interesting question from a user who is looking to upgrade from the free version of Time Clock MTS to a one client commercial version. The user currently has the admin version of Time Clock MTS installed on a PC where his employees clock in and out and is also where he runs reports and configures the software. In his new setup he wants to use this computer as a client (for clock-in and clock-outs only) and use his own computer to administer the software. So there’s a little bit of work required to set this up and still keep the data from the free version. Let’s take at what needs to be done to share his data file and setup Time Clock MTS in the configuration he wants.
1. Prepare a location on your file server where your database will reside. Make sure that all computers that are going to connect to that database have full read/write permissions on the folder where the database is going to be stored.
2. Log into the admin software on the computer that will become the client and go to the Tools->Options->System Options page and move the database to your server by clicking the Move button.
3. Uninstall the admin software on the computer that will become the client
4. Install the Time Clock MTS client software (which can be downloaded from here) on the computer, you’ll find that it will connect automatically to your database you moved to your server. If it doesn’t just go through the first run wizard and you can connect to it that way.
5. Download and install the admin software on the computer that you want to become the administrator. Go through the process of entering a password and so on. Don’t worry too much, you’re not going to use the database created when you install the admin software on this computer.
6. Log into the newly installed admin software as the administrator and go to the Tools->Options->System Options page and connect to the database on your server using the Change button.
That’s all there is too it, a useful process to know if you’re looking to move your administrator software to a new computer!
by Mark Nemtsas | Jul 25, 2011 | How To, Tips and Tricks, Using the Software
The recent release of Version 3.2.1 of Time Clock MTS saw the addition of a new feature to the Edit Times Screen that allows the insertion of a missing punch into the middle of an existing clock in/out pair. The typical situation where this might be useful is if an employee forgets to clock out for a break. This blog entry takes you through the process of inserting a missing punch using the Edit Times screen.
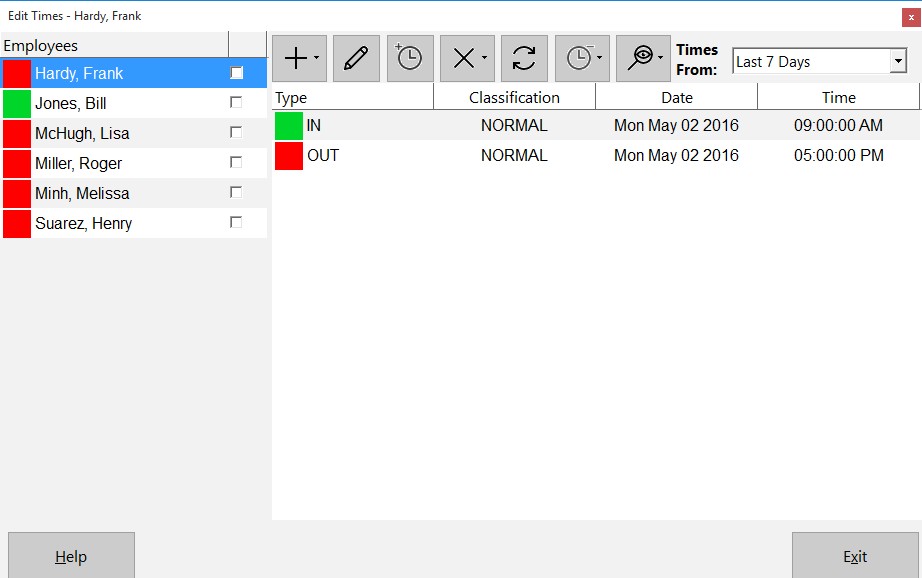
Figure 1 – Missing Punch on Edit Times Screen
Above you can see the Edit Times screen for an employee who has clocked in just before 9:00AM and clocked out just after 5:00PM. The employee has forgotten to clock out for lunch so the administrator must insert punch to represent the break. To do this you must click on either the clock in or out where you want to insert the missing punch and then click the Insert Missing Punch  button.

Figure 2 – The Insert Missing Punch Screen
Above you can see the Insert Missing Punch screen. Note that the Clock Out time is first and the Clock In comes next. This is because when you insert a missing punch you are representing a missed clock out and back in, which in our example is a missed 30 minute lunch break. It’s worth noting that you can also add a time note, assign a job to the missing punch, and change the overtime calculation method. It is important to realize that these settings only affect the newly created Clock In.
Let’s go ahead and adjust the Clock Out and Clock In times to the lunch break times of 12:00:00PM and 12:30:00PM.
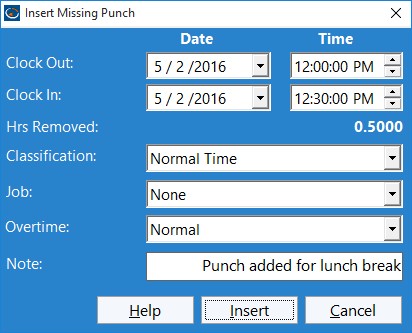
Figure 3 – The Insert Missing Punch Screen
Above you can see we’ve edited the screen to give the times wanted and have also added a note to record why this punch was inserted. We’ll go ahead now and click the Insert Punch button to add the clock out and in. This will take us back to the Edit Times screen.
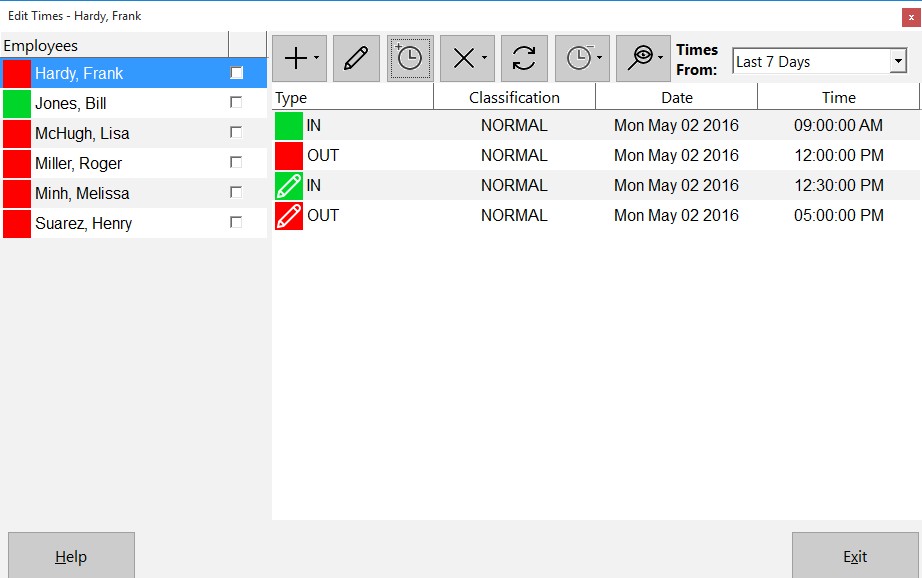
Figure 4 – The Edit Times Screen with Missing Punch Inserted
You can see in the image above that the missing punch has been added to represent the lunch break that the employee forgot to clock out and in for. Previously you could insert a missing punch into Time Clock MTS by using the Edit Time screen and by adding a new time but this new button greatly streamlines the process and helps to eliminate any potential for error.
As always if you have any questions please feel free to ask me!
by kathryn@timeclockmts.com | Jun 5, 2011 | Using the Software
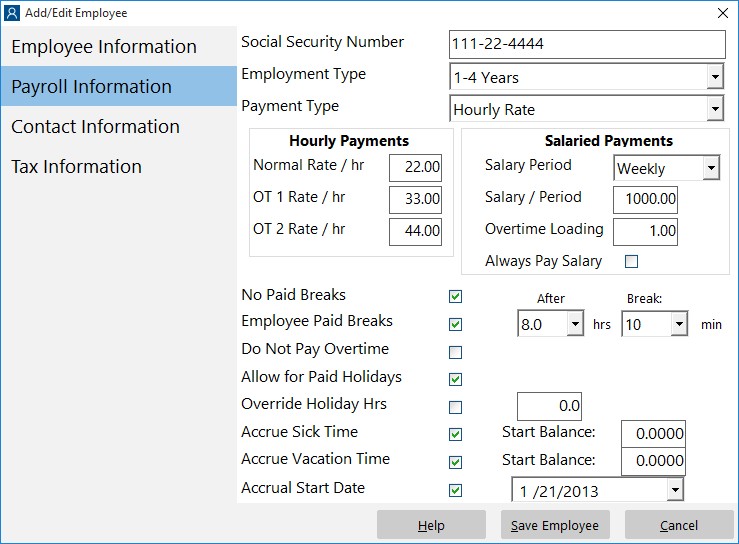
The Payroll Information Screen
Above you can see the Payroll Information screen which defines various settings pertaining to the payroll for the selected employee. In the Salaried Payments section is an innocuous checkbox, Always Pay Salary. When checked this setting means that Time Clock MTS will always pay your employees their calculated salary for a reporting period regardless of the hours worked during the reporting period. The reason I am blogging about this today is that 3 times in the last week Time Clock MTS users have emailed me concerned about apparent calculation errors in the software that were in fact entirely correct due to the Always Pay Salary setting being turned on. It’s best to look at an example to explain exactly how the software makes it’s calculations.
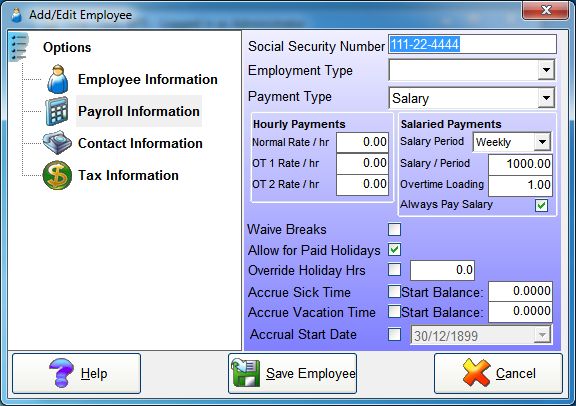
Setting up a Weekly Salaried Employee
First, let’s set up an employee to be paid a weekly salary. You can see the Payroll Information screen above for this sort of setup. The employee has the Payment Type set to Salary, the Salary Period to Weekly and the Salary / Period to $1000. Note that the Always Pay Salary setting is checked. We’ll go the Payroll Reports screen and run a Punchcard Report for a week (7 days) and check the results.
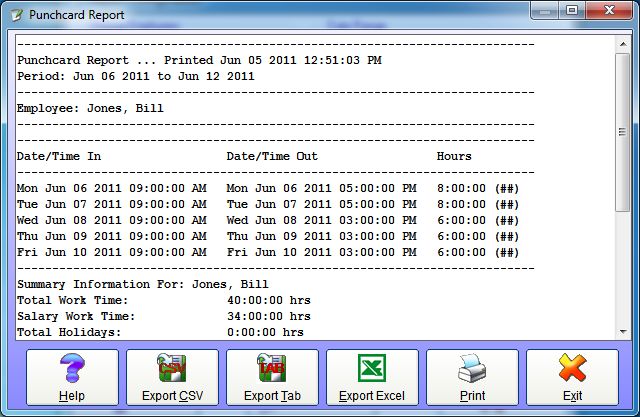
Punchcard Report with Always Paid Salary Setting Turned On
Above you can see a punchcard report run for the week June 6 to June 12. The employee has worked 34 hours for the week. Note that the report is showing a Total Work Time of 40 hours. However, below this is another value, Salary Work Time which is 34 hours. The first value is the calculated salaried hours, which in this case is the reporting period (one week) or 40 hours. If the report was run for 2 weeks the calculated salaried hours would be 80 hours, three weeks 120 hours and so on. The “Salary Work Time” value is the actual hours worked during the reporting period. The Total Work Time value is used for payroll calculations, so in this example the employee would be paid $1000 despite only working 34 hours for the week.
Now let’s turn off the Always Pay Salary setting and run the same report for the same time period.

Punchcard Report with Always Paid Salary Setting Turned Off
In this case you can see that the Total Work Time is the same value as the Salary Work Time, or 34 hours. This number will then be used for all salary calculations.
Conclusions
It may seem a little odd that the Always Pay Salary setting gives these sorts of results but in practice this is exactly how many work places pay their salaried employees. For example, monthly salaried employees would get paid 12 equal amounts each year, despite the different number of work days in a month. Similarly weekly salaried employees would get the same pay week in and week out regardless of overtime worked. The numbers can seem a little odd but once you understand what is happening it all becomes quite clear. Time Clock MTS can thus easily be used to monitor the attendance of salaried employees while still calculating the correct payment amounts for them, regardless of the actual hours they work.
by kathryn@timeclockmts.com | Apr 30, 2011 | Using the Software
I just received a rather lengthy email from a potential Time Clock MTS user. They’ve spent some time considering their questions so I thought it only fair to take some time to consider my answers and I’ve decided that they can be posted up on the blog for everyone to read.
1. Installation fee per server?
No, fees are by the number of administrator computers you require and the client computers you require. Administrator computers are used to configure the software and run reports and client computers are just used to clock in and out.
2. Are there regular “required” upgrades?
No, there are no required upgrades. We do release new versions of the software once or twice a month and upgrading is entirely optional.
3. Is there a fee with each upgrade?
You get one year of free upgrades with your purchase (within the same major release number). You can continue getting upgrades after this first year is up for a fee of 25% of your initial purchase price per year. Again this is entirely optional and you can keep using your software whether you pay this fee or not.
4. Can we have One Server but Employee’s can use from any computer?
Yes. Take a look at our network time clock page to understand how this would work.
5. Can administration be done on another computer besides the Server?
Yes, the administrator software doesn’t have to be on the same computer that the database is on.
5.1 Assuming YES to the last question, could administration be done from a home computer with office access?
Only via some sort of remote login software like PC Anywhere or Log Me In.
6. How does administration set up Employee’s in system?
Via the employee management interface, you can take a look at the help topic which should help: Managing Employees
7. Briefly, what are some of the administration features?
Adding/editing/deleting employees, managing employee times, creating tracked jobs, creating sick and vacation accrual times, running various reports.
8. How do employee’s time in and out?
They can clock in and out in two ways. Either by selecting their name from a list of employees and clicking a clock in/out button or by entering their employee ID number via a keyboard and pressing the enter button to clock in or out. For security you can enable PIN numbers, use a fingerscanner or take a webcam photo of the employee clock. They can also use a barcode swipe or a mag card swipe.
9. How is time corrected? Can Employee correct their own time?
Employees cannot correct their own times. Administrators do it via the Edit Times screen.
10. Can an Employee request time off using the time clock system assuming we can have one server with time clocks at each computer?
No, there’s no system to do this. EDIT: Version 4 November 2012 added this feature.
11. Can a manager approve Employee’s time directly from the time clock system from their own computer?
There’s no time off approval system. EDIT: This feature was also added in Version 4 and later of Time Clock MTS.
12. How does the time clock track Holiday Pay?
There’s a system to create one-off and recurring holidays. Employees can be set individually to either receive or not receive holiday pay. Take a look at the Time Clock MTS Holidays topic for more information.
13. Can the time clock accrue or calculate earned vacation and sick time?
Yes. You should take a look at our articles on Setting Up Vacation Accruals, Setting Up Sick Time Accruals, and Recording Sick and Vacation Time.
14. Some Employee’s have more vacation time than others. Can the system manage this?
Yes, you can have as many different accrual schemes as you like.
15. Currently, vacation and sick time is given at anniversary dates, (not annually at start of year) can the system handle this?
Yes, you just need to make sure to check the “Use Hire Date not Fiscal Year” checkbox when you’re setting up your sick and vacation time accruals.
16. Can the time clock calculate used vacation and sick time?
Yes, see the link above about recording sick and vacation time.
17. Would Exempt and Non-Exempt Employee’s both use the time clock so system can calculate earned and used vacation and sick?
Yes, they can both use the system.
18. Can Time Clock information be interfaced with Payroll Company’s system, so we could transmit pay period information?
No, not at present. It does however integrate with Quickbooks, SurePayroll and Union Bank Online Payroll.
by Mark Nemtsas | Apr 30, 2011 | How To, Tips and Tricks, Using the Software
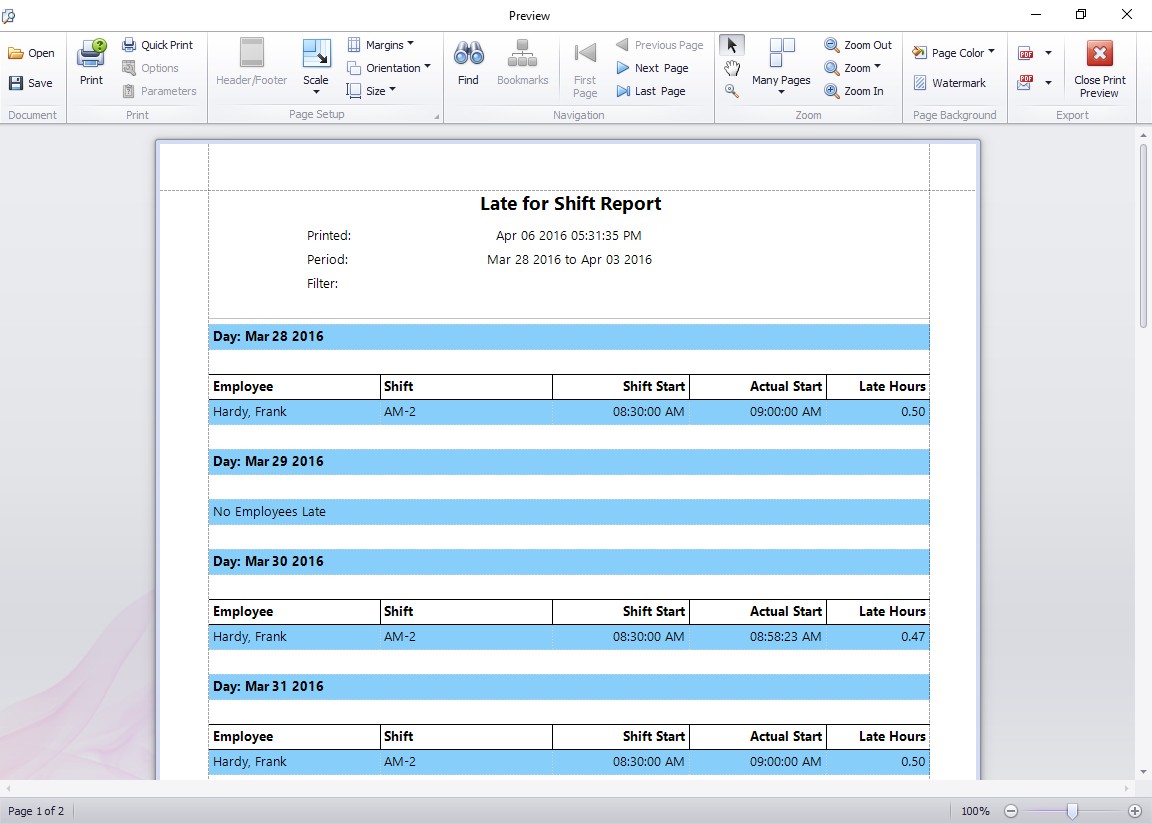
The late for shift report displays all employees that have arrived for work after their designated shift start times.
The recent release of Version 3.1.5 of Time Clock MTS included a new report that allows users to easily run a report displaying employees that have clocked in late for their shift. The output of this report can be seen above. Here’s how to setup Time Clock MTS to allow you to use this report to track when your employees are clocking in late for their shifts.
- For each different shift start time you need to track you’ll need to create a shift on the manage shifts screen in Time Clock MTS. You can do this in Tools -> Options -> Shifts. Read more about Shifts in the online help files. Made sure to set the shift start time to the time that you want to track.
- Assign each employee to the shift that they work. You can do this on the Employee Maintenance -> Edit Employee screen. See Employee Information in the Online Help File.
- Have your employees clock in and out using Time Clock MTS as normal.
- Run the Late for Shift report on the Report Configuration Screen. The report can be run over one or many days, and run for one or many employees.
- You can now interpret the report. It will give you a day by day list of the employees that have clocked in late for their shift. Each employee late arrival will be displayed along with the employee name, their shift name, the scheduled shift start, their actual arrival time, and the amount of time that they were late.
by kathryn@timeclockmts.com | Apr 28, 2011 | Using the Software
It’s probably no great surprise that after more than 5 years of development and being used by several thousand companies in more than 60 countries that Time Clock MTS has been used in some unusual ways. One interesting application that I am aware of is using it as Class Attendance Software in vocational education classes. One user in particular was running a vocational metal working class and wanted his students to experience a ‘work like’ atmosphere during the class. This included using Time Clock MTS to clock in at the start of the class and clock out at the end of the class. The class teacher carried through the idea of a ‘work’ environment by issuing a virtual payroll, having scheduled break times, and even using Time Clock MTS to track vacation time and track sick time.
It’s a fairly simple matter to setup Time Clock MTS to be used as class attendance software. Multiple classes could be tracked by displaying the student list in department folders, projects worked on by students during class could be tracked with the job tracking features, and the user interface could be modified to suit the school environment on the Interface Settings screen. Reports like the employee status report can easily be used to see what students are present at the class, or the job time report could be used to determine how much time students have spent working on particular projects or tasks.
In conclusion I’d like to say that while Time Clock MTS wasn’t designed specifically as class attendance software it can (and is) certainly able to be used as such. Modifying the user interface makes it a little easier for students to digest, and in the specific example I gave above it will give students in the class situation a taste of what a real work situation is like.