by Mark Nemtsas | Sep 15, 2009 | How To, Using the Software
A lot of businesses either want to track employee costs based on what tasks they’re working on, or perhaps on a customer based project by project basis. In Time Clock MTS we call this ‘job tracking’. This Time Clock MTS How To Article describes how to easily setup Time Clock MTS to track jobs in your employee time clock and then leads you briefly through the process of how an employee would record their time against a job as they use Time Clock MTS.
Creating and Editing Jobs
Step 1 : Defining Jobs
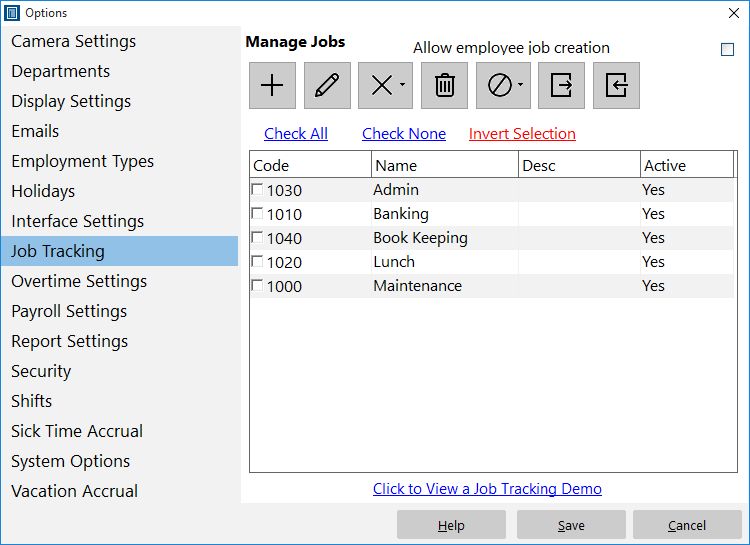
Firstly log into Time Clock MTS as the administrator. How you log in as the administrator was covered in this Time Clock MTS How To Article. Once you’ve done this go to the Tools->Options->Job Tracking screen, where you’ll see the screen above. To create a new job just click the new job button and you’ll be shown the screen below.
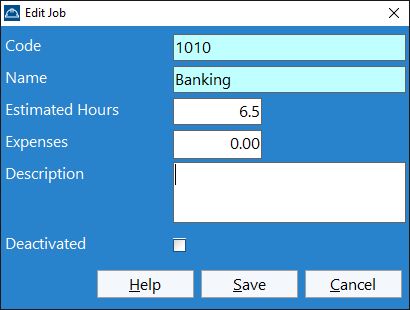
Creating a Job
To create a job give it a unique numerical job code, give the job a name, and if you like a description. If you do not have your own job numbering system Time Clock MTS will automatically assign each new job a unique job code. You can also disable a job to prevent employees booking time to that job. This might be useful if you’re just setting your system up, or your customer isn’t paying you for that job anymore, or perhaps your internal budget for a project has been exceeded.
Employee Details
Step 2 : Deciding Which Employees will Use Job Tracking
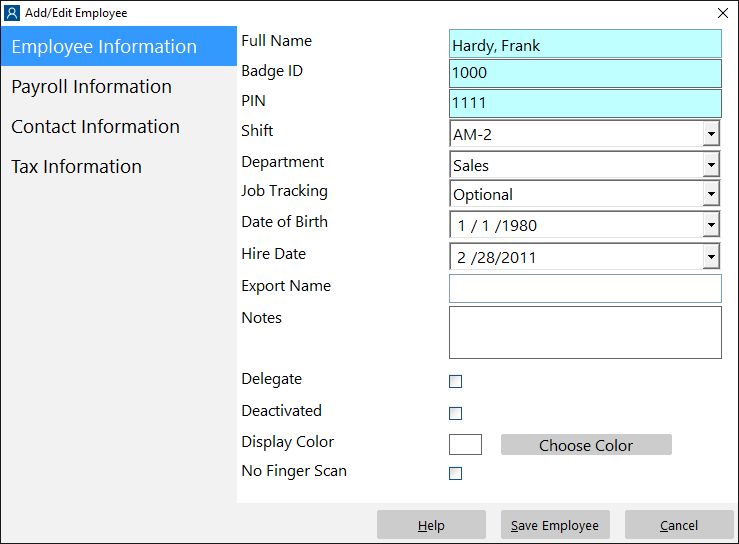
The next step is to decide which employees will have to use job tracking and how they will use it. Select an employee on the employee list and go to the Employee Maintenance->Edit Selected Employee screen (which you can see above). On the employee information screen use the job tracking drop down box to define how an employee will use job tracking. They can either not use it, use it optionally (they can choose not to enter a job code when they clock in) or must use it (they must enter a job code when they clock in).
Entering a Job Code
Step 3 : Employees Entering Job Codes
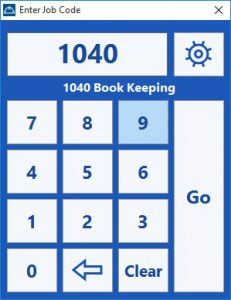
Entering job codes for employees couldn’t be any easier. When employees clock in they’ll be shown the enter job code screen above. Employees need to enter the job code for the job they want to book the time to either via keyboard or via the numeric buttons on the screen (with a mouse click or via a touchscreen). Time Clock MTS will try to auto complete the job code for the employee and show the job details so that the employee is sure he or she is booking their time to the correct job. It would be very useful to have printed out the Active Job Report and have this next to your Time Clock MTS computers so that the employees have a readily available list of the jobs they can book time to.
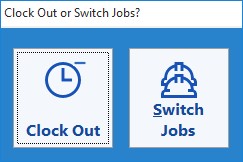
Switching Jobs
Employees can quickly switch jobs by clocking out of Time Clock MTS (via either the employee list or keypad screens of Time Clock MTS). The screen above will be shown to employees where they can either clock out or switch jobs. If they switch jobs the enter job code screen will be shown again and the employee can enter a new job code and switch to a new job.
Step 4 : Reporting on Jobs
The Job Time Report provides the Time Clock Administrator with all the information they’ll need to understand how time is being booked to jobs. It shows a break down of each job defined in Time Clock MTS, and how much time each employee has logged against each job.
by Mark Nemtsas | Jun 4, 2009 | Using the Software
I’ve done this a couple of times before, Time Clock MTS users sometimes ask interesting questions that are worth sharing with the rest of the user community. I got a good question this morning so I’ll post up here along with a solution.
Question:
I am beginning the program in the middle of the year. My employees began the year with 80 hours vacation. They each have various amounts of vacation left right now. I can’t get the program to show each employees individual vacation hours that are available. This is not on an accrual basis. Everyone starts the year with 80 hours vacation on January 1 of each year. How do I get the program to calculate properly?
The answer is pretty simple. Firstly, the user needs to setup a yearly accrual scheme which I’ve spoken about previously. There’s a subtle variation here though, this yearly accrual scheme needs to start on 1 January for all employees. So rather than checking the ‘Use Hire Date, not Fiscal Year’ you’d leave this unchecked. You’ll then need to go to Tools->Options->Payroll Settings screen and set the First Day of Fiscal Year to 1 January.
Adjusting the starting balance for each employee is required because the Time Clock MTS user will not be starting use of the software on 1 January. This is pretty simple again, just adjust each employees starting vacation balance using the Employee Maintenance->Edit Selected Employee->Payroll Information screen.
That’s how it’s done. It’s a fairly simple thing but does require you to change settings across a few different screens in Time Clock MTS. Got any more tricky accrual questions? Why not contact me and tell me what your question is and I’ll post up a solution here so everyone can benefit!
by Mark Nemtsas | May 24, 2009 | How To, Tips and Tricks, Using the Software
Changing the Windows System Time
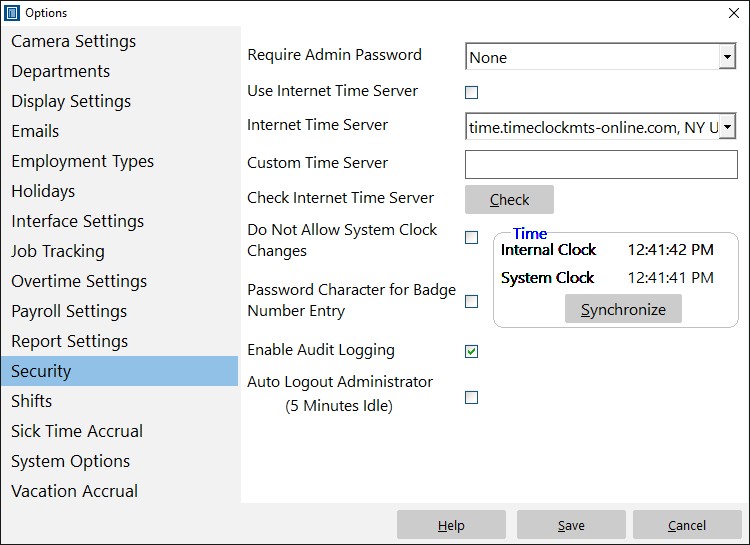
You may well know that Time Clock MTS can determine the internal time used for clocking in and out from an Internet time server. This is a pretty foolproof way of preventing time clock fraud as the times recorded are completely independent of the local PC clock setting. You can turn on this feature in the Time Clock MTS administrator program on the Tools->Options->Security Settings page. Just tick the Use Internet Time Server checkbox, then pick our dedicated time server (time.timeclockmts-online.com) from the dropdown box and click SAVE to save the change. You can read about how to do this in more detail in this blog entry
The above works well, but for whatever reason very infrequently it doesn’t work in a fool-proof fashion. This won’t result in incorrect employee attendance data but it can prevent employees from clocking in or out. Time Clock MTS will actually prevent employees from clocking in and out if it cannot contact the Internet time server for an hour (this is to stop employees just pulling a network cable to get around the Internet Time Server setting). Sometimes the reason Time Clock MTS cannot contact the time server can’t easily be determined, it may be network congestion, it might be firewall problems, or it might be problems with the time server itself. When these sorts of problems occur frequently it may be adopting a different solution to setting the system time using Windows itself. Here’s what you’ll need to do:
- Turn off the Use Internet Time Server setting in Time Clock MTS. This will result in Time Clock MTS determining all times from the local PC clock.
- Change the Windows settings to have the local pc clock time determined from an Internet time server. How you do this will depend on the version of Windows you are running. For example, in Windows Vista/7/8 you can do it by simply right clicking on the Taskbar clock and then selecting Adjust Date/Time from the popup menu.
- Change the Windows user account permissions that Time Clock MTS is run from to prevent changing the Windows System time. How you do this is well beyond the scope of this entry as it will vary tremendously depending on the version of Windows you are running and any sort of network management software you happen to be using.
That’s all there is to it. What you’ve done is set the local PC clock to get accurate time from an Internet time server and Time Clock MTS will get it’s clock in and out times directly from this. By adjusting the Windows user account permissions you’ve prevented employees from changing the system clock of the PC in an attempt to provide fraudulent time clock data.
by Mark Nemtsas | May 21, 2009 | Tips and Tricks, Using the Software
Update 24 November 2014 – This setting was removed from Time Clock MTS with the release of version 5. The content of this blog only apply to versions of Time Clock MTS BEFORE version 5.
I’ve had a couple of Time Clock MTS users send in emails about the same thing in the last week and it worth covering the issue here. Basically the symptom is this, when running reports (say for a week), sometimes it appears that the reports pick up a time or two from the next weeks report. When they run the next weeks report it is missing these times that show up on the previous weeks report. When you examine these times that seem to mysteriously appear on the wrong weeks report it turns out that the clock in time was before the usual clock in time for the day. The reason this is happening is because employees are clocking in BEFORE the First Day Starts At setting used by Time Clock MTS to determine when the work day (and thus work week) starts.
So, for example, lets say you have the First Day Starts At setting in Time Clock MTS (set on the Tools->Options-> Payroll Settings page) set to 8:00am. Now lets say an employee clocks in at 7.30am on Monday AND you dont have report rounding time turned on. Time Clock MTS considers the time worked between the clock in and the time when the employee clocks out to OCCUR ON SUNDAY rather than Monday. The time of clock in determines the day on which the recorded time occurs. This is complicated a little if you have report rounding turned on. If you have report rounding set to, say 15 minutes, then an employee can clock in up to 15 minutes prior to 8:00am on Monday to have their time to be reported on Monday. If they clock in more than 15 minutes prior to 8:00am then the time will be reported on Sunday.
There’s a couple of ways of preventing this sort of thing happening in Time Clock MTS.
- Examine if you need to actually use the First Day Starts At setting. It is really only useful if you run shifts or if you want to restrict clock in times to stop employees clocking in early. If you dont need to use the setting leave it set to 12:00am (again you can change this setting on the Tools->Options->Payroll Settings screen.
- Turn on report rounding and restrict clock in times to the same period as you’ve set report rounding for. So, for example, if you set report rounding to 15 minutes set the clock in restriction to 15 minutes before shift start. To restrict clock in times you must assign an employee to a shift and then set the clock in restriction on the Tools->Options->Shifts screen.
by Mark Nemtsas | May 3, 2009 | How To, New Features, Using the Software
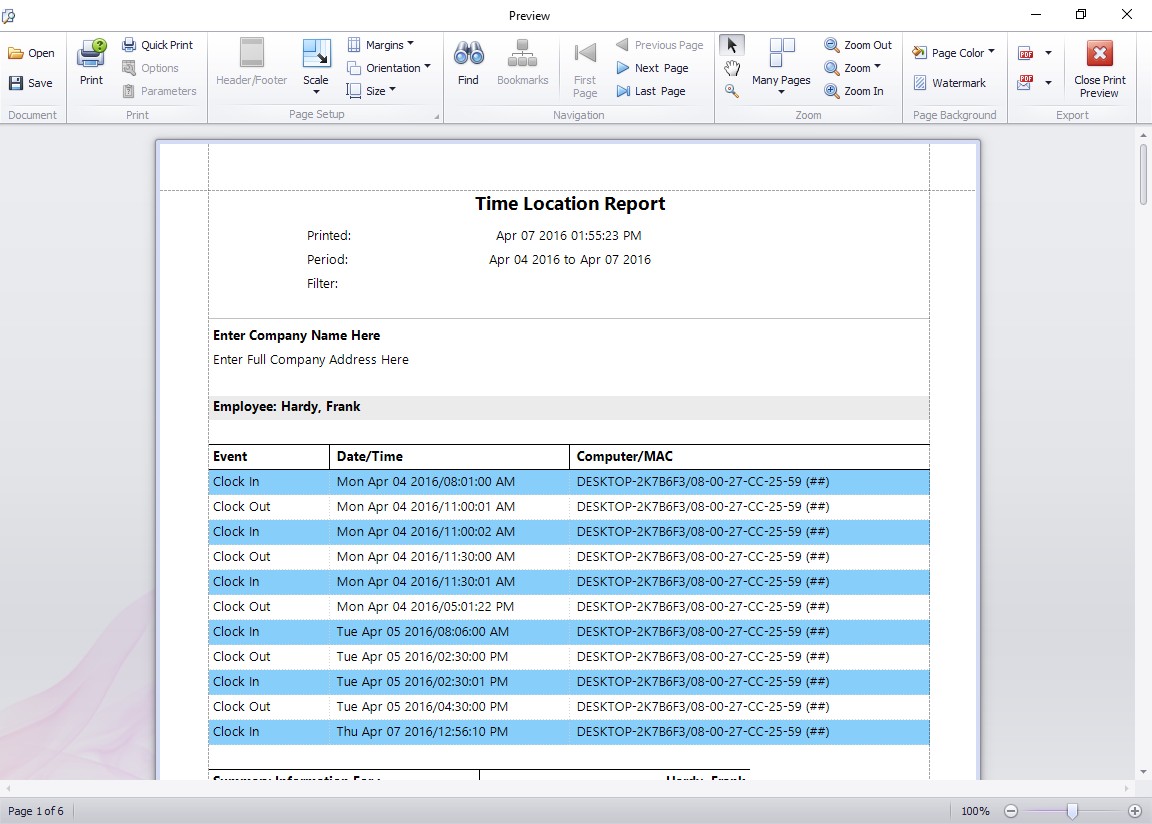
This report shows you what computer your employee has clocked in or out from.
One of the most common forms of employee time clock fraud is buddy punching. This is simply when one employee clocks in or out for another one. Time Clock MTS has a number of methods built into it to help you reduce or eliminate this practice including fingerprint security, image capturing, and employee PINs. Version 2.2.12 saw a new feature added to the software to help further eliminate buddy punching.
When an employee clocks in or out Time Clock MTS now records the Computer Name and Network MAC address along with the time record. Each computer on your network will have a unique computer name and the network cards in these computers all have a unique MAC address. Armed with these two pieces of information you or your network admins can determine exactly which PC an employee clocked in or out from. To give you this information in an easy to read format there’s a new report, the Time Location Report. You can run this report in the same way as you run all the other Time Clock MTS reports, from the Report Configuration Screen. An example of this new report is shown above. Each time recorded for the employee has it’s own line and each time shows the computer name and MAC address of the computer the employee clocked in or out from.
So, if each of your employees is supposed to clock in and out from their own PC, and you suspect someone is clocking in or out for someone else, then this new feature can help you detect this practise. Just run the Time Location Report and you can see quickly and easily where an employee is clocking in or out from!
by Mark Nemtsas | Apr 28, 2009 | Tips and Tricks, Using the Software
I am beginning to think that there’s some confusion about what the File->Reset Administrator Password menu item does so it’s worth a little bit of clarification. A few months back I described how you could use this menu item to Reset Your Administrator Password.
When you Should Use the Reset Administrator Password Menu
You should only use the File->Reset Administrator Password menu when you’ve forgotten your administrator password and you need to reset it. To reset your administrator password successfully you’ll need to know the answers to the reminder questions. If you answer the questions correctly then Time Clock MTS will contact our web server to get a new password and reset the password. If you’re a registered user of Time Clock MTS then the email address you used to purchase the software will be emailed the new password. If you’re using the trial version or the free version then you’ll be told what the new password is via a popup message.
You shouldn’t use the File -> Reset Administrator Password Menu if you know your Administrator password and just want to change it.
Manually Resetting Your Administrator Password
If you know your administrator password and just want to reset it to something different then you should not use the above method. Log in as the administrator and go to the Tools->Options->System Settings page and reset the password there. You can read more about this in the System Settings Help Topic.
What to do When You’ve Forgotten Your Admin Password AND Reminder Question Answers?
In this case you’ll need to get us to reset your admin password for you. You’ll need to email us your Time Clock MTS database. We’ll reset the password for you and then email your database back, once you’ve got it back you’ll need to read the instructions here to learn what to do.
I hope that this helps to clear up any confusion!
