by Mark Nemtsas | Nov 7, 2008 | How To, Tips and Tricks, Using the Software
Add, edit, and delete shifts.
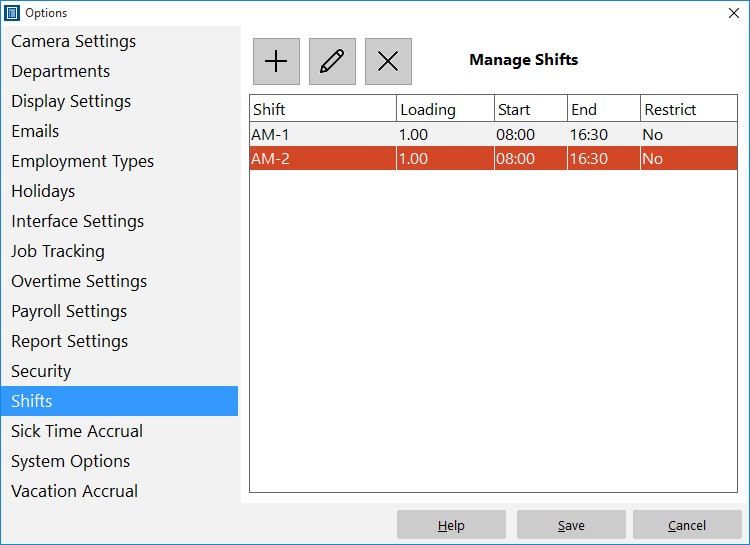
Time Clock MTS has a system built in to prevent employees punching in too early. To set this up you must be logged in as the time clock administrator and then navigate to the Tools->Options->Shifts page (see image above and the shifts help topic). Click the new shift  button and you’ll be taken to the Add/Edit shift screen as shown below.
Shifts can be used to control when employees can punch in.
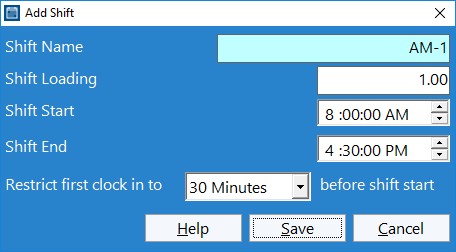
At the bottom of this screen you can see the new setting Restrict First Clock in to XX before shift. All you need to do is make a selection of None, 1 minute, 6 minutes, 15 minutes, and 30 minutes from the drop down. Obviously if you select none then there will be no restriction on when an employee can clock in. However, if you select one of the time limits then any employee assigned to that particular shift will be prevented from clock in any earlier that the chosen limit before the shift start time. So, for example, in the shift above, any employee will not be able to clock in any earlier than 7.30AM.
The clock in must be the first one of the day for the restriction to take effect.
by Mark Nemtsas | Sep 10, 2008 | Tips and Tricks, Using the Software
In the last weblog entry about time clock software and magnetic card readers I talked about using Time Clock MTS without a keyboard and using magnetic swipe cards to interact with this. In this entry I’ll cover the user of bar code readers with Time Clock MTS.
Bar codes allow the storing of normal text data in printed form and the data can be read by a bar code reader very quickly, and most importantly, reliably. Bar codes themselves can be printed from a normal printer on any computer, all you need is a bar code font package (which are very inexpensive) and then you’ll be able to print bar codes from various specialized applications or even from MS Word or Excel. The bar codes themselves can user different formats (such as Code 128, Code 25, or Pharmacode), but which one is used doesn’t matter much to Time Clock MTS.
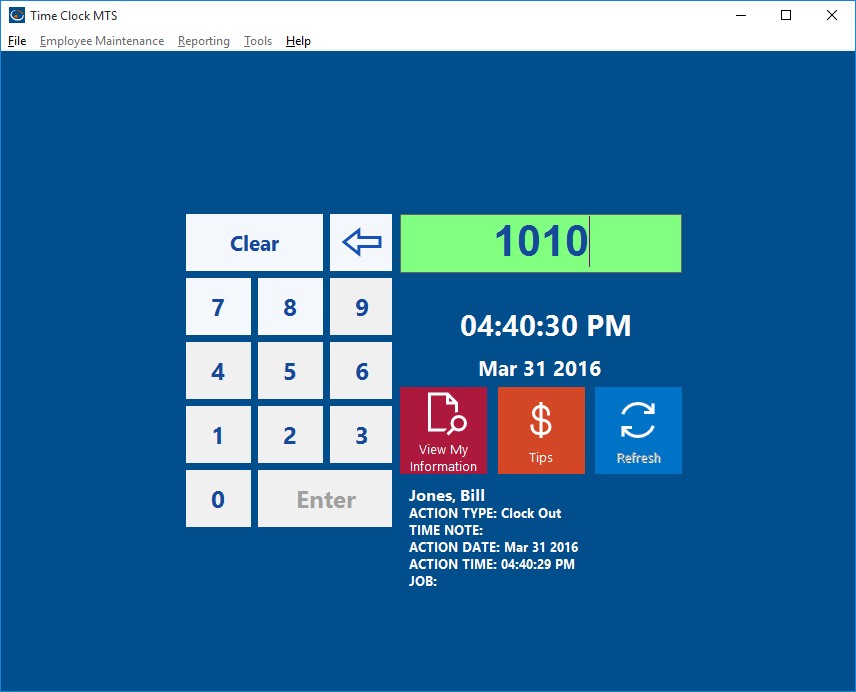
The Keypad Interface
You can use Time Clock MTS with a bar code scanner whether you’re using the Keypad Interface (see image above) or the Employee List Interface. This article deals with the setup required for the Keypad Interface and but if you want to use a barcode scanner with the Employee List Interface you should follow the detailed instructions show in this article instead.
Similar to magnetic card readers, the simplest bar code readers can plug into the keyboard port (PS2 Port) or USB port of a PC and output characters to the PC in exactly the same manner as a keyboard would. If your reader can’t do this then you’ll most likely find that it comes with some software that once installed allows it to output data to your computer like a keyboard. In addition, like a mag card reader they will usually put a return character at the end of the stream of data they read to signify that they have finished reading the information from the bar code. So, if you setup Time Clock MTS to use the Keypad Interface and you use a barcode reader to scan in the badge number of an employee then you’ll be able to clock them in or out very quickly and easily.
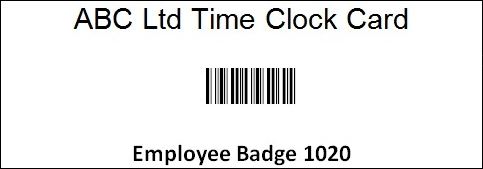
Example of a Simple Barcode Badge
Here’s some basic steps to take when wanting to setup Time Clock MTS with a barcode reader:
- Look for a bar code reader reader that can plug into the keyboard port (PS2) or USB port of your PC and output text exactly like a keyboard. This is typically known as a reader with a keyboard wedge. If your scanner doesn’t come with a keyboard wedge then it will most likely come with some software that once installed allows it to act as a keyboard, which is known as a software wedge.
- Get a reader that can output a return (or line feed) character at the end of the stream of read data, most will do this by default or you will be able to configure them to do so.
- Get some card stock printed up with your barcodes that are encoded with the Time Clock MTS Badge/Employee ID’s. These ID’s are setup on the Employee Information Screen. It doesn’t matter much with bar code format you use, but make sure your bar code reader can read it, Code 25 or Code 128 are good choices. It may be a good idea to get the cards laminated to extend their useful life.
- Stick to the default employee numbering in Time Clock MTS (which starts at 1000 and increments by 10 for each new employee). This will allow you to pre-print a number of cards that can be used as your company expands. So your cards would be encoded with the numbers 1000, 1010, 1020 etc etc.
Further reading see our entry on a barcode employee attendance system for under $250.
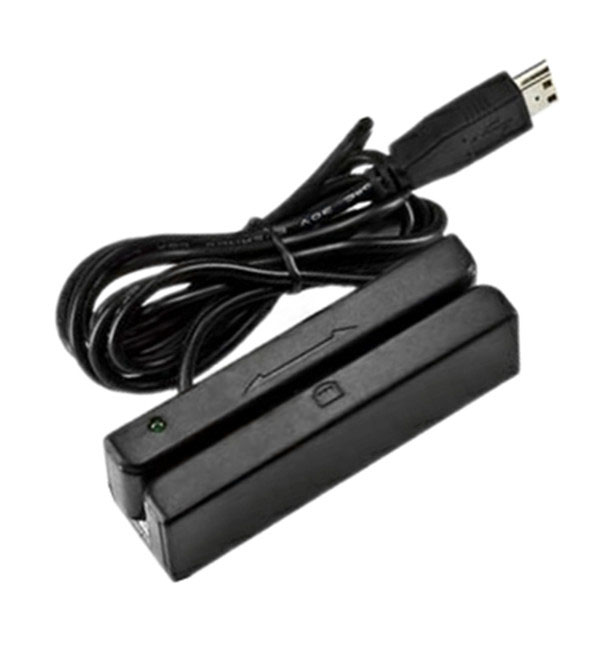
by Mark Nemtsas | Sep 9, 2008 | How To, Using the Software
The Keypad Interface
If required Time Clock MTS can be used without a keyboard by using a touch screen or a magnetic card reader or a barcode reader. Today I’ll talk about using Time Clock MTS with a magnetic card reader. In its most simple form a magnetic card simply has normal text characters (like those you’d type on your keyboard) stored in the magnetic stripe on the card. In fact, some of the simplest magnetic card readers can plug into the keyboard port or USB port on your computer and output text characters to the computer EXACTLY the same way that a keyboard does. This is known as a “keyboard wedge”. If your card reader doesn’t allow this you’ll usually find that it comes with some software that allows it to emulate a keyboard, which is known as a “software wedge”.
So, for example, if you had a magnetic card with the characters “hello world” stored in the magnetic strip and you had a magnetic card reader plugged into your keyboard port (or emulating a keyboard with a software wedge) and you scanned the card while you had a text editor (like MS Word) running then you’d see the characters “hello world” appear on your monitor. And in all likelihood you’d get the “enter” or “return” character at the end of the line. Most magnetic card readers output the “return” character at the end of the data scanned from a magnetic card by default so that you know you have all of the data from the magnetic card.
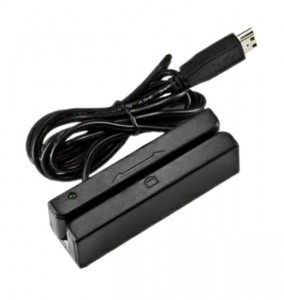
A Magnetic Card Reader
If you’re using the Employee List Interface of the software and you want to use it with a Magnetic Card reader then you should follow the detailed instructions shown here.
However, if you’re using the keypad interface of Time Clock MTS you’ll need to use the card reader a little bit differently. On keypad screen you can use a magnetic card reader to output characters to the employee ID/badge number field and the “return” or “enter” character “presses” the Enter button on the screen to clock the employee in or out. So, the practical upshot of this is if you have magnetic cards encoded with Time Clock MTS employee badge numbers (or employee ID’s) then you can use them to clock your employees in or out of Time Clock MTS very quickly and easily. In summary here’s a checklist of what you should look for in a magnetic card reader:
- Look for a magnetic card reader that can plug into the keyboard port (PS2) or USB port of your PC and output text exactly like a keyboard which is typically known as a “keyboard wedge”. If it cannot do this, check to see if it comes with a software program that allows it to emulate a keyboard, known as a “software wedge”.
- Look for a magnetic card reader that can output a return or line feed character at the end of the data read of a swipe card.
- You only need the most basic of magnetic cards, they only really need one ‘stripe’ and the data doesn’t need to be encrypted or anything fancy.
- Get your magnetic cards encoded with the Time Clock MTS Badge/Employee ID’s. These ID’s are setup on the Employee Information Screen.
- Stick to the default employee numbering in Time Clock MTS (which starts at 1000 and increments by 10 for each new employee). This will allow you to buy pre-encoded magnetic cards that can be used as your company expands. So your cards would be encoded with the numbers 1000, 1010, 1020 etc etc.
by Mark Nemtsas | Aug 18, 2008 | Tips and Tricks, Using the Software
Rounding of time clock data is both legal and commonly practiced in many areas. Typically time clock rounding rules allow rounding of employee attendance information either up or down based on predefined time segments. Usually these time segments are either 6 minutes, 15 minutes, or 30 minutes. Normal arithmetic rounding rules are used, so for example:
- Rounding set to 15 minutes, an employee clocking in between 8:00:00AM and 8:07:29AM will have their time rounded down to 8:00:00AM.
- Rounding set to 15 minutes, an employee clocking in between 8:07:30AM and 8:14:59AM will have their time rounded up to 8:15:00AM.
Which Time Clock Rounding Rules your company decides to use depends on the local regulations in your area. In the interests of fairness (and probably legality) a balanced rounding approach should be used, as this favors neither the employer or employee. However, some localities allow the use of time clock rounding rules that ALWAYS ROUND UP clock in times and ALWAYS ROUND DOWN clock out times. This is clearly favorable to the employer and should be used with caution (if it is used at all).
Whatever time clock rounding rules you choose to adopt be assured that Time Clock MTS is able to perform the rounding automatically and accurately for you. You can setup Time Clock MTS to do your time clock rounding automatically using the Payroll Settings screen from within the software.
by Mark Nemtsas | Aug 5, 2008 | How To, Tips and Tricks, Using the Software
In part 2 of customizing Time Clock MTS Reports I covered some of the report sections and data fields used to customize the reports in the software. In this third part I’ll cover the remainder of the report sections and data fields.
Employee Summary Section
- Full Name – the name of the employee as set on the Employee Information Screen
- Total Work Time – the total hours worked by the employee for the report period
- Total Holidays Time – the total public holiday hours for the employee for the report period
- T – inserts a TAB space, used for alignment and formatting purposes
Employee Accruals Section
- Sick Time Taken Period – the sick time taken by the employee for the report period
- Sick Time Taken Fiscal – the sick time taken by the employee for the current fiscal year
- Sick Time Taken All Time – the sick time taken by the employee since they were employed
- Sick Time Owing – the current sick time owing to the employee
- Vacation Time Taken Period – the vacation time taken by the employee for the report period
- Vacation Time Taken Fiscal – the vacation time taken by the employee for the current fiscal year
- Vacation Time Taken All Time – the vacation time taken by the employee since they were employed
- Vacation Time Owing – the current vacation time owing to the employee
- T – inserts a TAB space, used for alignment and formatting purposes
Payroll Information Section
- Full Name – the name of the employee as set on the Employee Information Screen
- Total Work Time – the total hours worked by the employee for the report period
- Total Holidays Time – the total public holiday hours for the employee for the report period
- SSN – the social security number of the employee as set on the Payroll Information Screen
- Regular Hours – the number of hours worked by the employee during the report period that were paid at the normal rate
- Daily OT Hours – the number of hours worked by the employee during the report period that were paid at the daily overtime rate
- Weekly OT Hours – the number of hours worked by the employee during the report period that were paid at the weekly overtime rate
- Normal Rate – the normal rate of pay
- OT Rate – the overtime rate of pay
- Normal Earnings – earnings during the report period at the normal rate of pay
- Daily OT Earnings – earnings during the report period at the daily overtime rate of pay
- Weekly OT Earnings – earnings during the report period at the weekly overtime rate of pay
- Total Earnings – the total earnings for the report period
- T – inserts a TAB space, used for alignment and formatting purposes
by Mark Nemtsas | Aug 1, 2008 | Tips and Tricks, Using the Software
Time Clock MTS Stand Alone Edition
With personal computers becoming less and less expensive and old models usually left unused there’s no reason to not put these machines to a useful purpose. One great use is to replace your paper based time clock card system with an electronic time clock system such as Time Clock MTS. Time Clock MTS will run on pretty much any computer from the last several years and give you a time clock card system that is far superior to older manual paper based systems.
You can collect your time and attendance information at many locations but automatically store it in one data store for easy and instant payroll reporting. Time Clock MTS will do all of your overtime calculations and your payroll calculations using your rules in just seconds and without error. The software contains a number of security features that will help to minimize or eliminate the problems experienced with older manual systems. Employees can no longer manipulate their time card information manually and buddy punching is largely eliminated.
Page 21 of 23« First«...10...1920212223»