by Mark Nemtsas | Jun 20, 2008 | New Features, Using the Software
A key problem with any time clock system is that of employees that clock in and out for each other. This is known as ‘buddy punching’ and is the main method by which employees try to manipulate their time card information. The use of magnetic cards, proximity devices, and PINs can help reduce buddy punching, but of course it does not prevent employees sharing their card, prox device, or even their PIN with a co-worker and still providing fraudulent data.
There are a couple of ways of eliminating buddy punching, one of these is capturing an employee image at the time of clocking or out. Using a computer along with Time Clock MTS and cheaply available web cameras allows you to have a very secure time and attendance solution that can largely eliminate buddy punching and help reduce your payroll costs accordingly.
Camera Hardware Requirements
You don’t need anything special to allow Time Clock MTS to capture images when employees clock in and out. Time Clock MTS will work with almost any sort of USB or integrated web camera, if your version of Windows can detect your web camera then Time Clock MTS can probably use it.
Software Requirements
There are no additional software requirements, if you have Time Clock MTS Version 2.0.2 or newer then you have all the software you require to use a camera with Time Clock MTS. You can always download Time Clock MTS from here.
Setting Up Time Clock MTS to Use a Web Camera
Just make sure your web camera is plugged into your computer and then run Time Clock MTS and log in as the administrator. Go to the Tools->Options->Camera Settings page. You’ll see the following screen:

Capture employee images when they punch in or out.
If your camera is connected properly and is accessible by Time Clock MTS just check the Enable Image Capture check box. See below for a range of configuration options to setup image capture to suit your requirements:
- You can decide when you want to capture images (clock in, clock out or clock in and out), it is recommended that you capture images on both events for maximum security.
- The image capture location can be easily set using the Set button. By default it will have the location set to the same directory that your Time Clock MTS database is stored in.
- Because captured images take up disk space you may decide to only keep the recorded images for a certain amount of time. Time Clock MTS can delete older images based on their age, you can decide to keep images for a week, a month, 6 months, or forever.
- If you have more than one camera attached to your Time Clock MTS computer you can choose which one to use by clicking the Change Camera button. Time Clock MTS will default to the first camera attached to your computer if the selected camera is no longer attached to the PC.
- Time Clock MTS captures images into JPEG format.
Viewing Captured Images
If you suspect that buddy punching is going on in your work place then you can view captured images easily from within Time Clock MTS. While you are logged in as the administrator go to the Tools->Edit Times screen.
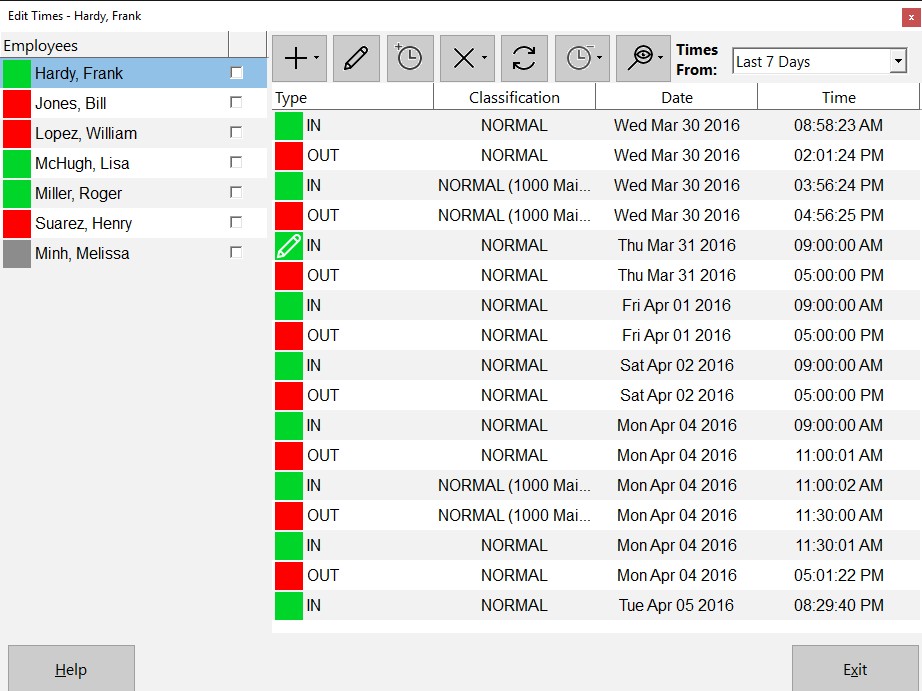
The Edit Times Screen
You will see a the View button in the toolbar above the list of times, this is the button with an eye and magnifying glass icon on it. Just select the time you wish to view the captured image for, and then click the View button. You’ll then be shown the following screen showing your captured image along with the clock in/out and user details that are associated with the captured image.
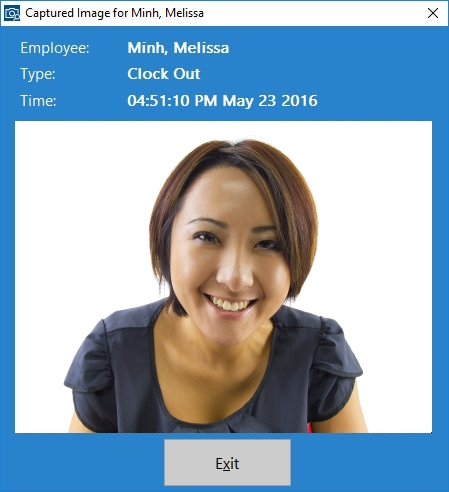
This screen allows administrators to view images captured when employees clock in or out.
That’s all there is to it. If you have a web camera and want to ensure that your time clock information is secure and accurate then I’d strongly recommend using this feature to help reduce your payroll costs!
by Mark Nemtsas | Jun 18, 2008 | New Features
The Simple Wages Report is a new addition to Version 2 of Time Clock MTS.
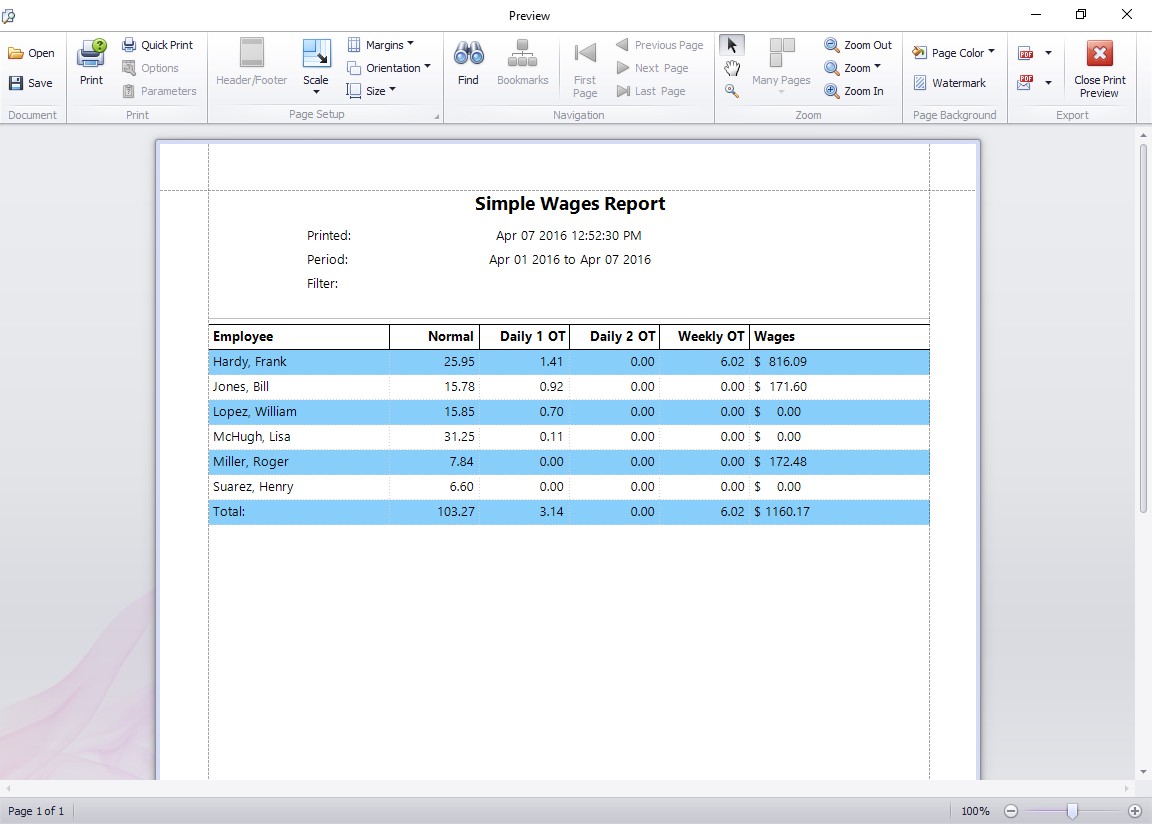
The Simple Wages Report
Available from the report configuration screen gives a simple summary of activity across a time period. The summary is a simple line per employee. You can see at a glance the hours worked for the week, the hours of daily overtime, and the hours of weekly overtime. Total salary payable is also displayed.
This report is useful for supply to payroll departments for entry into payroll software, or even as a simple management report that gives key information without too much detail.
by Mark Nemtsas | Jun 14, 2008 | How To, New Features, Tips and Tricks
Time Clock MTS Versions 2.0.1 and higher feature a new setting to allow you to exclude a time pair from any overtime calculations. You can do this via the Tools->Edit Times menu. Just select the time pair you want to exclude from overtime calculations and click the Edit Time button and you’ll be shown the Edit Time screen.
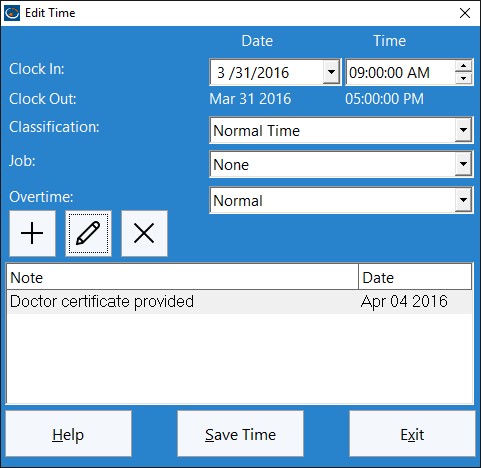
The Edit Time Screen
To exclude a time from overtime calculations all you need to do is select the ‘Ignore for Overtime’ option for the time, and click the Save Time button to save the change. For overtime purposes this time will now be ignored for all overtime calculations regardless of other overtime settings. Let’s examine how this would work with some examples.
Example 1
Daily overtime set at 8 hours, weekly overtime limit set at 40 hours. Employee works a 5 day week of 10 hrs, 8 hrs, 8hrs, 8 hrs, and 8 hrs for a total of 42 hrs. The Time Clock MTS Administrator has flagged two hours of day one as ‘Ignore for Overtime’ because the employee was underpaid by two hours last week. Time Clock MTS will report this week as 42 normal hours only.
Example 2
Daily overtime set at 8 hours, weekly overtime limit set at 40 hours. Employee works a 5 day week of 8 hrs, 9 hrs, 9hrs, 8 hrs, and 8 hrs for a total of 42 hrs. The Time Clock MTS Administrator has flagged four hours of day 5 as ‘Ignore for Overtime’ because the employee went home sick during the day, the administrator wants the employee to be paid for these hours but not impact on overtime calculations. Time Clock MTS will report this week as 40 normal hours, and 2 daily overtime hours.
Why Use this Setting?
There are a few reasons why you’d want to make use of this setting:
1. It’s a way of helping administrators fix up underpayments from previous pay periods. You may want to just add a few hours to the current payroll period to make up for hours not paid previously, but you don’t want these added hours to impact on overtime for the current pay period.
2. You don’t want sick time or vacation time to impact on overtime calculations. Example 2 above covers this case.
3. It’s a way of employers paying employees for time they are making up. For example, an arrangement may be reached with an employee to have 4 hours off work one week on the understanding that they will make it up the next week. Of course you don’t want the make up hours to impact on overtime calculations for the second week.
by Mark Nemtsas | Mar 29, 2008 | New Features
The information in this old article is now superseded. If you want to learn how to setup the Time Clock MTS Network PLUS Edition with SQL Server you should read these instructions.
Introduction
Time Clock MTS is now ready to be tested using MS SQL Server as a database rather than the standard MS Access database. This will result in a program that is more responsive, more reliable, and able to cater for more client computers than ever before. If you are interested in taking part in this beta then all the usual disclaimers apply. The software *is* beta and the setup is reasonably complex at the moment. The setup will improve a lot when we get to the final release.
Download and Install the BETA Verions of Time Clock MTS
If you are a current user of Time Clock MTS then you will only need to download and install the update versions of the client and admin programs. If you’re new to Time Clock MTS or want to try a fresh install then you’ll need to download the full installation packages. Go to our Time Clock Downloads Page to download Time Clock MTS.
Create Your SQL Server Database
The first setup is to create your SQL Server database using the Time Clock MTS Access database as a template. You must have installed the admin version of Time Clock MTS first, and can use your existing populated timeclock.mdb file as a template.
- The best method of creating the SQL Server database is to use the built in database upsizing wizard within MS Access. You’ll need to do this in Access 2000 or better and the wizard can usually be found on the Tools->Database Utilities->Upsizing Wizard menu within MS Access.
- Before upsizing make sure to install Time Clock MTS on one computer and run it at least once on the default database that ships with the software. This will update the database with all the latest fields and tables. If you have any existing data in your MS Access database this will be exported to the SQL Server database during this process.
- When you’re ready to upsize open the timeclock.mdb database (found in C:\Documents and Settings\All Users\Application Data\Time Clock MTS\Database unless you’ve moved it) in MS Access and run the database upsizing wizard. Choose to Create a New Database and click Next.
- On the next screen enter your SQL Server details here such as your server name, UID, password and the name of the database you want to store your information in. Note this information down and when you’re happy click next.
- On the next screen you want to choose to export ALL tables to SQL Server. Click Next when you’re done.
- On the next screen you’ll be given the option to export table attributes to SQL Server. Leave all the default options here and just click Next.
- On the next screen you’ll be given the opportunity to make application changes, just leave all the default options and click next.
- On the next screen you’ll be told the the wizard is now ready to do the upsize, just click Finish and let it do its work.
Connecting the Time Clock MTS Admin Program to the SQL Server Database
You’ll need to have installed the Time Clock Admin program with the normal MS Access database before connecting to the SQL Server database.
- Find your timeclock.ini file. This should be in C:\Documents and Settings\All Users\Application Data\Time Clock MTS\. Note that you may have to show hidden files and folders in Windows Explorer to seet his file.
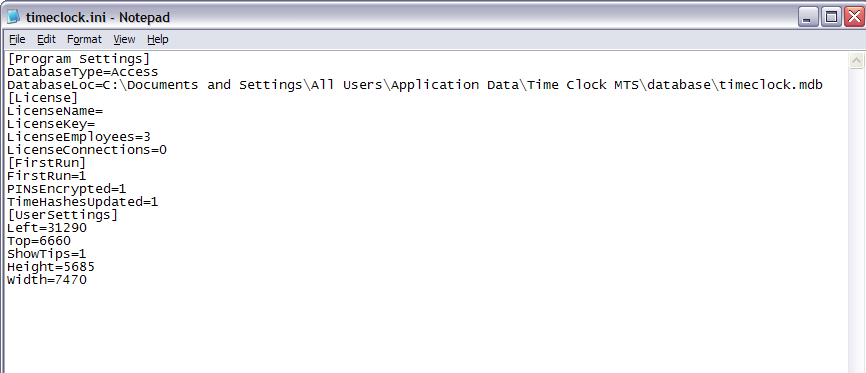
- Open the timeclock.ini file in Windows Notepad and look for the [Program Settings] section. There should be a setting or two in here already, containing the location of your MS Access database and one called ‘DatabaseType’ that says ‘Access’. It should look something like this:
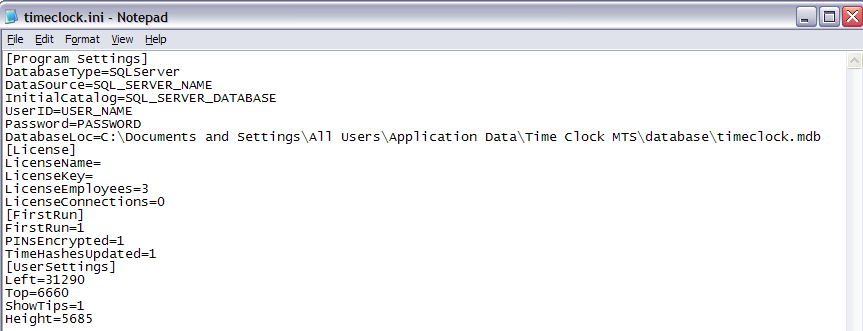
- Now we’re going to edit the file to look like:
 Explanation of Settings
Note that the DatabaseType setting has changed to SQLServer, make sure you get the spelling and case of this correct
SQL_SERVER_NAME = your SQL Server
SQL_SERVER_DATABASE = the database you created above (by default Access will have called this timeclockSQL)
USER_NAME = the SQL Server user name you have setup for Time Clock MTS
PASSWORD = the password for the SQL Server USER_NAME
- When you’re happy with the timesheets.ini file save it. Try running the Time Clock MTS admin program, if you’ve entered all the details above properly then it will connect to your SQL Server database.
Connecting the Time Clock MTS Client Program to the SQL Server Database
You’ll need to have installed the Time Clock Client program and connected it to an MS Access database first.Once this is done you’ll then need to make the changes required to connect it to the SQL Server database. The changes are EXACTLY THE SAME as those described above for the Admin program. Just open and edit the timeclock.ini file as described above.