by Mark Nemtsas | Jan 26, 2014 | New Features, New Releases, News
After spending the last two months working hard I’m glad to say that today (26 January 2014) we’ve released Time Clock MTS Version 5. This new version includes more than 40 distinct changes in the release notes and takes the first steps toward making Time Clock MTS more “internet friendly”. It also marks the debut of the Time Clock MTS Web Extensions helper program.
For existing users of earlier versions of Time Clock MTS who are thinking about upgrading you should be aware that Version 5 makes changes to the time clock database that render it incompatible with earlier versions. So make sure you back up your data BEFORE upgrading. Read More Here.
No doubt I’ll be writing a series of entries about the release of Version 5 but I thought it well worth the effort of summarizing the major changes in this blog entry.
Key New Time Clock Features
- Email Alerts – email alerts can now be sent based on certain events occurring in Time Clock MTS. Right now alerts can be sent when a new Time Off Request is raised, when a Time Off Request is approved or denied, or when an employee punches in or out.
- Green / Red Punch Indication Lights – both the Employee List and Keypad interfaces of Time Clock MTS provide a visual indication of a successful or failed employee punch.
- Emails – there’s a new screen for managing email addresses. These are used for email alerts but will be used for direct emailing of reports in the future.
- Client Specific Translations – you’ve been able to adjust the time clock screen labels for a while but now the labels can be different for each client computer. Allowing (for example) a time clock terminal in Spanish and one in English.
- New Reports – we’ve added three new reports.
Key Time Clock Enhancements
- Keypad View Timecard – employees using the keypad interface can now view their own timecard.
- Add Multiple Times Enhancements – a lot of time was spent automating the add multiple time punches screen to make entering time punches more efficient.
- 12 Character Badge Numbers – due to a design decision made a long time ago the employee badge number was restricted to 9 characters. We’ve managed to extend this out to 12 characters.
- Other Report Periods Added – the report configuration screen has some more time period buttons added to speed things up for users with semi monthly payroll periods.
- Edit Times Enhancements – the Edit Times screen has been enhanced. More information is now displayed for each time punch and the screen can (finally) be resized.
by kathryn@timeclockmts.com | Dec 26, 2013 | New Features, New Releases, Using the Software
One of the major new features that is will be included in Time Clock MTS Version 5 (due to for release in January 2014) is email alerts. Email alerts can be configured by the time clock administrator and will automatically send emails to recipients of your choosing based on certain events happening in your employee time clock. Email recipients are configured on the manage time clock emails screen I spoke about a few days ago. Email alerts are set up on the new Email Alerts screen (see below) which will be available from the Tools->Email Alerts menu from within the Time Clock MTS Administrator software.
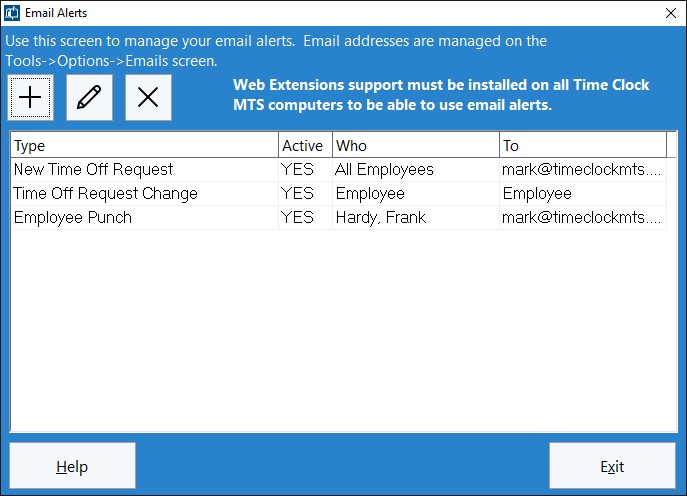
This screen is used by the administrator to manage email alerts.
The Email Alerts screen looks like many other screens in the software. A new alert is added using the New Alert button, existing alerts are edited by double clicking on them in the list or by selecting an alert and clicking the Edit Alert button. Deleting alerts is simply a matter of selecting an alert on the list and clicking the Delete Alert button. The initial release will include three different types of email alerts. The first is a raised when an employee creates a new time off request, the second is raised when the status of a time off request is changed by the time clock administrator, and the final type can be raised when an employee punches in or out (or both). I’ll preview the detailed features of each of these types of alerts in another blog entry in the next week.
As we get feedback from Time Clock MTS users after Version 5 is released we’ll be including more types of email alerts as time goes by.
by kathryn@timeclockmts.com | Dec 23, 2013 | New Features, New Releases, Using the Software
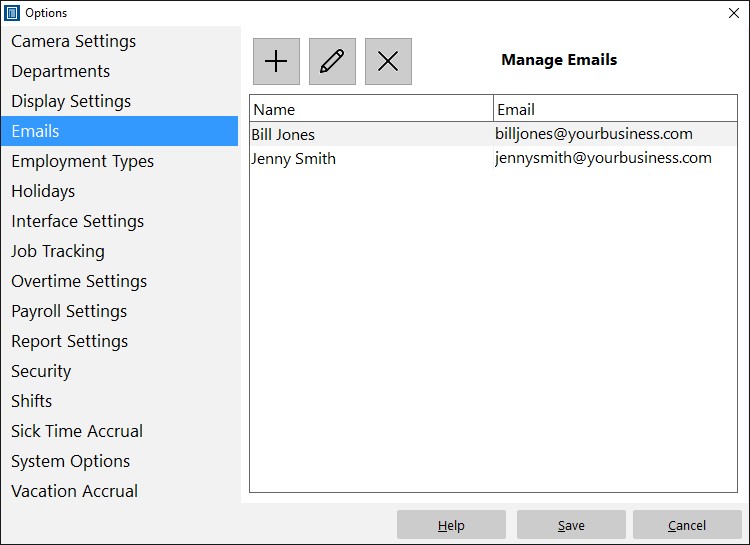
The Manage Emails Screen
Above you can see what the Manage Emails screen is going to look like in Time Clock MTS Version 5 (due for release in January 2014). This screen will be available from the Tools->Options menu in the Time Clock MTS Administrator software.and is used to add, edit, and delete emails from the master email list. In the initial release of the new version emails will be used to send email alerts. In the future time clock emails will also be used to allow direct emailing of PDF versions of reports from the reporting screen.
It is suggested that you create emails for the time clock administrator, department supervisors, payroll supervisor, and any other employee supervisor. Of course each of these people will need to actually have an email account they can check. It doesn’t matter if this is their work email or a web based email system like GMail.
by Mark Nemtsas | Mar 29, 2013 | New Features
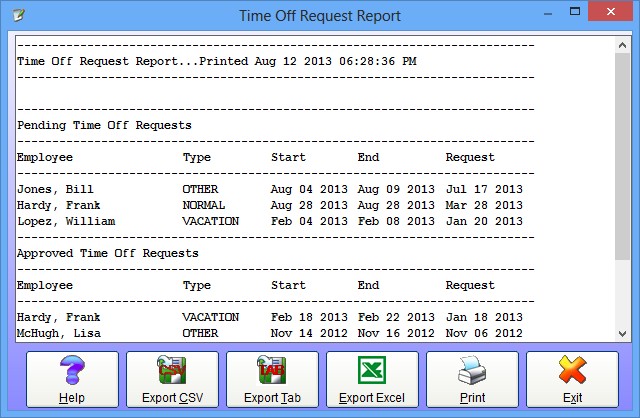
The Time Off Request Report
Above you can see the employee time off request report which is a new addition to our employee clockin software. If you’re not sure what Time Clock MTS employee time off requests are you can read more about them here or watch a video explaining how employees place a request.
The employee time off request report allows users to break down requests by status and date. The way the report is generated is different to most other reports in Time Clock MTS because it is not configured from the report configuration screen but rather is run directly from the screen administrators use to manage employee time off requests. Here’s an image of that screen:
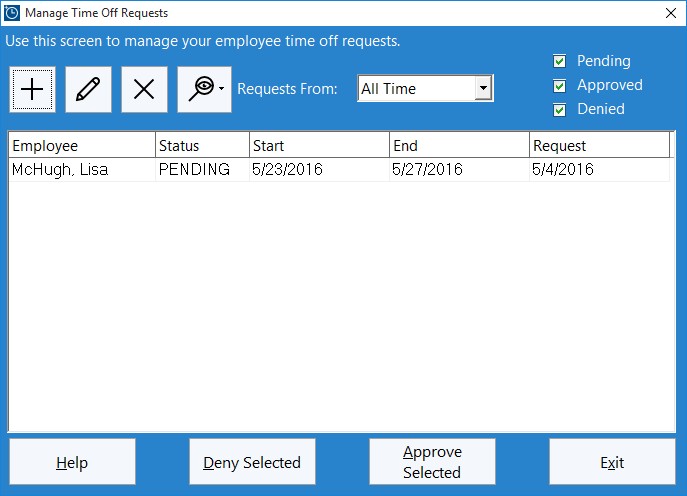
Figure 1 – The Administrator Time Off Requests Screen
The report is run by clicking the button with the printer icon on it. The actual data displayed on the report is determined by what data is displayed on the screen at the time. So, if for example, you’re showing requests from All Time (selected from the time period drop down) and only displaying Pending requests (because the Pending checkbox is ticked and the other two boxes are not) then the report will show Pending requests regardless of the date the requests were made.
Another example would be to display all Approved requests from the the previous month. To accomplish this we would select “Last Month” from the time period drop down and check the “Approved” checkbox and uncheck the others. To view the report click the Printer button.
In conclusion if you do need to record and track employee time off requests from your employee punch clock software then the time off request report is an ideal way of reporting on those requests. Don’t forget that there’s also dozens of other time clock reports available from within Time Clock MTS and one of those is bound to fit your requirements.
by kathryn@timeclockmts.com | Jan 20, 2013 | New Features, Using the Software
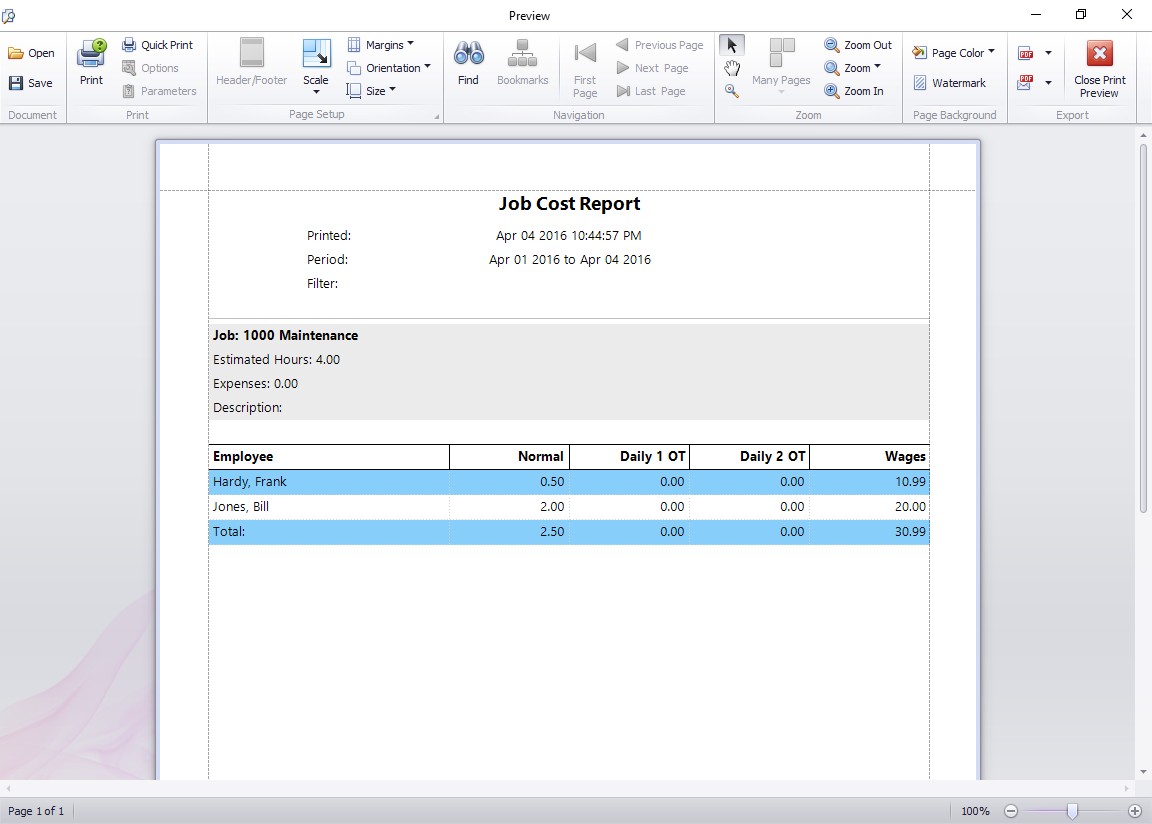
This report breaks down job costs by employee and by hourly rate.
Above you can see an interesting report that was added to the latest version of our Job Tracking Time Clock. The Job Cost Report breaks down the total wages cost for a single job or all jobs across a date range. If you’re running the report for all jobs then time spent working on NO job is also included in the report. The salary costs are split by each employee who has worked on the job during the report date range, and furthermore, their hours are categorized by hour type. This means you can see how many normal rate hours, overtime rate 1 hours, and overtime rate 2 hours have been spent by each employee on a job.
Remember that Time Clock MTS allows you to calculate overtime hours in many different ways and with two rates. You could, for example, have a two tiered daily overtime system where any hours worked between 8 and 12 on a given day are paid at overtime rate 1. Any hours worked over 12 will be paid at overtime rate 2. Overtime rates 1 and 2 can also be paid if you setup Time Clock MTS to pay overtime using the seventh day overtime rule. This rule pays overtime to an employee if they have worked the first 6 days of a working week and then work on the seventh day. The first (usually) 8 hours worked on the seventh day are paid at OT rate 1, while any hours after that are paid at OT rate 2.
Regardless of what overtime scheme you’re using the Job Costing Report will report the hours worked by each employee against a job and break this down by pay rate.
by Mark Nemtsas | Nov 7, 2012 | How To, New Features, Using the Software
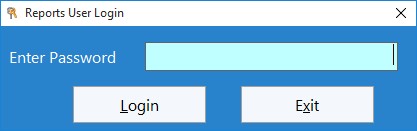
The release of Version 4 of Time Clock MTS introduced what we’re calling the “Reports User”. The Reports User can log into Time Clock MTS with their own password and run payroll reports but not perform any administrative functions. The really powerful thing about the Reports User is that they can log into the Time Clock MTS administrator program AND the Time Clock MTS client program to run reports. This means that there’s no need to have continual access to the employee time clock software administrator computer (or the administrator password) when someone needs to run payroll, activity, or job time reports.
This Time Clock MTS How To Article covers how the Reports User is setup and how you’d go about logging in as that user.
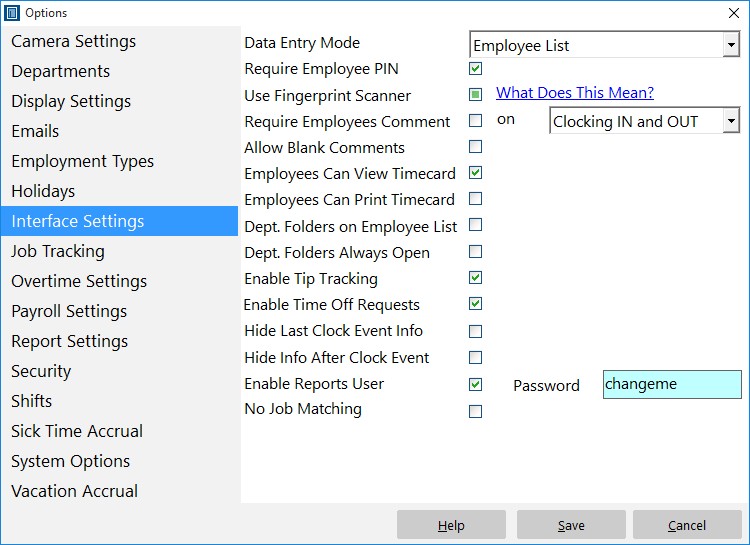
Use this screen to control how employees punch in and out and how Time Clock MTS looks.
- Log into the Time Clock MTS as the administrator.
- Go to the Tools->Options->Interface Settings screen (see image above) and check the Enable Reports User checkbox.
- Enter a password for the Report User. The password must be between 6 and 10 characters long and can only contain letters, numbers, and the underscore character.
- Click the Save button to save the changes.
- Log out of the administrator account using the File->Log Off Administrator Account.
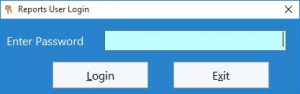
This screen is used by report users to login with their password.
- The Reports User may now log in using the client or administrator software using the File->Log in as Reports User menu. They’ll need to enter the Reports User password to be able to log in (see above).
The Report User can access all reporting functions via the Reporting menu. This includes all of the payroll reports that can be accessed from the Payroll Reports. Don’t forget that the Reports User needs to log out of Time Clock MTS using the File->Log Off Reports User Account.