by Mark Nemtsas | Apr 17, 2012 | How To, Tips and Tricks
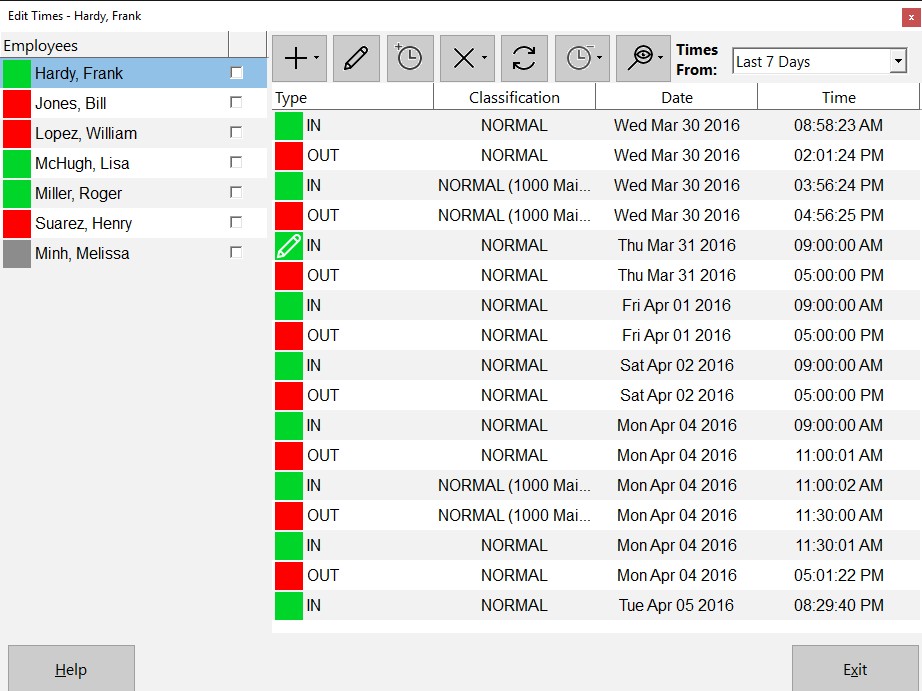
The Edit Times Screen
This Time Clock MTS How To Article covers how the Time Clock Administrator can punch out all employees that are currently punched in quickly and easily. This can be especially useful at the end of the work day to punch out any employees that may have forgotten to punch out when they left work for the day.
To punch out all employees that are currently punched in just follow the steps below..
- Log into Time Clock MTS as the administrator. How you log in as the administrator was covered in this How To Article.
- Go to the Tools->Edit Times screen and you’ll be shown the screen at the top of this article.
- Click the Punch In / Out
 button and choose the Punch Out All Employees option from the menu that pops up.
- A popup screen will give you the chance to set the punch out time for the group of employees. See the screen below. In this example we’ve set the time to 5:00:00PM.
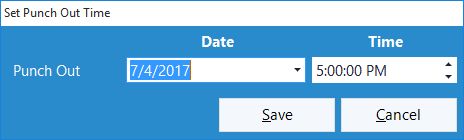
Setting the Punch Out time
- Confirm that you want to punch out all employees in the confirmation window that is then shown.
- All employees that are punched in will be punched out of Time Clock MTS
If this article isn’t what you were looking for you might find the How to Punch In All Employees article or how to Punch a Group of Employees In or Out article useful.
by Mark Nemtsas | Apr 16, 2012 | How To, Using the Software
SurePayroll is a very popular online employee payroll system that will calculate wages, pay your employees and help you stay compliant with payroll taxes & regulations. We’re happy to say that our pc time clock software, Time Clock MTS will now integrate with SurePayroll allowing you to quickly and easily export your employee time and attendance data to your payroll system. Here’s the steps that need to be taken to produce a data file suitable for exporting to SurePayroll.
1. Map Employee Names and ID’s Correctly
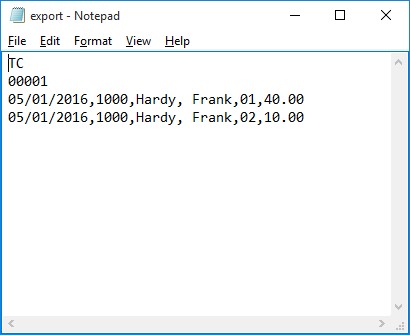
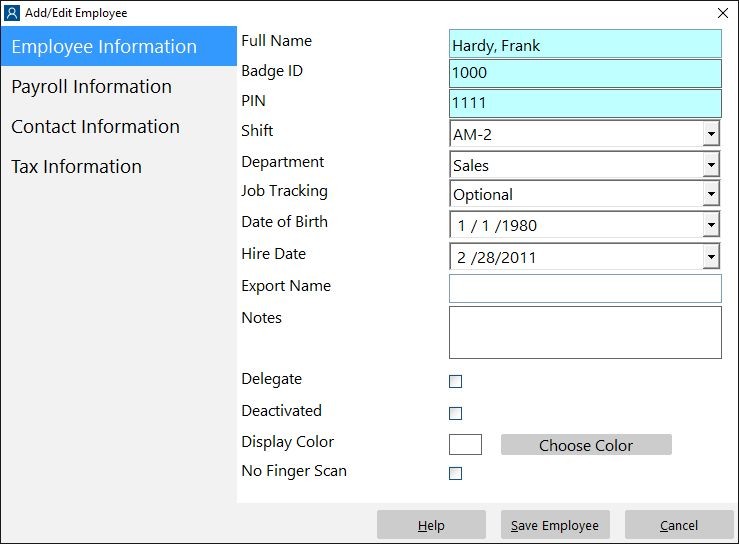
Time Clock MTS uses only one field for employee’s names while the SurePayroll system requires a first and last name. To get around this you must name your Time Clock MTS employees using the form LastName, FirstName. It is vital that you get the comma in between the last and first name. You can see in the image above that the employee is named Jones, Bill.
The second thing to ensure is that the Time Clock MTS employee Badge ID matches your SurePayroll employee numbers exactly. If this is not done then the time clock data for that employee will not be able to be imported to your payroll system. Above you can see that the employee Badge ID is 1010, this must be the same as the SurePayroll employee number.
2. Export Data Using the Pre-Defined SurePayroll Export Format
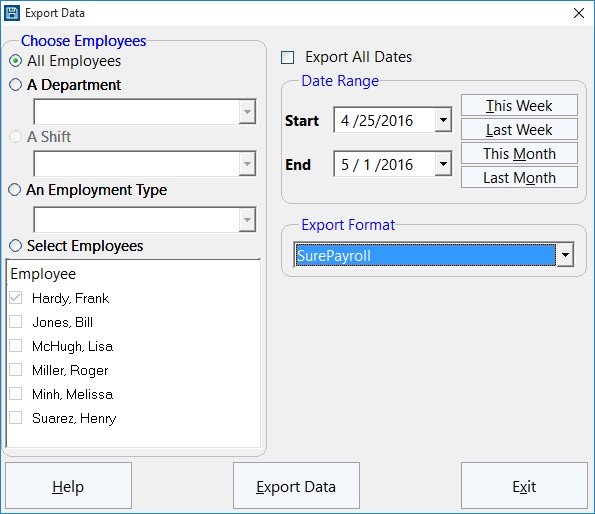
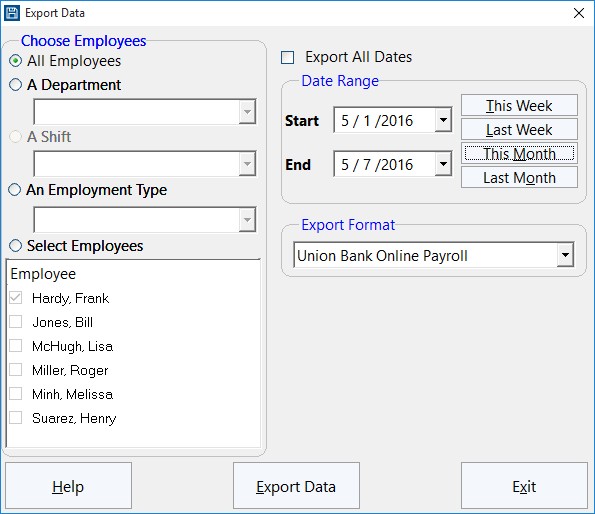
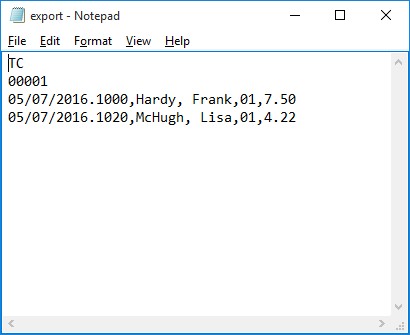
The next step is to actually export the data. This is done from within Time Clock MTS on the Reporting->Data Export->Export Data screen (shown above). Use the selection boxes on the left to choose what employee data you want to export. The date selection buttons on the top right allow you to select the date range that you want to export time clock data for. When you are happy with both the employee selection and the date range click the Export Data button to start the data export process. When the export is complete a Notepad window will pop up and you’ll see your exported data (see the image below). You can now save this file with the correct name and file extension required by SurePayroll and import it into your payroll system.
by Mark Nemtsas | Apr 5, 2012 | How To, Tips and Tricks
We’ve just had a request from a Time Clock MTS user who wanted to export their time clock data to Union Bank Online Payroll. Here’s the steps that need to be taken to produce a data file suitable for importing to Union Bank Online Payroll.
1. Map Employee Names and ID’s Correctly
Time Clock MTS uses only one field for employee’s names while the Union Bank Online Payroll system requires a first and last name. To get around this you must name your Time Clock MTS employees using the form LastName,FirstName. It is vital that you get the comma in between the last and first name. You can see in the image above that the employee is named Jones,Bill.
The second thing to ensure is that the Time Clock MTS employee Badge ID matches your Union Bank Online Payroll employee numbers exactly. If this is not done then the time clock data for that employee will not be able to be imported to your payroll system. Above you can see that the employee Badge ID is 1010, this must be the same as the Union Bank employee number.
2. Export Data Using the Pre-Defined Union Bank Online Payroll Export Format
The next step is to actually export the data. This is done from within Time Clock MTS on the Reporting->Data Export->Export Data screen (shown above). Use the selection boxes on the left to choose what employee data you want to export. The date selection buttons on the top right allow you to select the date range that you want to export time clock data for. When you are happy with both the employee selection and the date range click the Export Data button to start the data export process. When the export is complete a Notepad window will pop up and you’ll see your exported data (see the image below). You can now save this file with the correct name and file extension required by Union Bank Online Payroll and import it into your payroll system.
by kathryn@timeclockmts.com | Mar 10, 2012 | How To, Using the Software
We’ve had an interesting question from a Time Clock MTS user who uses the software with two different databases to track two distinct departments in their workplace. The user asked if there was an easier way to have the Time Clock MTS administrator program connect easily to the two different databases with out having to make use of the Change button on the System Options screen. It turns out there is an easier way. Here’s what we suggested (these instructions will not work on Windows XP).
1. On the Time Clock MTS administrator program make two copies of the file:
c:\Program Data\Time Clock MTS\timeclock.ini
And call them timeclock_location1.ini and timeclock_location2.ini
2. Open up both of these files in Windows Notepad and change the setting DatabaseLoc in each file to the path to your two Time Clock MTS databases.
3. Save both files.
4. Create a batch file and enter the following commands into it.
copy “c:\Program Data\Time Clock MTS\timeclock_location1.ini” “c:\Program Data\Time Clock MTS\timeclock.ini”
“c:\Program Files (x86)\Time Clock MTS\timeclockmts.exe”
Save the batch file as “timeclockmts_database1.bat”.
Note: If you’re not running a 64 bit version of Windows use the path c:\Program Files\Time Clock MTS\ rather than c:\Program Files (x86)\Time Clock MTS\timeclockmts.exe.
5. Create another batch file and enter the following commands into it.
copy “c:\Program Data\Time Clock MTS\timeclock_location2.ini” “c:\Program Data\Time Clock MTS\timeclock.ini”
“c:\Program Files (x86)\Time Clock MTS\timeclockmts.exe”
Save the batch file as “timeclockmts_database2.bat”.
Note: If you’re not running a 64 bit version of Windows use the path c:\Program Files\Time Clock MTS\ rather than c:\Program Files (x86)\Time Clock MTS\timeclockmts.exe.
6. Create a Shortcut to both batch files on your Windows desktop. Call one “Time Clock MTS Database1” and the other “Time Clock MTS Database2”.
7. All you need to do to open up Time Clock MTS connected to either of the two databases is double click on the appropriate shortcut.
These instructions require more advanced computer knowledge than Time Clock MTS usually requires of it’s users but it’s a complex setup required by very few. If you’re unclear about anything in this article just Contact Us and we’ll try to help you out.
by Mark Nemtsas | Jan 8, 2012 | How To, Tips and Tricks
The Overtime Settings Screen
If you’ve got several employees in your business who are receiving different amounts of hourly pay, it can be difficult to keep track of it all manually. Time Clock MTS is a simple and easy time clock system that helps you manage the information of all your individual employees.
Overtime is one of those things that’s well-known for getting slightly confusing. However, with a effective and easy-to-use time and attendance tool, you can set the hourly overtime rate for each employee (even if it varies from one employee to another) and let the computer work out the rest!
This Time Clock MTS How To Article is a step-by-step guide for setting up daily overtime for your employees using Time Clock MTS.
- Log in as the Administrator. You can do this buy choosing File > Log In As Administrator. Tap in your password and you’re ready to go.
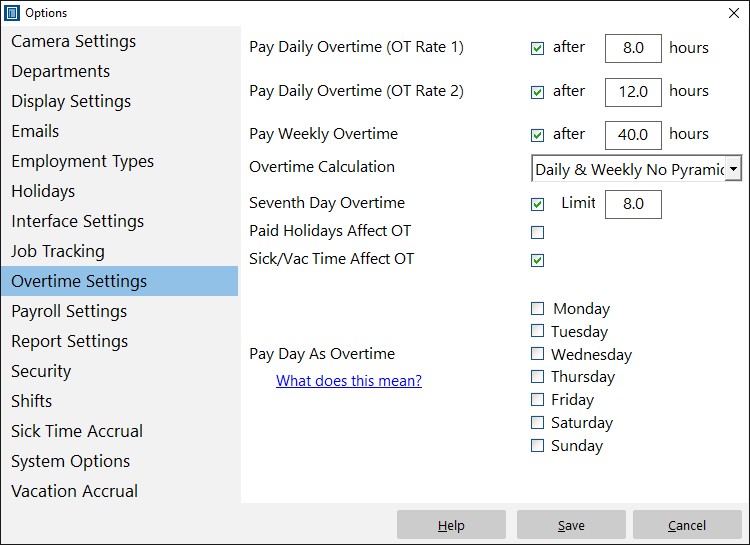
- Once you’re logged in, select Tools > Options. A new window will open and you’ll see a list on the left-hand side. Choose Overtime Settings from the list.
- Set the amount of hours the employees must work before receiving overtime pay. You can do this by checking the box next to “Pay Daily Overtime (OT Rate 1)” and then typing in the number of hours. For example, if you type “8” in the box, this means that the employee has to work eight hours before starting to receive overtime pay. Click the Save button to save the changes and close the Options window.
- The final thing to do is to actually set the hourly overtime rate. To do this, start by highlighting the employee on the “Employees” list. Select Employee Maintenance > Edit Selected Employee. A new window will open and you should see a list of four different categories on the left-hand side. From this list, choose “Payroll Information”. Look for “Hourly Payments” half way down the page on the right-hand side of the window.
Type the hourly overtime rate in the box labeled “OT 1 Rate / hr” and click “Save Employee”.
by Mark Nemtsas | Jan 7, 2012 | How To
When running a business with several employees, one of the things you might need to do is setup weekly overtime. Time Clock MTS allows you to do this without having to worry about calculation errors. Once you’ve entered the required information, the time and attendance tool will work out the rest and help you to get an accurate and reliable calculation of all your employees’ wages.
This Time Clock MTS How To Article is a step-by-step guide for setting up weekly overtime for your employees using Time Clock MTS.
- Start off by logging in as the administrator. This can be done by selecting File -> Log In As Administrator menu.
- Select Tools -> Options from the menu bar at the top of the window. Once a new window has opened, have a look down the left-hand menu and choose “Overtime Settings”
- Check the box titled “Pay Weekly Overtime”. You can then type in how many hours you want the employee(s) to work in the week before receiving overtime pay. For example, if you choose 40 hours, the employee(s) will be paid regular pay for the first 40 hours and then overtime pay for the hours worked after that.
- Choose the employee for whom you want to set the weekly overtime pay. Select Employee Maintenance -> Edit Selected Employee.
- Once the new window opens, select “Payroll Information” from the left-hand side and look for a box on the right-hand side labeled OT 1 Rate / hr. Type in the amount that you want the employee to receive for each hour worked overtime.
It’s very easy to manage your employees and their payroll information using Time Clock MTS. An efficient time clock tool will come in handy for a lot of things and will help you to easily pay your employees with the assurance of having accurate calculations.