by Mark Nemtsas | Oct 25, 2011 | How To, Tips and Tricks
The Generate Payroll Reports Screen
One of the features that businesses look for when choosing an employee attendance tool is the ability to export data to other software programs. Many people that use a time clock system will often need to export data to spreadsheets, word processors and other such database packages. If this can be done easily, quickly and effectively, it will save time and hassle for the business. This Time Clock MTS How To Article covers the steps to follow if you want to create a payroll report and export it to another software program.
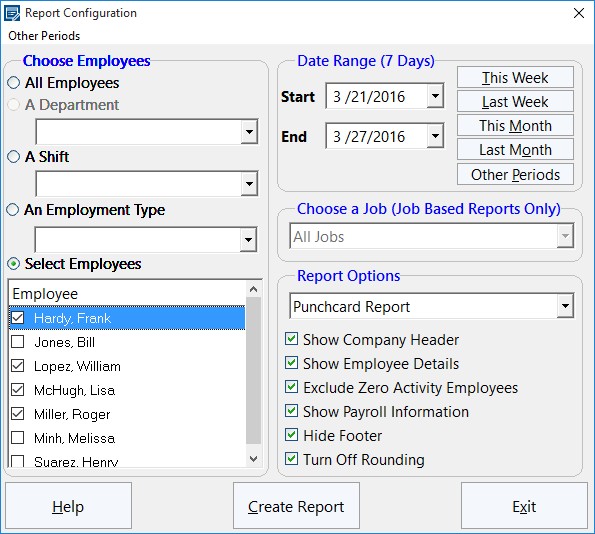
- Open Time Clock MTS and log into your administrator account. Once you are logged in, go to Reporting -> Payroll Reports. This is the part of the time clock tool that allows you to control which reports are created. This is where you should go whenever you need to create any sort of report. You can create reports on employees, departments, shifts and many other things. If you don’t want reports generated on all of the employees (or departments etc.), you can choose the ones you want to see reports about from a list.
- Once you have opened the Report Configuration screen, you can choose what report you want to create (here is a Full List of Time Clock MTS Reports). You can select different employees, departments, shifts and employment types. Additionally, you can choose a specific date range and the type of report that you would like. You can choose the type of report by using the drop-down menu on the right-hand side of the screen. There are various other options on the screen that you can choose, for example, you can choose whether you want the company header to be displayed on the report, the employee details and any other information.
- Now that you have chosen exactly what you want the reports to be about, you can go ahead and create it. To create the reports, simply click Create Report at the bottom of the screen. The report will appear almost instantly and will contain information such as the total hours worked, total vacation time and total earnings.
- Once the screen containing the report has appeared, you can now export the data by clicking any of the buttons at the bottom of the screen, e.g. Export CSV.
You can choose either Export CSV, Export Tab or Export Excel. Exporting the data takes a few seconds and exports the report(s) onto the software of your choice. You may also choose to print the report, which can be done by clicking Print.
Time Clock MTS has many features like this that make it an ideal time and attendance tool for both large and small businesses. By following the above steps, you can create reports for whatever you want and export it in a matter of a few seconds.
by Mark Nemtsas | Sep 26, 2011 | How To, Using the Software
The Overtime Settings Screen
This Time Clock MTS How To Article will show you the four simple steps that you will need to follow in order to pay a given weekday as overtime using the Time Clock MTS tool. Using the tool, you can change the settings to pay your chosen employees overtime on certain days of the week. This is particularly useful if your employee’s employment agreement, pay scale, or union agreement requires a certain weekday (typically Sunday) to be paid as overtime.
Here’s the steps to follow to pay all time on a given weekday as overtime:
Step 1. Make sure that you are logged into the administrator account, otherwise you will not have access to any of the settings and will not be able to edit employee information. If you have only just downloaded Time Clock MTS, you will need to create a password for the administrator account and log in once it has launched.
Step 2. Next, you will need to set the overtime rates so that you are paying the correct amount per hour. This can be different for each employee. In order to set the overtime rates, select one of your employees from the list. Click Employee Maintenance->Edit Selected Employee->Payroll Information. You can then set it using the boxes labelled “OT 1 Rate/hr” and “OT 2 Rate/hr”.
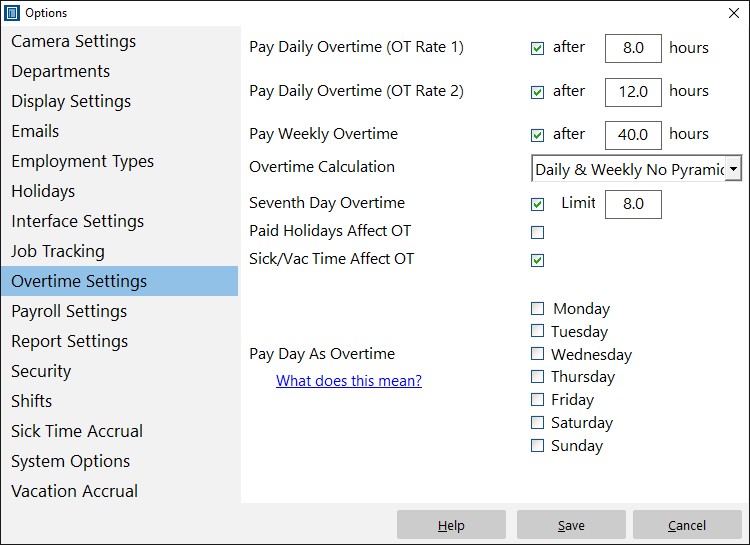
Step 3. Click Tools->Options->Overtime Settings to pay a given day as overtime. To do this, select Employee Maintenance->Edit Selected Employee->Payroll Information and select the box next to the particular day that you want to pay as overtime.
Each employee can have different pay rate for overtime. You may decide to pay a small handful of your employees more overtime pay than others, and all this can be set by selecting the Payroll Information of each employee and setting it as you wish. You can also choose to pay certain days as overtime; if you choose this, the whole day will be paid as overtime and normal overtime limits do not apply. The whole day will be paid as the hourly rate that you have set for Overtime 1, regardless of how many hours during the day the employee works.
As you can see, Time Clock MTS is very useful if you have employees that are receiving various amounts of pay for the different hours that they work. Arguably the most useful feature of this tool is the fact that you can edit each employee’s payroll information individually, so that you can alter the pay of one employee without it affecting the pay of any others.
by Mark Nemtsas | Jul 25, 2011 | How To, Tips and Tricks, Using the Software
The recent release of Version 3.2.1 of Time Clock MTS saw the addition of a new feature to the Edit Times Screen that allows the insertion of a missing punch into the middle of an existing clock in/out pair. The typical situation where this might be useful is if an employee forgets to clock out for a break. This blog entry takes you through the process of inserting a missing punch using the Edit Times screen.
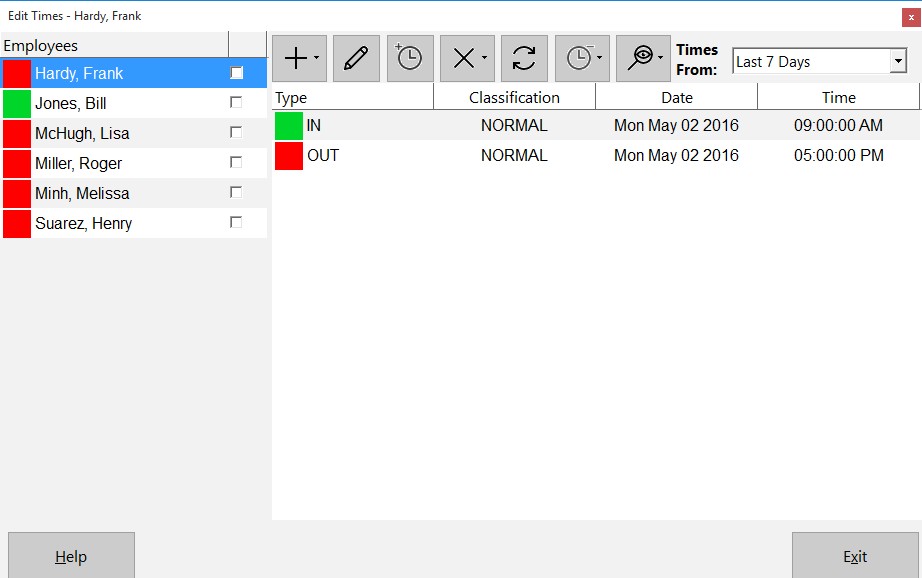
Figure 1 – Missing Punch on Edit Times Screen
Above you can see the Edit Times screen for an employee who has clocked in just before 9:00AM and clocked out just after 5:00PM. The employee has forgotten to clock out for lunch so the administrator must insert punch to represent the break. To do this you must click on either the clock in or out where you want to insert the missing punch and then click the Insert Missing Punch  button.

Figure 2 – The Insert Missing Punch Screen
Above you can see the Insert Missing Punch screen. Note that the Clock Out time is first and the Clock In comes next. This is because when you insert a missing punch you are representing a missed clock out and back in, which in our example is a missed 30 minute lunch break. It’s worth noting that you can also add a time note, assign a job to the missing punch, and change the overtime calculation method. It is important to realize that these settings only affect the newly created Clock In.
Let’s go ahead and adjust the Clock Out and Clock In times to the lunch break times of 12:00:00PM and 12:30:00PM.
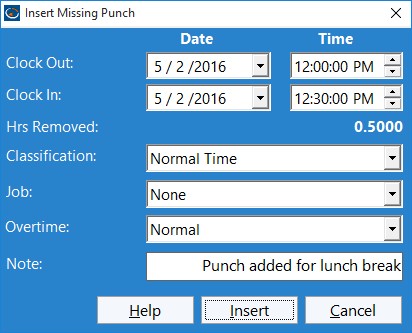
Figure 3 – The Insert Missing Punch Screen
Above you can see we’ve edited the screen to give the times wanted and have also added a note to record why this punch was inserted. We’ll go ahead now and click the Insert Punch button to add the clock out and in. This will take us back to the Edit Times screen.
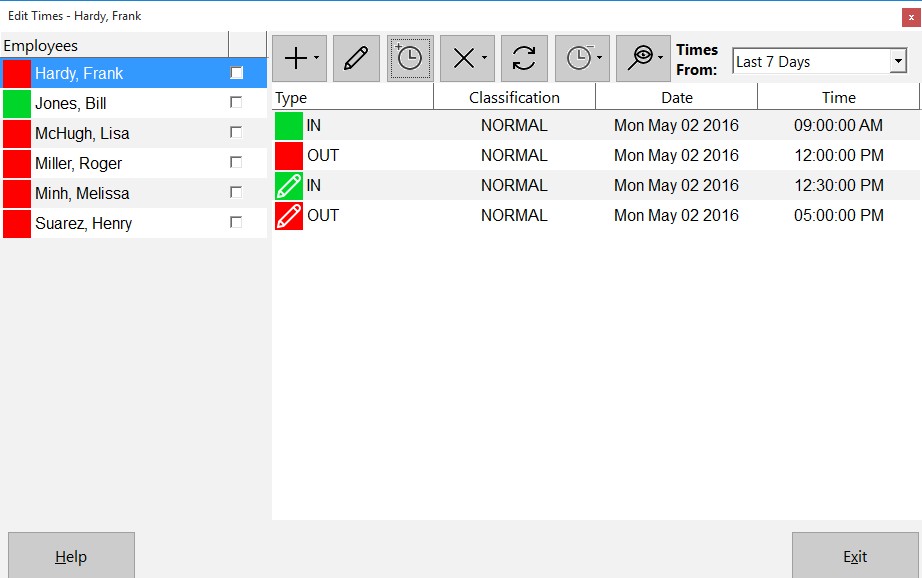
Figure 4 – The Edit Times Screen with Missing Punch Inserted
You can see in the image above that the missing punch has been added to represent the lunch break that the employee forgot to clock out and in for. Previously you could insert a missing punch into Time Clock MTS by using the Edit Time screen and by adding a new time but this new button greatly streamlines the process and helps to eliminate any potential for error.
As always if you have any questions please feel free to ask me!
by Mark Nemtsas | Apr 30, 2011 | How To, Tips and Tricks, Using the Software
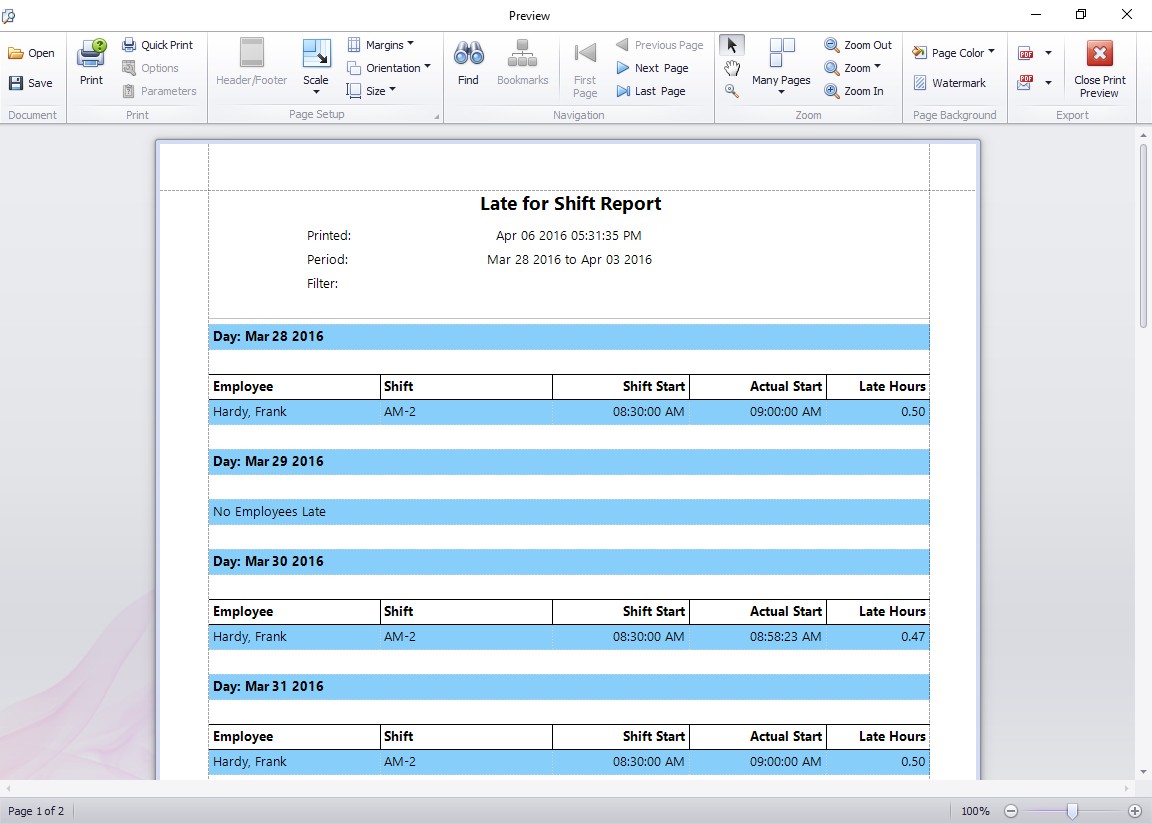
The late for shift report displays all employees that have arrived for work after their designated shift start times.
The recent release of Version 3.1.5 of Time Clock MTS included a new report that allows users to easily run a report displaying employees that have clocked in late for their shift. The output of this report can be seen above. Here’s how to setup Time Clock MTS to allow you to use this report to track when your employees are clocking in late for their shifts.
- For each different shift start time you need to track you’ll need to create a shift on the manage shifts screen in Time Clock MTS. You can do this in Tools -> Options -> Shifts. Read more about Shifts in the online help files. Made sure to set the shift start time to the time that you want to track.
- Assign each employee to the shift that they work. You can do this on the Employee Maintenance -> Edit Employee screen. See Employee Information in the Online Help File.
- Have your employees clock in and out using Time Clock MTS as normal.
- Run the Late for Shift report on the Report Configuration Screen. The report can be run over one or many days, and run for one or many employees.
- You can now interpret the report. It will give you a day by day list of the employees that have clocked in late for their shift. Each employee late arrival will be displayed along with the employee name, their shift name, the scheduled shift start, their actual arrival time, and the amount of time that they were late.
by Mark Nemtsas | Apr 15, 2011 | How To, Tips and Tricks
At last count nearly 50 churches were registered users of Time Clock MTS and we know that many of these use Time Clock MTS to track student attendance at Sunday school. The tracking requirements for a Sunday school are not too dissimilar to that needed for regular school attendance software but it’s worth some effort looking at how to use Time Clock MTS as Sunday school attendance software effectively.
Customize the User Interface
Using the Interface Settings Screen customize the main user interface to suit the Sunday school environment. Your students will likely be offended to be called employees, so change those labels to ‘students’, you might like to change the ‘clock in’ and ‘clock out’ to less work oriented terms too. I’d suggest ‘Arrive’ and ‘Depart’.
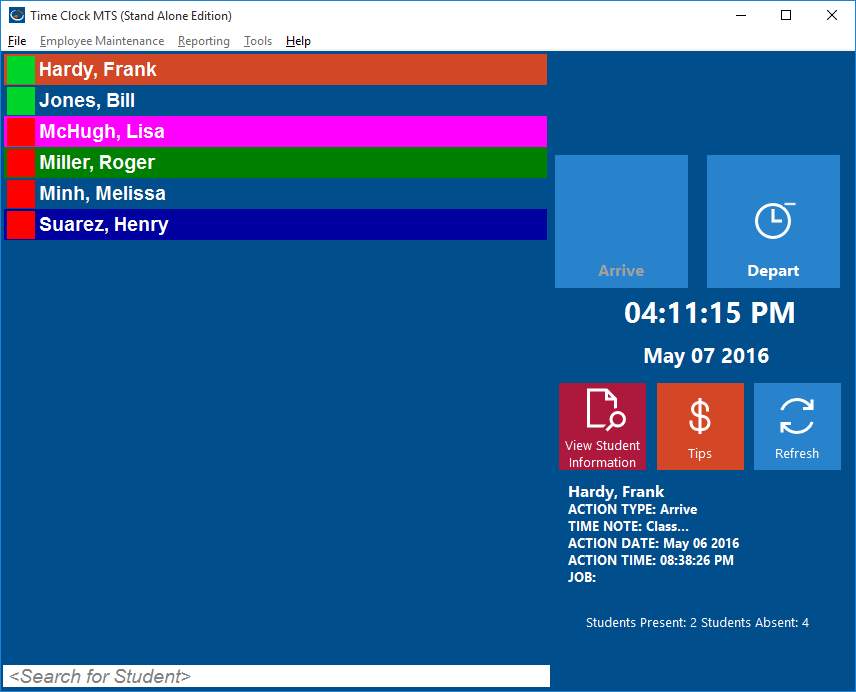
Customization for Sunday School Attendance
Create Jobs to Track Lessons or Classes
If you want to track your student attendance to various lessons then I’d suggest making use of the job tracking features of Time Clock MTS. So, if for example, you had a series of lessons on the various books of the New Testament you could assign each a code and have your students clock in and out with this code as they attend each different lesson. At the end of the series of lessons you could offer those students who missed out catch up sessions. Determining who missed out is very simple, just run the Job Time Report.
Create Departments for Each Teacher
If you run a larger Sunday school you might find it useful to track student attendance by teacher. To do this create a department representing each teacher and assign students to each department using the Manage Employees screens. You could then easily see a class list for each teacher and report on attendance to each teachers class by simply running Time Clock MTS attendance reports on a department by department basis.
Record Sunday School Attendance
Using Time Clock MTS to record Sunday school attendance is quite simple. You could do it in two ways. The first is to provide a central computer (or computers) and to have your students check in when they arrive for a class and then check out when they depart. Alternatively if your classes are smaller you might have the teachers take attendance on a laptop or similar and check each student in when roll is called at the beginning of class.
Report on Sunday School Attendance
If you make use of the Employee Status Report you’ll find that it’s a super quick and easy way to check what students are attending your Sunday school classes. If you’re wanting to track lesson attendance and you’ve made use of job tracking then the various job tracking reports will easily give you the information you need.
Conclusions
Time Clock MTS wasn’t really designed to be used as Sunday School Attendance Software, but as features have been added over the years it certainly has become flexible and useful enough to be used as such. With almost 50 churches currently using it in the role it clearly has something to offer with a customizable interface, flexible tracking options, and powerful reporting. All of this at a remarkably inexpensive price.
by Mark Nemtsas | Apr 15, 2011 | How To, Tips and Tricks
A quick browse through our customer database shows at the time of this post that 68 schools (not including colleges and universities) are using Time Clock MTS. It’s safe to assume that some of these, at least, are using Time Clock MTS as school attendance software. I thought it would be useful to look at how you could configure Time Clock MTS to track and record the attendance of students within schools.
Change the Time Clock MTS Display Labels
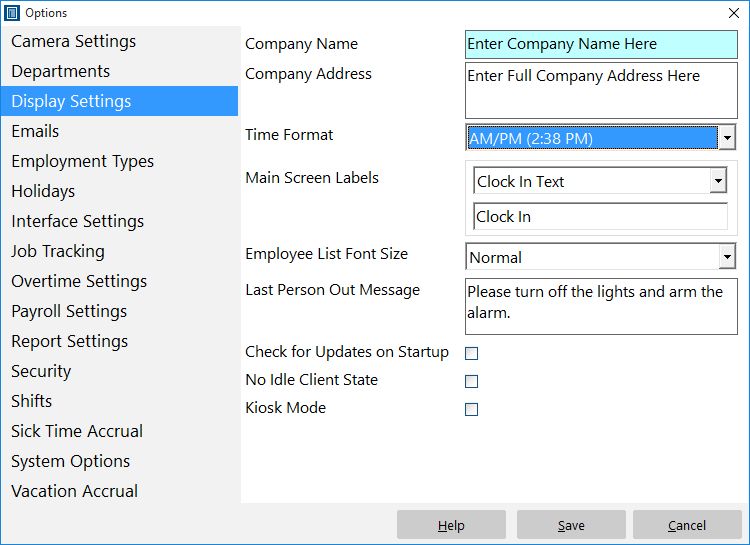
The Display Settings Screen
Above you can see the Tools->Options->Display Settings screen. You can use the ‘Main Screen Labels’ options to change the text shown on the main screen of Time Clock MTS. We originally designed this to allow users to translate the main screen into other languages but we are aware that some users are using it to make the software more user friendly to their particular business. If you’re using Time Clock MTS as school attendance software then you can easily make it more student friendly by changing these terms. The image below shows what the result can be when making the software more school friendly.
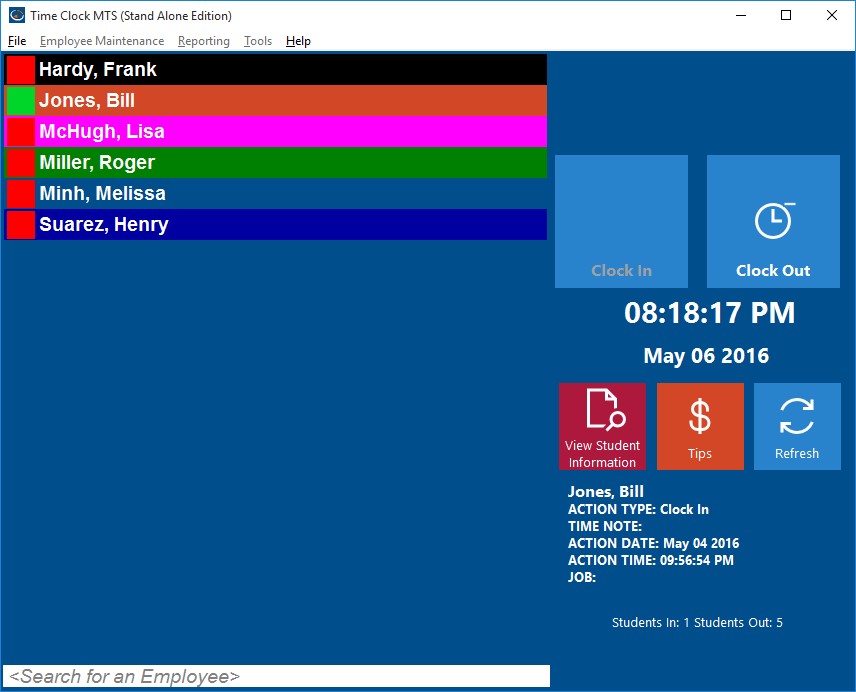
Time Clock MTS configured as school attendance software
Record Student Contact Information
The Manage Employees screens in Time Clock MTS allow you to record the student name, contact information, and alternate contact information. This is immediately useful if a school needs to contact a student, their parents, or notify someone due to an unexplained school absence.
Track Students by Class
Student attendance by class could be easily tracked using the departmental tracking features with Time Clock MTS. Simply create a department for each student class and then assign each student to the correct class using the Manage Employees screens mentioned above. You could then setup your Time Clock MTS clients (clocking stations) to display only the students from appropriate class. Alternatively you could configure the student list to display in folder view and have an expandable list of classes and students that could be looked through very quickly and easily.
Track Daily Attendance
Time Clock MTS can be easily used to track the daily attendance of a student. Simply have them check in when they arrive for home class, or perhaps when they enter the school building.
Period Attendance
Using the Job Tracking features of Time Clock MTS you could easily configure the software to track student attendance by period. Simply create a job code for each subject and have students clock into each subject’s period using the appropriate job code.
Report on Student Attendance
The Employee Status Report gives you a quick and easy way of reporting on student attendance. It’s a simple matter to run this report and see what students are not at school for the day and then make contact with their parents to notify them of their absence. For more comprehensive reporting the Simple Attendance Report could be used to print off attendances by class or period and then distributed to teachers via noticeboard or email.
Conclusions
While Time Clock MTS wasn’t specifically designed as school attendance software many of the features allow it to be used as such. The customizations available will make it easy to use for your students, while configuration options will easily allow you to track student attendance by class or period as well as allowing to store their contact details. Comprehensive and flexible reporting then allows for simple attendance tracking of your student population.