by Mark Nemtsas | Mar 13, 2011 | How To
This report shows all days with missing punches during the reporting period.
The recent release of Version 3.1.2 of Time Clock MTS and the addition of the new Missing Punches Report made me realize that we’d never posted up a blog explaining how users of Time Clock MTS could detect when an employee has forgotten to clock in or out. So, here we have a few methods doing this:
1. Make use of the Employee Status Report at the beginning or end of the work day. Run at the end of the work day an employee who has forgotten to clock out will still be shown as clocked in. Conversely, an employee who forgot to clock in at the beginning of the day will still be shown as clocked out.
2. A quick visual scan of the Employee List Interface at the beginning or end of the work day can serve the same purpose as running the Employee Attendance Report described in point one.
3. Periodically run the Punchcard Report. A quick scan of the hours worked over the reporting period should quickly highlight any extra long periods between clock in and outs. You should also look out for extremely short clock periods (for example when an employee forgets to clock in one morning and that afternoon clocks in and back out immediately). Both these indicators can be a sign of an employee forgetting to clock in or out.
4. Institute a policy that requires employees to enter a note when they’ve forgotten to clock in or out and realize this when they go to clock out at the end of the day or back in the next day. Use the Employee Notes Report to find these notes.
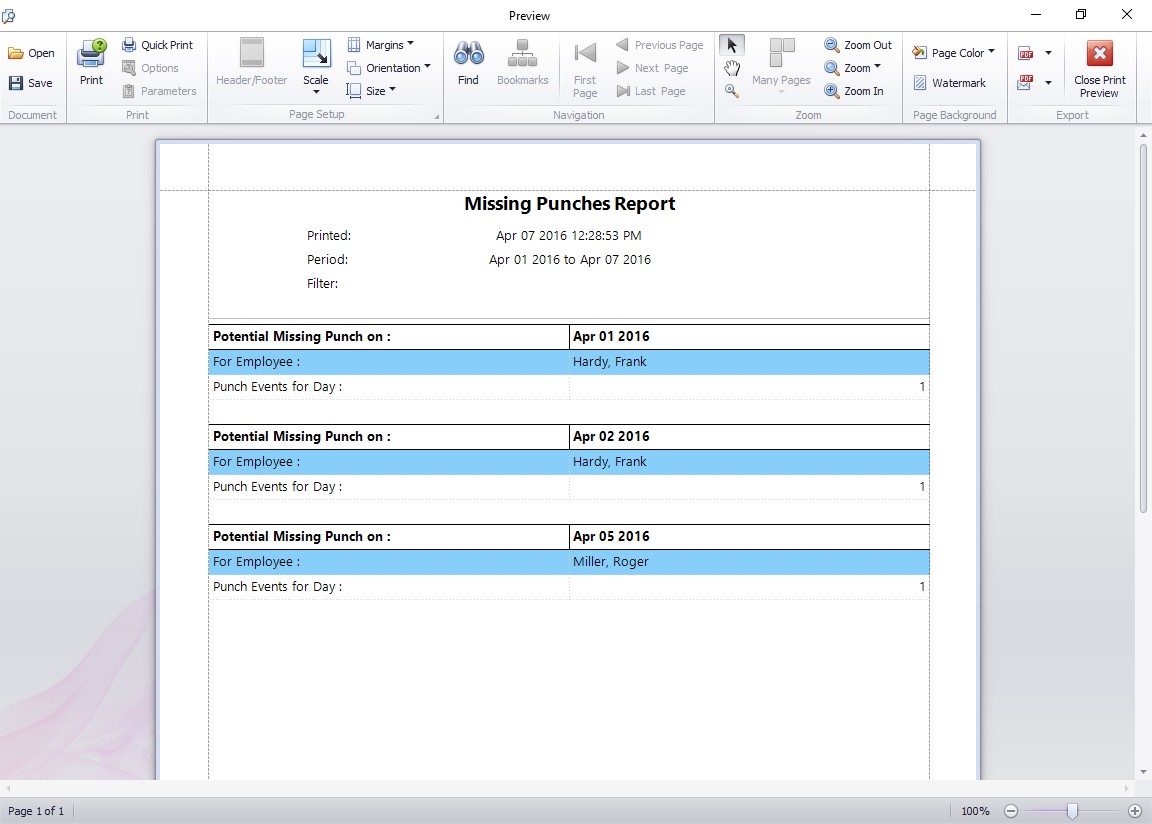
5. Make use of the Missing Punches Report. This report checks the employee clock in / out activity on a day by day basis over the chosen reporting period. Any day that shows an odd number of clock events is reported as potentially missing a clock in or out. The logic behind this is is that if an employee forgets to clock out then that day will show an unbalanced number of clock events as will the day before.
Got any other suggestions of how Time Clock MTS can be used to detect when an employee forgets to clock in out? Why not Contact Us and let us know!
by Mark Nemtsas | Mar 7, 2011 | How To
This Time Clock MTS How To Article covers how to to use Time Clock MTS to record new tips received and edit existing recorded tips. Note that because of the critical need for employees to manage their own tip diary that both employees and the Time Clock MTS administrator can add, edit, and delete tips.
Enable Tip Tracking
Before anyone can add, edit, or delete tips the Time Clock MTS administrator must enable tip tracking. The process to do this is described in the Enabling Tip Tracking How-To article.
Tip Tracking as an Employee vs Tip Tracking as the Time Clock MTS Administrator
Employees and the Time Clock MTS administrator have access to exactly the same tools for adding, editing, and deleting employee tips. However, if you’ve got the Employee PIN feature or Employee Fingerprint Security turned on then these security features are applied when employees try to access the tip tracking features. The security features are not applied when Time Clock MTS is in Administrator Mode.
The employee tip diary is used to enter employee tips here as well as view tip diary reports.
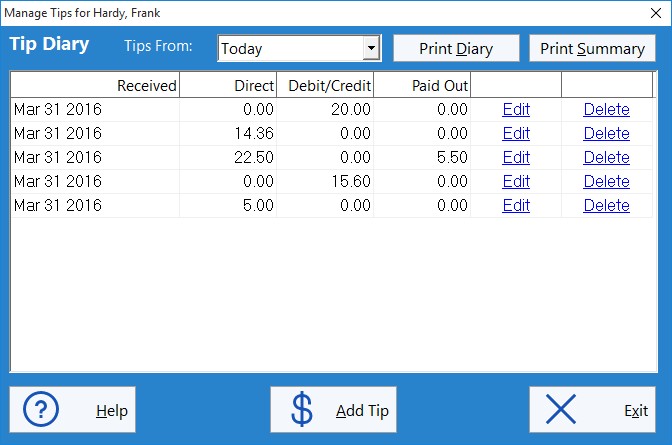
The Employee Tip Tracking Screen
Employee tips are managed from the Employee Tip Tracking screen which can be seen above. This screen is accessed from the Tips button on the employee time clock, a screenshot of which is shown at the top of this article. The employee tip tracking screen is basically an interactive tip diary. The time range that tips are displayed from can be selected from the time period drop down box. A tip can be edited or deleted by clicking the Edit or Delete link next to that tip. A new tip can be added by clicking the Add Tip button. The functions of the Print Diary and the Print Summary buttons will be covered in a subsequent How-To article.
Employees could use this screen to record their tips in a couple of ways. They could record each and every tip received individually, in which case their tip diary would contain a lot of entries but these would of course be summarized at reporting time. The alternate way is for employees to total up tips received during their shift and to just enter one summary tip that covers everything they received.
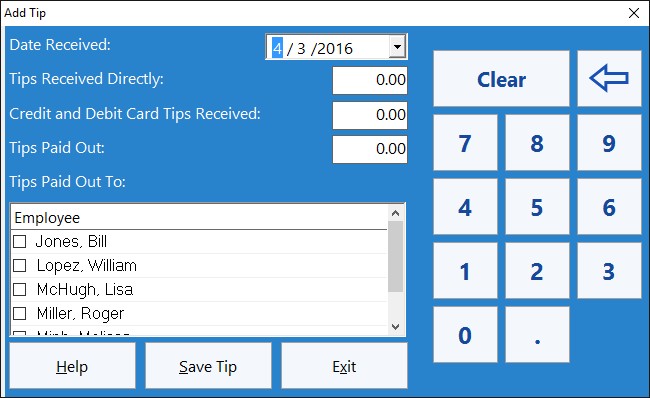
Employees use this screen to add a new tip.
Adding or Editing an Employee Tip
When you add a tip or edit a tip you’ll be shown the screen above. As with most Time Clock MTS screens users must fill in the details and click the Save Tip button to save the changes. The employee tip screen allows employees to record direct tips received from customers or other employees, tips received from credit or debit cards, and tips paid out to other employees as well as who those tips were paid out to. Numeric values can be entered in the value fields on this screen with either a keyboard or via the keypad buttons on the right of the screen. Things to note on this screen include the requirement for the employee to select the date the tip recorded was received, and that they must select who tips are paid out to if a value has been entered into that field. Note that Time Clock MTS automatically records the date that a tip was recorded and this cannot be changed.
Any tips added or edited while the Time Clock MTS Administrator is logged in will be flagged as such by the system. These tips will be marked with a “##” symbol on the Employee Tip Diary Report.
by Mark Nemtsas | Mar 6, 2011 | How To, Tips and Tricks
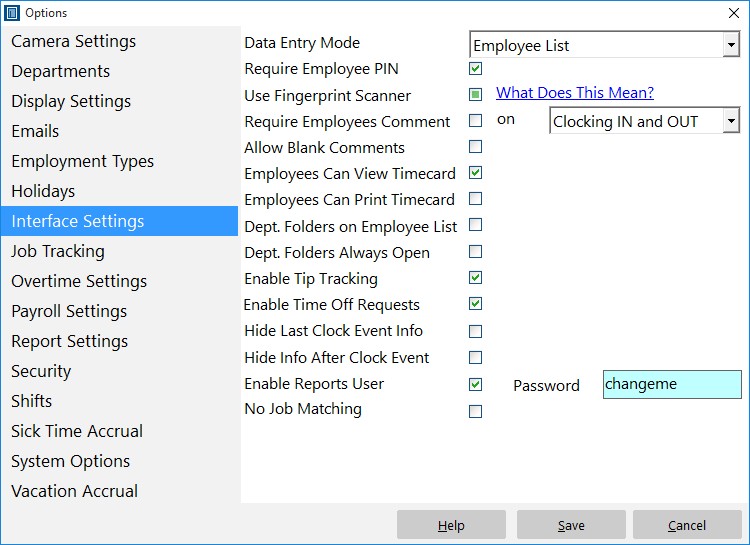
The Interface Settings Screen
This Time Clock MTS How To Article covers how to configure Time Clock MTS to allow your employees to record, track, and report on any tips they receive while working.
To enable employee tip tracking in Time Clock MTS just follow the steps below..
- Log into Time Clock MTS as the administrator. How you log in as the administrator was covered in this Time Clock MTS How To Article.
- Go to the Tools->Options->Interface Settings screen and you’ll be shown the screen at the top of this article.
- Check the Enable Tip Tracking checkbox.
- Select the Employee List Interface option from the Data Entry dropdown. Note that tip tracking does not currently work if you’re using the keypad interface.
- When you’re happy with your selection press the Save button to save the changes.
The Employee Time Clock Screen
- Logout of the Time Clock MTS administrator account and you should see the employee time clock screen looking like it does above. Note that the Tips button is now visible. Your employees can now start recording tips received by clicking this button.
We’ll cover how to record and report on employee tips in subsequent how to articles.
by Mark Nemtsas | Feb 19, 2011 | How To, Tips and Tricks, Using the Software
From time to time we need to users of Time Clock MTS to run the software in a special logging mode to allow us to find and fix up problems with the program or with the computer it is installed on. When this mode is activated Time Clock MTS creates a new Microsoft Excel worksheet and logs all manner of information to the worksheet which can then be emailed to us. This blog entry details how to start up the software in what we call “Excel Debug Mode”.
1. Find the Start->Run box on your version of Windows. If you’re using Windoxs XP it’s just a matter of pressing the Windows Start button and selecting the Run option from the window that pops up. In Windows Vista the Run box is hidden by default and you may need bring back the Start->Run box. If you’re running Windows 7 just click the Windows Pearl (the round button on the bottom left of your desktop) and select the run option from the window that pops up.
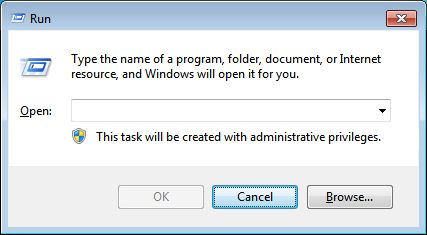
2. Generally the Start->Run box looks something like the screenshot shown above.
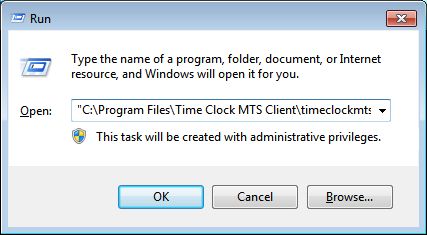
3. Enter the following command into the text field in the window. Make sure to enter the correct command depending on whether you’re trying to get the Time Clock MTS Administrator program or the Client program started in Excel Debug Mode. Make sure to cut and paste the commands from this article rather than trying to type them in.
Administrator Program:
“C:\Program Files\Time Clock MTS\timeclockmts.exe” ExcelDebug
Client Program:
“C:\Program Files\Time Clock MTS Client\timeclockmtsclient.exe” ExcelDebug

4. Click the OK button and Time Clock MTS should start up as should a Microsoft Excel Worksheet. The worksheet should look something like it does above.
That’s all you need to do to start Time Clock MTS in Excel Debug Mode. If we ask you to do this we’ll ask you to do something once the software is running (like clock someone in and out or similar). Then all you’ll need to do is shutdown Time Clock MTS, save the Excel worksheet and attach it to an email to send to us. As always if you have any problems or get stuck please Contact Us for more information.
by Mark Nemtsas | Jan 20, 2011 | How To, Tips and Tricks, Using the Software

Employees can view their own information and print their own timesheet.
If you’ve ever uninstalled Time Clock MTS then you would have noticed that a web based survey pops up in your browser window asking you why you’re uninstalling the software. This is a valuable tool for you to tell us about bugs in the software that we are not aware of or to work out if there’s an annoying aspect to the software that a lot of people are bothered by. We’ve found the results of these surveys extremely useful but from time to time we get an uninstall survey response that tells us that a particular user decided not to purchase the software because they believe the software doesn’t do something it actually does. Most of the time when I get one of these responses I’ll pop up a blog entry covering the topic. Today the following feedback came in from an uninstall survey:
wish the employee could print out their timesheets without being log in as admin because as admin you can change time which I do not like….this is the reason I uninstalled and did not buy
Of course you can configure the software to allow employees to print their own timesheets without having them log in as the administrator and here’s how to do it:
There it is, two simple steps. Your employees will now be able to view their own timecards and then print those timecards to a printer or export them to Excel. Of course if you’ve enabled employee PIN’s or Passwords then your employees will need to enter their PIN before they can view their timecard.
by Mark Nemtsas | Jan 7, 2011 | How To, Tips and Tricks
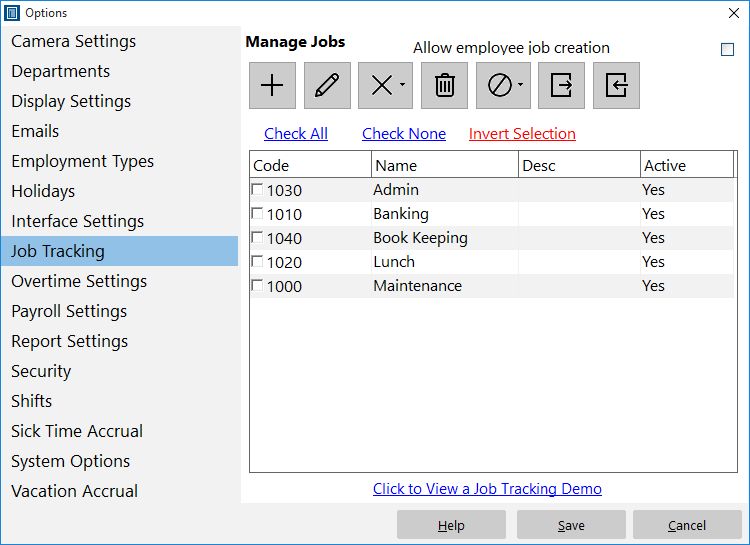
Job Tracking Setup Screen
Generally you’d want a time clock administrator to setup new jobs for the Time Clock MTS Job Tracking System but sometimes it’s useful to allow employees to create their own jobs on the fly during the work day. If you work from daily job sheets that have many small jobs that might just run to a few hours you would quite likely find this useful because of the lower administrative overheads. This Time Clock MTS How To Article covers how to allow your employees to create new jobs.
To allow employees to create new Time Clock MTS jobs just follow follow the steps shown below.
- Log into Time Clock MTS as the administrator. How you log in as the administrator was covered in this Time Clock MTS How To Article.
- Go to the Tools->Options->Job Tracking screen and you’ll be shown the screen at the top of this article.
- Check the Allow Employee Job Creation checkbox.
Once checked employees entering a new job code when clocking or switching jobs will automatically create new job with that job code. Of course the time clock administrator will need to then name and manage the jobs appropriately via the Tools->Options->Job Tracking screen.
Page 10 of 16« First«...89101112...»Last »