by Mark Nemtsas | Nov 20, 2012 | How To, Tips and Tricks, Using the Software
Time Clock MTS has some features that allow you to create multiple employees for your time clock system quickly and accurately. This can significantly speed up the process of setting up Time Clock MTS for the first time as well as adding new employees to an existing system. It can also help to greatly reduce data entry errors when creating new employees.
This Time Clock MTS How-To Article takes you through the process of creating four new employee records using the Export Employee Data and Import Employee Data features within Time Clock MTS.
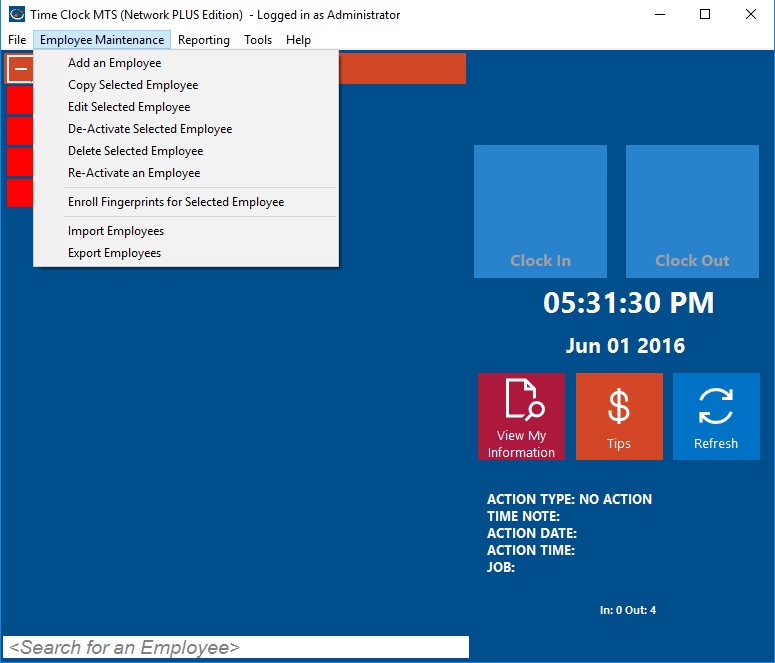
Figure 1 – The Export Employees Menu
1. Export Your Existing Employees to Microsoft Excel
This process relies on you having some existing employees in your Time Clock MTS database and that you have Microsoft Excel installed on your computer. Log into the Time Clock MTS Administrator program as the admin and go to the Employee Maintenance->Export Employees menu (see the image above).
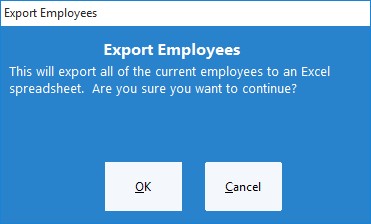
Figure 2 – Confirm Export Employees Action
2. Confirm the Export Employees Action
Time Clock MTS will ask you to confirm the export employees action (see the image above). Click the OK button to proceed.
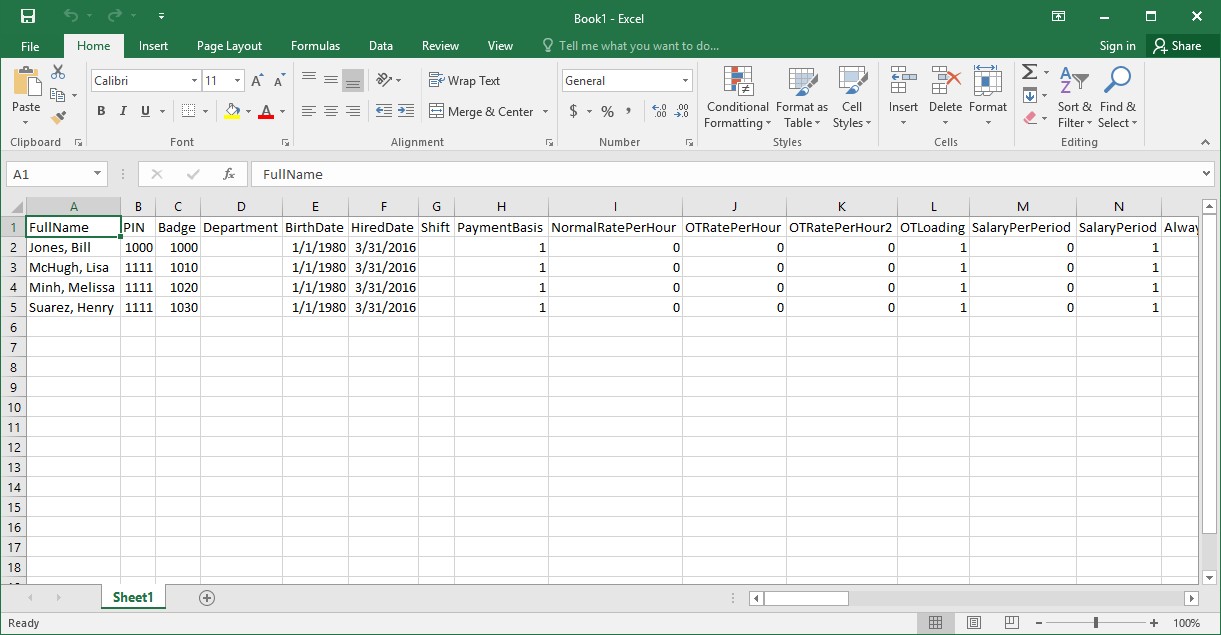
Figure 3 – Exported Employee Data
3. View the Exported Employee Data
A Microsoft Excel window will appear containing your existing employee data (see the image above). It is important to realize that Time Clock MTS uses the Employee Badge as the unique identifier for each employee. The consequence of this is if you change the Badge numbers of the employees in your exported data to new numbers and import that data back into Time Clock MTS it considers them to be entirely new employees.
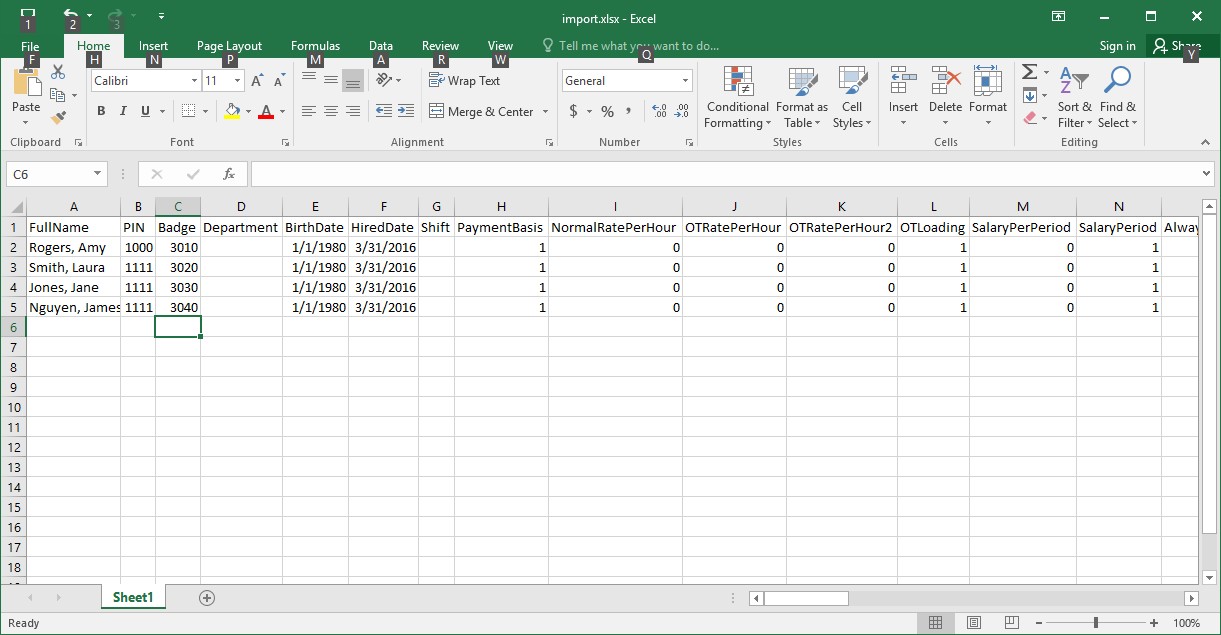
Figure 4 – New Employee Data
4. Edit the Exported Employee Data
We’re going to change the employee name column of each exported employee and (most importantly) give each one a new badge number. You can see what this might look like in the image above. You should note that at this step you could create copies of your employee data rows and create as many new employee records as you like, conversely you could delete export rows and create fewer new employees than you exported. The choice is yours. In this example we exported 4 employees and we’re going to create four new ones.
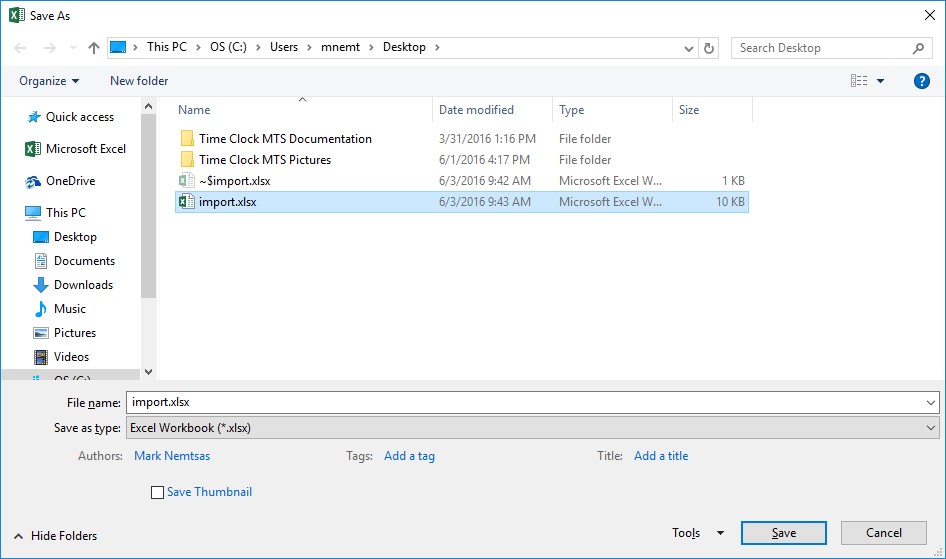
Figure 5 – Saving the Employee Data
5. Save the New Employee Data
The next step is to save the Microsoft Excel spreadsheet that contains your new employee data. Note the location where you save it because you’ll need to know the location in the following steps. In our example I saved the spreadsheet to a folder on my Windows desktop (see image above).

Figure 6 – The Import Employees Menu
6. Import the New Employee Data Back into Time Clock MTS
While still logged into Time Clock MTS as the administrator go to the Employee Maintenance->Import Employees menu (see above).
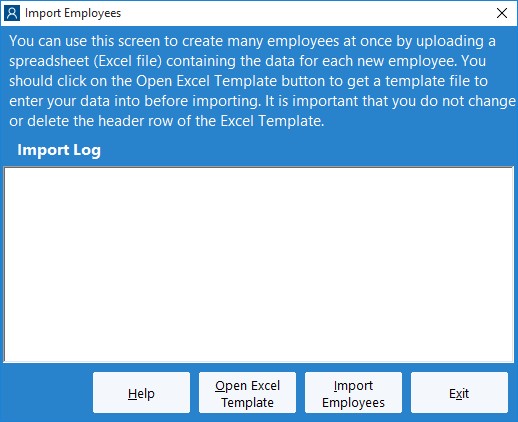
Figure 7 – The Import Employees Screen
7. Select the New Employee Data Spreadsheet
On the Import Employees screen (shown above) click the Import Employees button. This will allow you to navigate to where you saved your new employee data in Step 5. Once you’ve found it open the file.
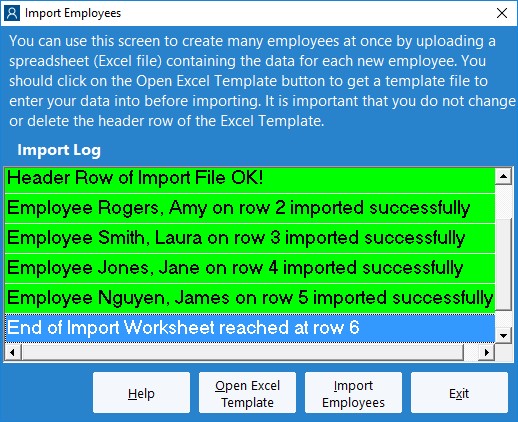
Figure 8 – Import Employees Complete
8. Watch the Employee Import Process
Time Clock MTS will now import the new employee data from the spreadsheet. As it imports each employee a message will be displayed on the Import Employees screen telling you whether that employee was created successfully or not. When the process is complete the Import Employees screen may look something like the image shown above. Note that each new employee is reported as being imported successfully.
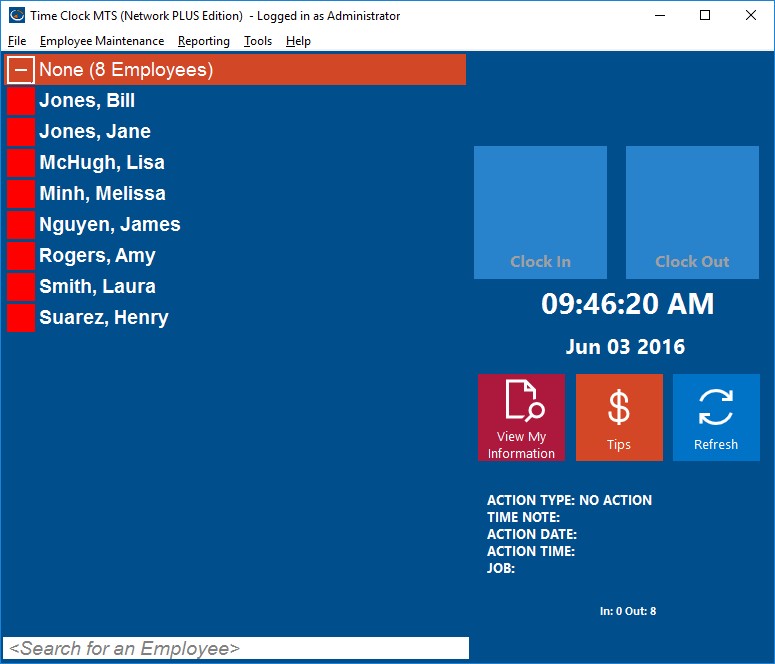
Figure 9 – The New Employees
9. View Your New Employees
The final step is to exit out of the Import Employees screen by clicking the Exit button. When we are returned to the employee time clock we can see that the new employees are present on the employee list.
Important Note
If you happen to try to import an employee whose badge number matches the badge number of an employee that is already present in your Time Clock MTS database do not worry. The Import Employee process will not import that employee and leave your existing employee information intact.
by Mark Nemtsas | Nov 10, 2012 | How To, Using the Software
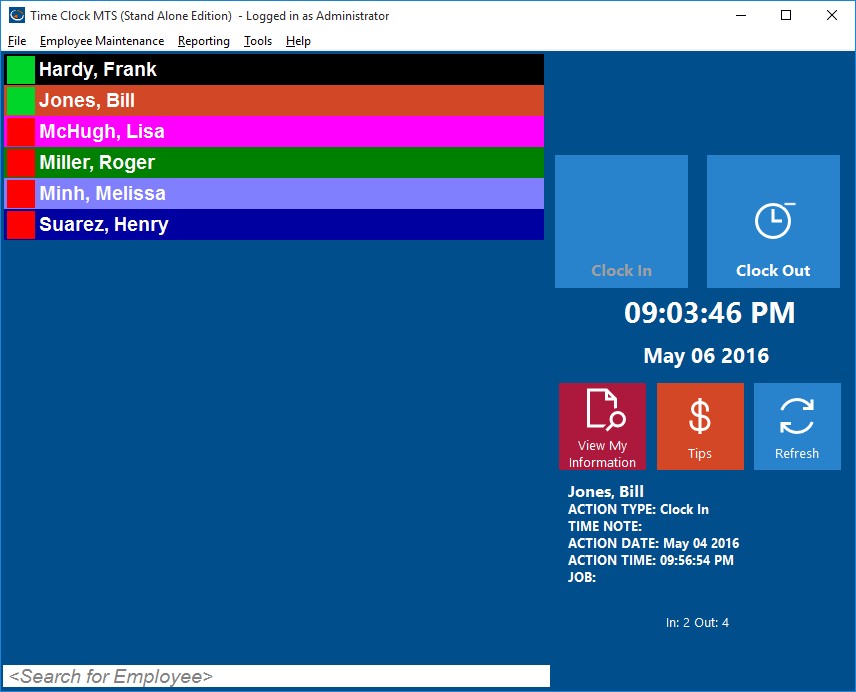
Each employee can be given a display color to make them easier to find.
Version 4 of our Timeclock Software includes a new feature to allow you to highlight employees on the employee list with a color. You can see what this might look like on the image above. You’ll need to be using the Employee List Interface to see the effects of this in your time card software. Setting up Time Clock MTS to show background colors for employees is pretty simple. Here’s how to do it.
- Log into the Time Clock MTS Administrator program as the administrator.
- Select the employee you want to change the background color for and then select the Employee Maintenance->Edit Selected Employee menu.
- On the Employee Information Screen click the Choose Color button.
- Choose a color from the color picking window that appears.
- Click the Save Employee button to save the change.
- When you return to the main time clock screen you should see that the employee is now highlighted with your selected color. Please note that while you have the employee selected in the list the highlighted color will not be displayed.
by Mark Nemtsas | Nov 7, 2012 | How To, New Features, Using the Software
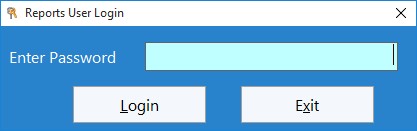
The release of Version 4 of Time Clock MTS introduced what we’re calling the “Reports User”. The Reports User can log into Time Clock MTS with their own password and run payroll reports but not perform any administrative functions. The really powerful thing about the Reports User is that they can log into the Time Clock MTS administrator program AND the Time Clock MTS client program to run reports. This means that there’s no need to have continual access to the employee time clock software administrator computer (or the administrator password) when someone needs to run payroll, activity, or job time reports.
This Time Clock MTS How To Article covers how the Reports User is setup and how you’d go about logging in as that user.
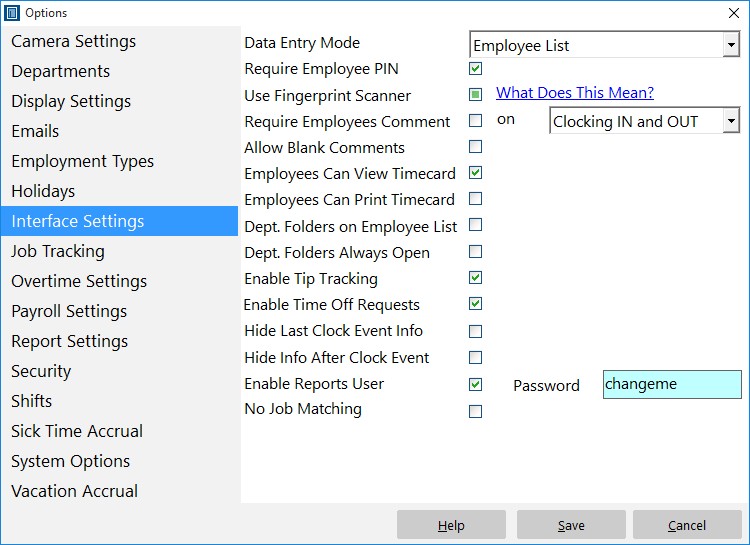
Use this screen to control how employees punch in and out and how Time Clock MTS looks.
- Log into the Time Clock MTS as the administrator.
- Go to the Tools->Options->Interface Settings screen (see image above) and check the Enable Reports User checkbox.
- Enter a password for the Report User. The password must be between 6 and 10 characters long and can only contain letters, numbers, and the underscore character.
- Click the Save button to save the changes.
- Log out of the administrator account using the File->Log Off Administrator Account.
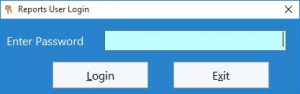
This screen is used by report users to login with their password.
- The Reports User may now log in using the client or administrator software using the File->Log in as Reports User menu. They’ll need to enter the Reports User password to be able to log in (see above).
The Report User can access all reporting functions via the Reporting menu. This includes all of the payroll reports that can be accessed from the Payroll Reports. Don’t forget that the Reports User needs to log out of Time Clock MTS using the File->Log Off Reports User Account.
by Mark Nemtsas | Aug 9, 2012 | How To
This Time Clock MTS How To Guide explains the process of moving your employee attendance database to a different location. This is useful if you do not want to store your valuable time clock data on your local computer but rather on your network server where the file is backed up and more secure.
1. Close All Time Clock MTS Clients
The first step is to close all Time Clock MTS client programs. If a client is still connected to the Time Clock MTS database you are trying to move then it will not be able to be moved.
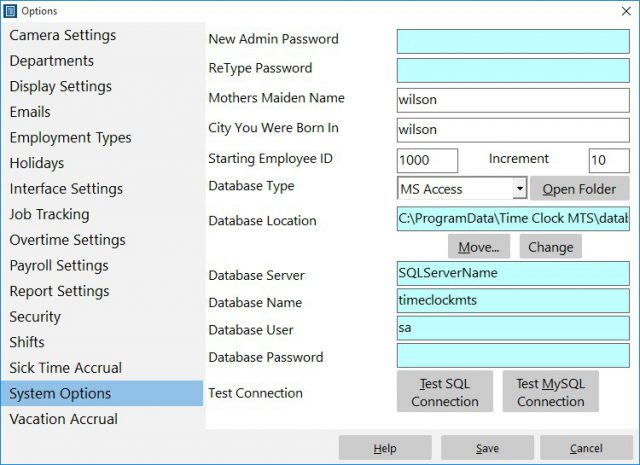
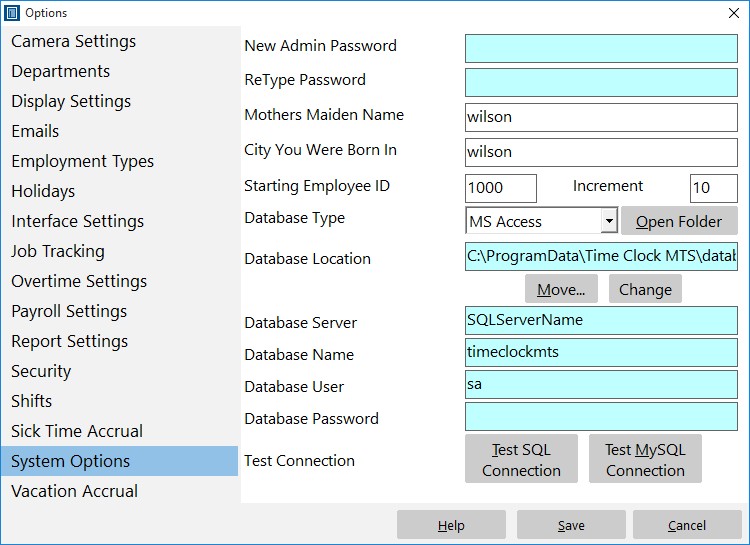
Figure 1 – The System Options Screen
2. Navigate to the System Options Screen
The next step is to log into Time Clock MTS administrator program as the administrator and go to the Tools->Options->System Options screen. On this screen we can see that the database location is on the local c:\ drive. To move this file click the Move button.
3. Select the New Database Location
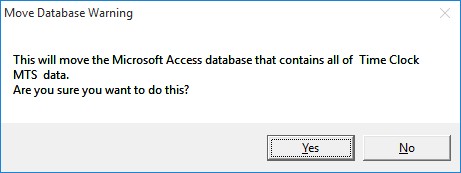
Figure 2 – Confirm Database Move
Confirm the move action by clicking Yes on the screen above.
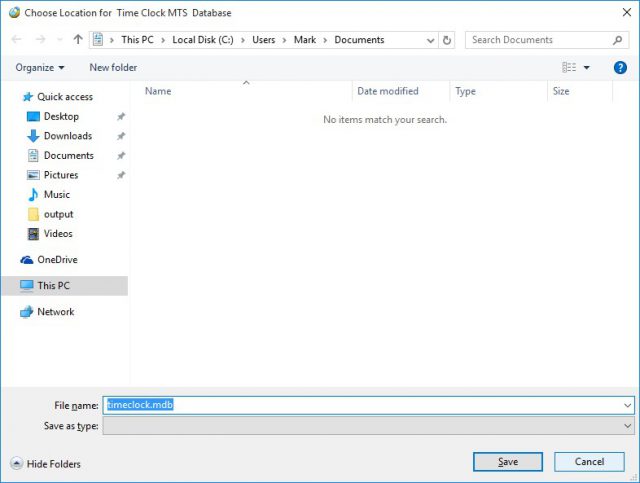
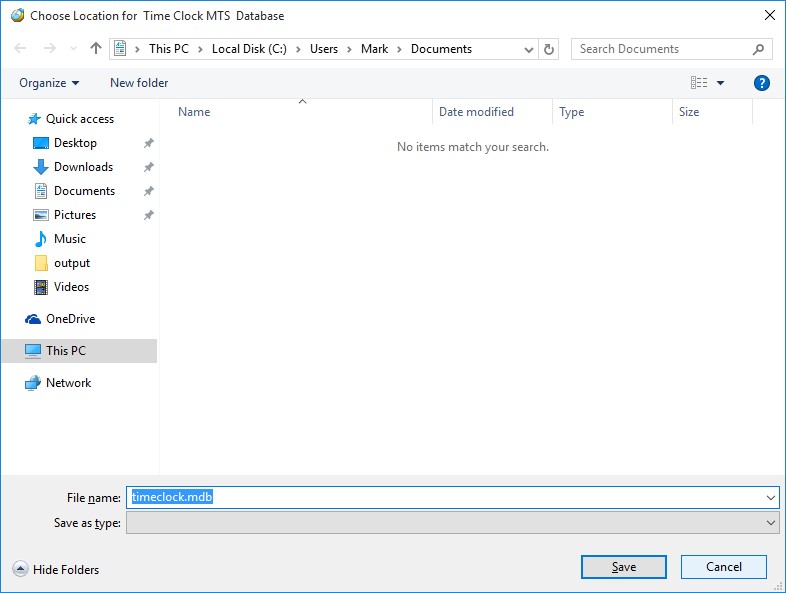
Figure 3 – Select a Location
We’ll then be shown a folder browser window similar to the one above. In our example we’ve prepared a network drive that we’re going to move the Time Clock MTS to. It can be seen at the lower left of the above screenshot and is called “Time Clock MTS” and has been mapped to the X:\ drive. We should note that Time Clock MTS must have full/read write permissions on the folder that you’re going to store the Time Clock MTS database in.
We’re going to click on the new database folder now.
4. Save the New Location
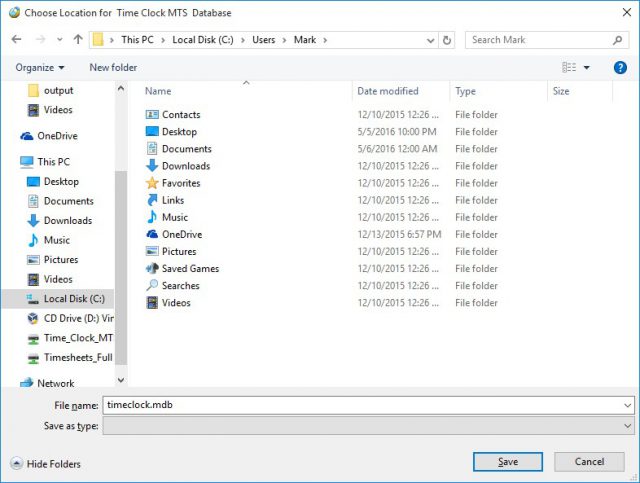
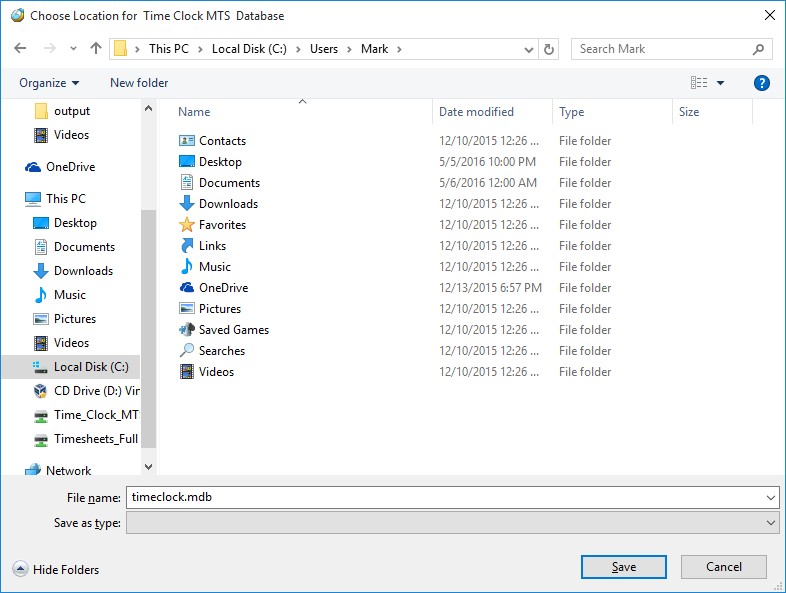
Figure 4 – Location Selected
Once the new location is chosen the folder browser window looks like the screenshot shown above. We’re going to confirm the move by clicking the Save button.
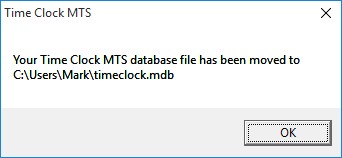
Figure 5 – Database Move Successful
The folder browser window will now close and Time Clock MTS will display a message similar to the one above informing us that the database has been moved. This message can be acknowledged by clicking the OK button.
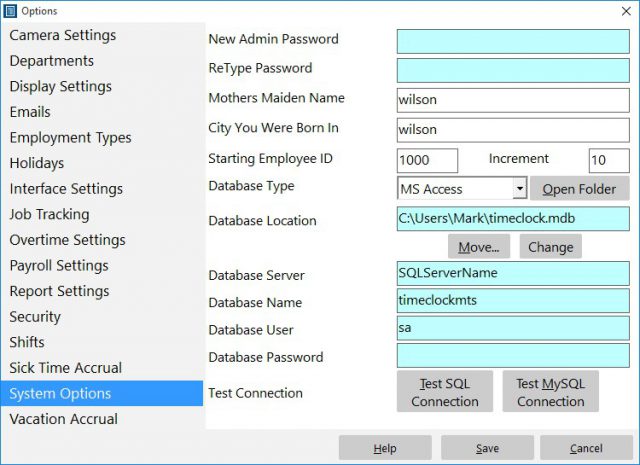
Figure 6 – New Database Path
We’ve now been returned to the System Options screen. We can see that the Database Location has been changed to our selected location.
Moving the Time Clock MTS database is now complete. Note that the next time you run any Time Clock MTS clients you’ll be asked to connect to a database and you’ll need to navigate to this new location on the client computers.
by Mark Nemtsas | Apr 23, 2012 | How To, Tips and Tricks
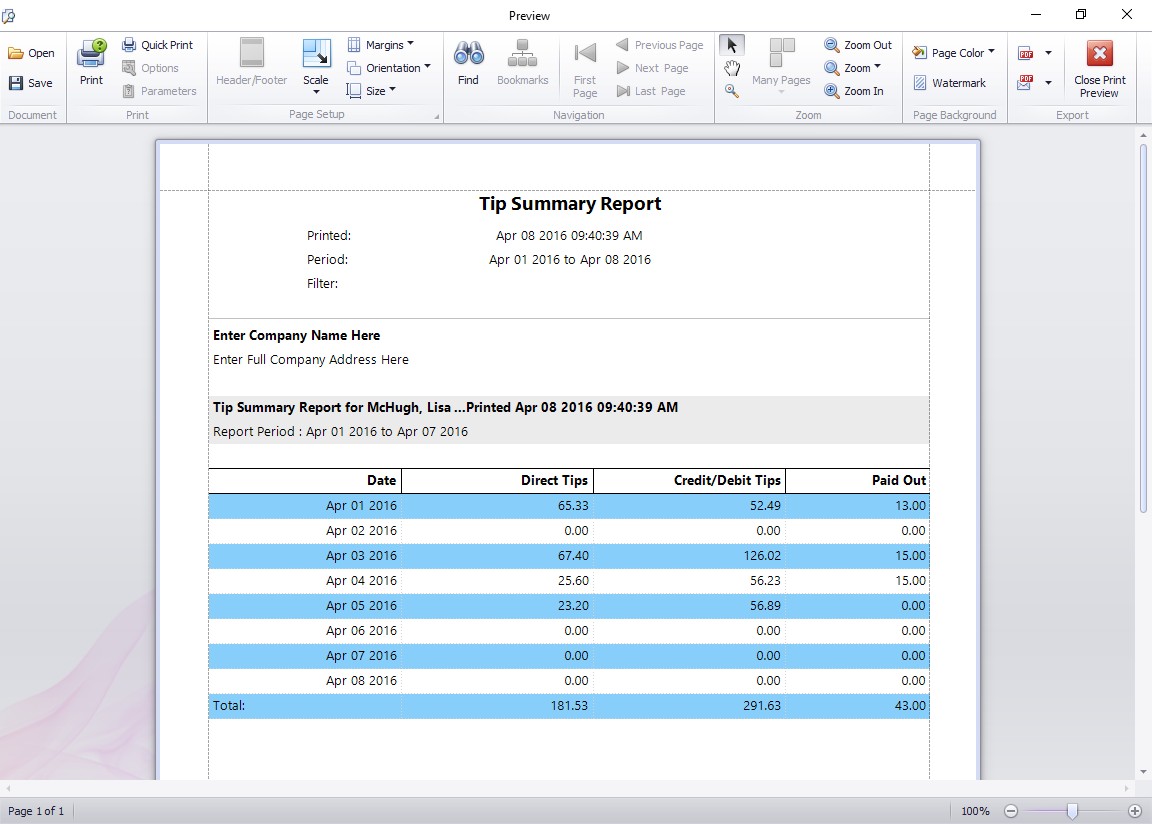
The Tip Summary Report
This Time Clock MTS How To Article covers how you can run reports on employee tips. There are three main employee tip reports in our tip tracking software and this how to article describes each in detail. Employee Tip reports can be run from the Reporting->Payroll Reports screen and you must be logged in as the Time Clock MTS administrator to access the reports. As is normal with most other Time Clock MTS reports you can run any of the tip based reports for a date range, one or many employees, or by department.
The Tip Summary Report
The Tip summary report (shown above) gives a day to day breakdown of tips for each employee. This includes a daily report on tips received directly, credit/debit card tips received, and tips paid out to others.
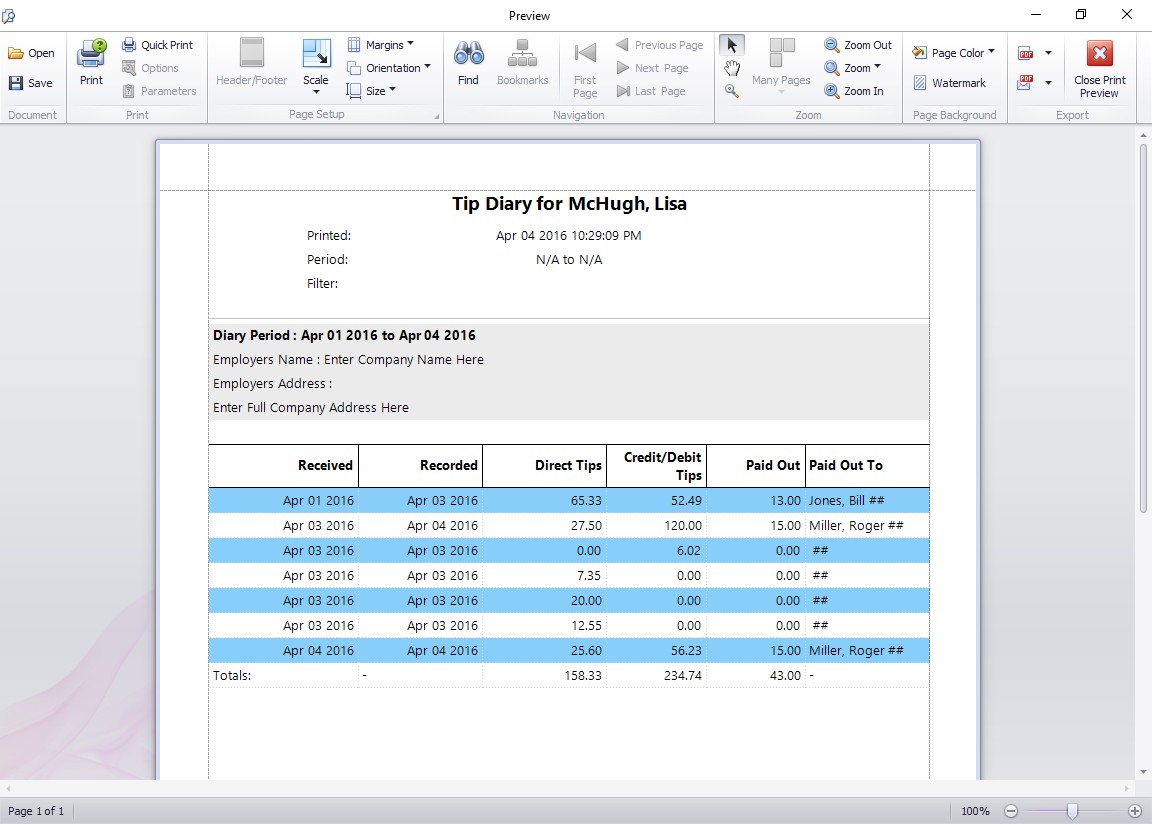
The Employee Tip Diary Report
The Employee Tip Diary Report
The employee tip diary report gives full details of each entry made by the employee into their tip diary across the reporting date range. Totals are then displayed for each type of tip over the reporting period. This report is very similar to Form 4070A Employee’s Daily Record of Tips which is available from the IRS.
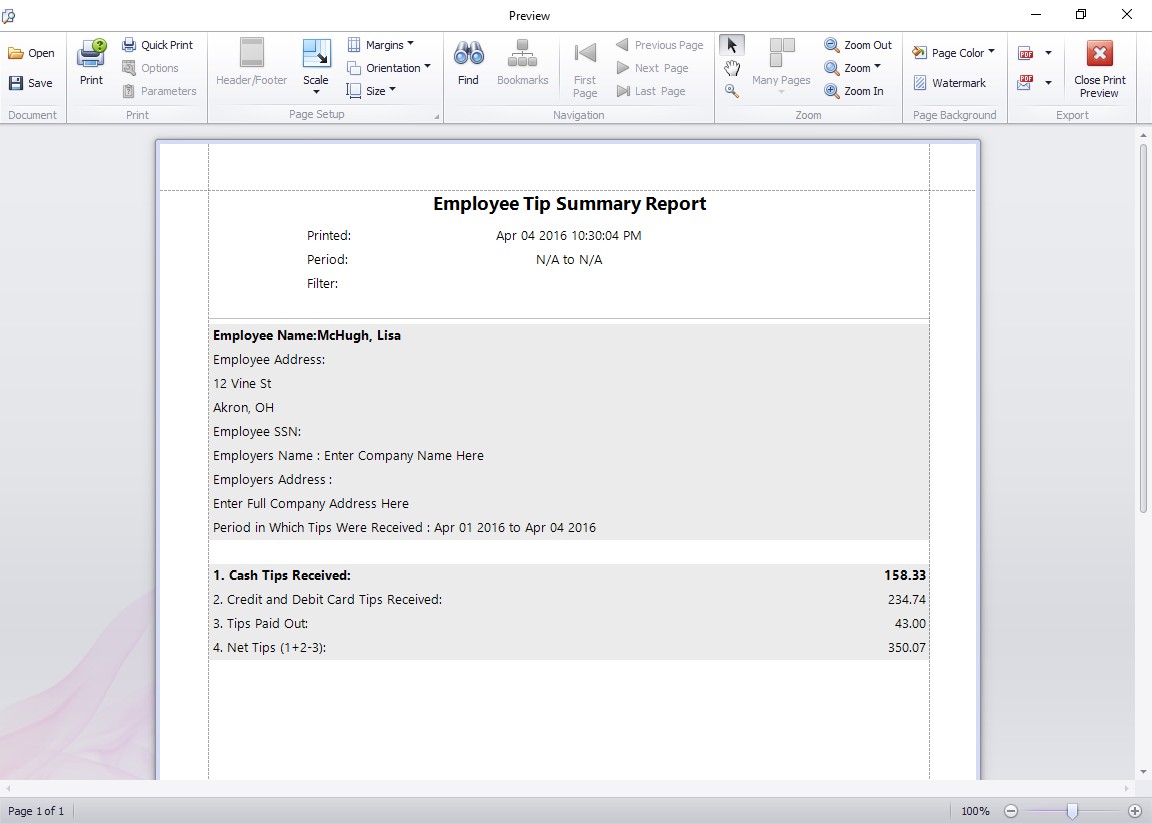
The Employee Tip Diary Summary Report
The Employee Tip Diary Summary Report
The employee tip diary summary report produces a very easy to read summary of the employee tip activity over the selected reporting range. Totals are displayed for each type of tip over the reporting period. This report is very similar to Form 4070 Employee’s Report of Tips to Employer which is available from the IRS.
by Mark Nemtsas | Apr 18, 2012 | How To
This Time Clock MTS How To Article covers how employees can record a tip using the Time Clock MTS employee tip tracking system.
- The first step is to log in as the Time Clock MTS administrator and enable tip tracking. This was covered in the how to article How to Setup Employee Tip Tracking.
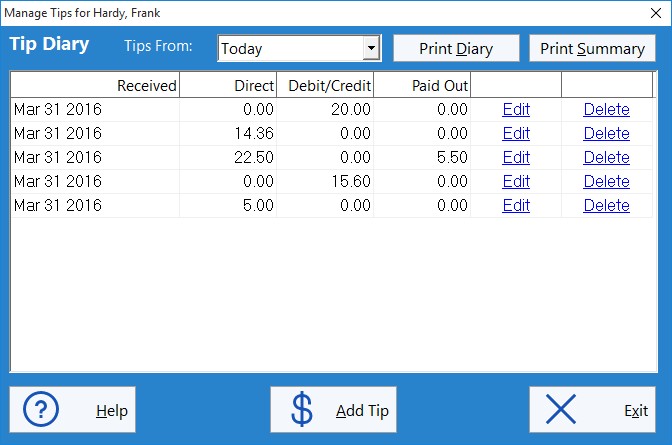
- Employees will now be able to see the Employee Tip Tracking button on the time clock. To enter a tip they should click this button and they’ll be shown the Employee Tip Diary which can be seen in the image at the top of this article.
- The Employee Tip Diary is used by employees to add, edit or delete employee tips. To add a new tip employees must click the Add Tip button.
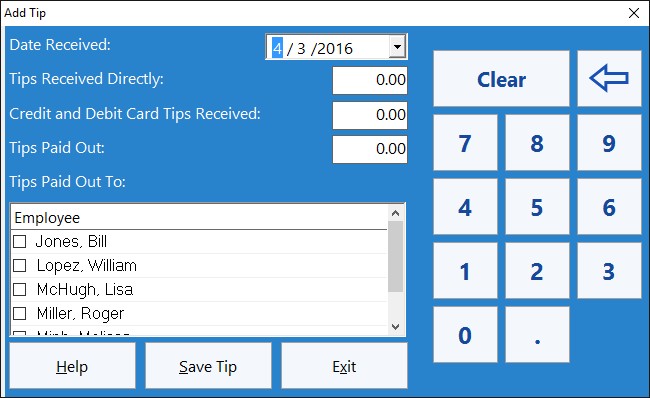
The Add Tip Screen
- The Add Employee Tip screen (shown above) allows employees to enter details of a tip or gratuity that they’ve received. The details of the tip (date received and cash or credit amount) are entered into the fields on the left side of the form. Data can be entered via a keyboard or via the numeric keypad on the right.
- If the employee has paid out the tip to other employees they should enter an amount into the Tips Paid Out field and then select the employee(s) paid out to from the employee list box.
- When the employee is happy with the details of the tip to be added they must click the Save Tip button and the tip will be added the employee’s tip diary.