by Mark Nemtsas | Aug 29, 2013 | How To, Using the Software
A user of Time Clock MTS wanted to export their time clock data to Proliant Payroll Service. Proliant forwarded their import file requirements to me and it turns out that Time Clock MTS can export directly to Proliant using the built time clock export file format creator.
Proliant Time Clock Export Format 1
The first format Proliant can import is an aggregate format that is simply a line per rate type per employee. For example, Employee badge 146 works 40 hours of regular time and 10 hours of overtime during the week. The company’s code for regular earnings is R1 and the code for overtime is O1. The resulting record in the time clock output file would be:
“146”,”E”,”R1″,40.0
“146”,”E”,”O1″,10.0
Here’s how you’d setup an export format to produce this data:
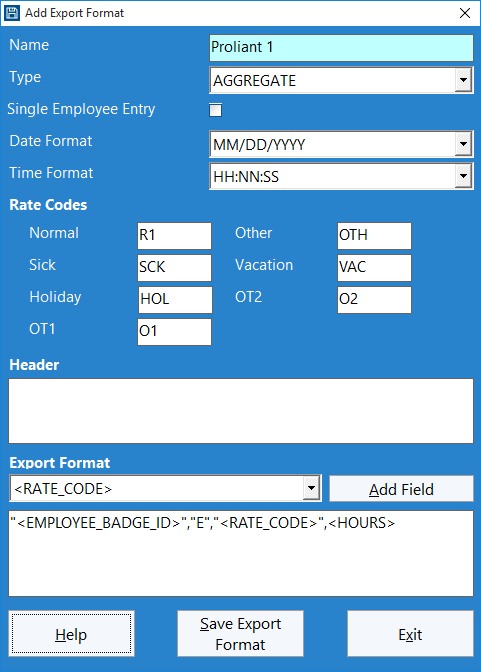
Proliant Data Export Format 1
Note that we’ve set the format type to AGGREGATE and the “E” field is a hard coded field required by Proliant.
Proliant Time Clock Export Format 1
The second format Proliant can accept is line by line listing of all time punches across a time period including the punch dates and times. For example, an employee with badge ID of 51 works the following hours in a week:
- 8/1/2013, In : 9:30AM, Out: 5:30PM
- 8/2/2013, In : 9:00AM, Out: 5:00PM
- 8/3/2013, In : 8:45AM, Out: 10:45AM
- 8/3/2013, In : 10:45AM, Out: 4:45PM
- 8/4/2013, In : 9:00AM, Out: 5:00PM
- 8/5/2013, In : 8:30AM, Out: 4:30PM
A resultant data file for this would be:
“51”,”E”,”Reg”,8.0,,,,,,,,,,,”8/1/2013 9:30:00″,”8/1/2013 17:30:00″
“51”,”E”,”Reg”,8.0,,,,,,,,,,,”8/2/2013 9:00:00″,”8/2/2013 17:00:00″
“51”,”E”,”Reg”,2.0,,,,,,,,,,,8/3/2013 8:45:00″,”8/3/2013 10:45:00″
“51”,”E”,”Reg”,6.0,,,,,,,,,,,”8/3/2013 10:45:00″,”8/3/2013 16:45:00″
“51”,”E”,”Reg”,8.0,,,,,,,,,,,”8/4/2013 9:00:00″,”8/4/2013 17:00:00″
“51”,”E”,”Reg”,8.0,,,,,,,,,,,”8/5/2013 8:30:00″,”8/5/201316:30:00″
Here’s how you’d setup an export format to produce this data:
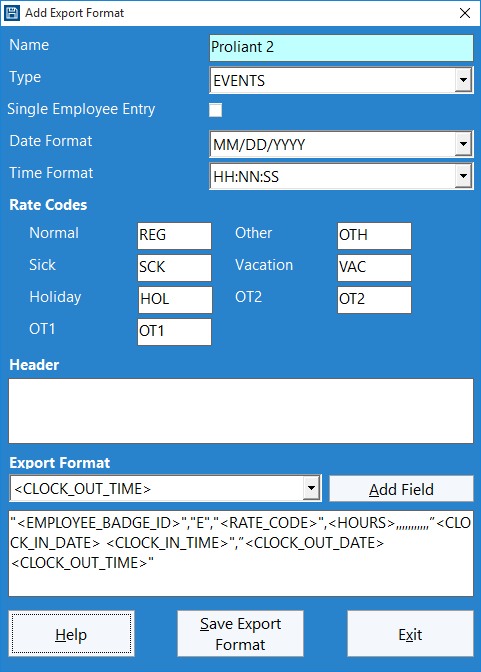
Proliant Data Export Format 2
Note that we’ve set the format type to EVENT and the “E” field is a hard coded field required by Proliant.
by Mark Nemtsas | Feb 19, 2013 | How To
I received an email this week from an existing Time Clock MTS user who has the stand-alone edition of the software. He wanted to start using the software on more than one computer and also wanted to move the administrator software to another computer and use the original computer as a Time Clock MTS Client. It was a good question so I thought it was worth posting up my reply here for future reference.
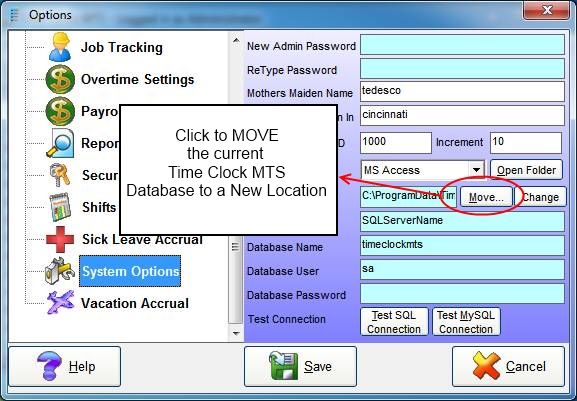
System Options Screen – Moving the Existing Database
- Share a folder on your network server that is accessible to both computers. Then move your Time Clock MTS database to the folder using the Tools->Options->System Options screen while logged in as the Time Clock MTS administrator. You can move the database by clicking the MOVE button from this screen. See image above for more information.
- Uninstall Time Clock MTS from that computer.
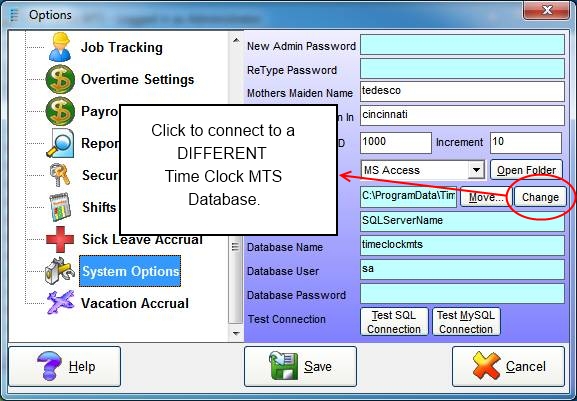
System Options Screen – Connect to a Different Database
- Install Time Clock MTS on the other computer. Run it for the first time and setup a new password. Log into that Time Clock MTS as the administrator and connect to the database you moved in step one above by going to the Tools->Options->System Options screen and clicking the CHANGE button.
- Purchase an upgrade to the Time Clock MTS Network Edition. You can do that on this page.
- Install the Time Clock MTS client on the existing computer, when you run it the first time it should be connected to the database you moved in step one above.
- Register both computers with the new registration keys you’ll get when you make the upgrade purchase.
There’s a couple of things to note with this process. In Step 1, make sure the folder you share gives all Time Clock MTS computers full read/write/create/delete permissions on that folder. In Step 5 the Time Clock MTS client should pick up the settings from the administrator software that used to be on it. However, in some cases it may not and you’ll be shown a First Run Wizard that will take you through the process of connecting to an existing Time Clock MTS database.
by Mark Nemtsas | Nov 28, 2012 | How To, Using the Software
Employee time off requests in Time Clock MTS are a convenient and easy way for employees to request time off. The time clock administrator can then approve or deny these requests and automatically create time punches for the requested time off period. In previous Time Clock MTS How-To Articles I talked about setting up Time Clock MTS to allow employees to request time off, how employees place time off requests, and how the time clock administrator uses the time off request management screen. This article covers how an administrator approves a time off request.
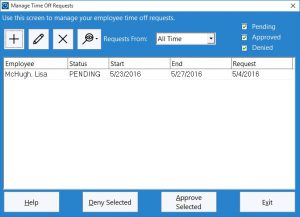
Figure 1 – The Administrator Time Off Requests Screen
1. The Administrator Time Off Requests Screen
To approve a time off request the time clock administrator must use the Administrator Time Off Requests screen. This is accessible from within the Time Clock MTS Administrator program via the Tools->Time Off Requests menu. You can see this screen above. To approve a request click on it in the list (it must have the PENDING status) and click on the Approve Selected button.
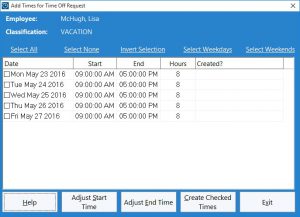
Figure 2 – The Add Times for Time Off Request Screen
2. The Add Times for Time Off Request Screen
The Add Times for Time of Request screen (see above) is then displayed. This screen is used to create time punches for each of the days the employee has requested off. The screen allows users to select what days in the period to create punches for, and allows adjustment of the start and end time of each day in the time off period. Links are provided above the list to allow users to select different days during the period, for example, all the days, the weekdays, or the weekends.
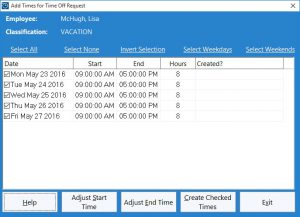
Figure 3 – All Times Selected
3. Select the Times to Create
The first step is to select the days to create punches for. In this example we shall create a clock in and out for each day. To do this we can either check the boxes next to each day in the list or click on the Select All link. Note in the image above that all days have the checkbox next to them ticked. Note also that we’ve selected the last day in the period because we want to change the end time for this day (perhaps employees work a shorter day on Friday).
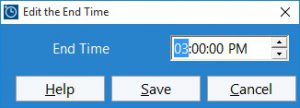
Figure 4 – Changing End Time to 3:00PM
4. Adjust the Start / End Times
Once the day you want to adjust the time for is selected click the Adjust Start Time or Adjust End Time buttons as required. In this case we’re going to adjust the end time to 3:00PM. This is done using the screen shown above. Click the Save Time button to save the change.
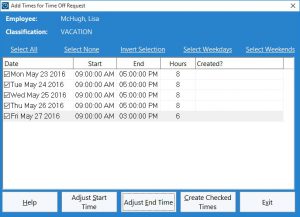
Figure 5 – Ready to Go!
5. Create the Time Punches
In the screenshot above you can see that we’re ready to go. All of the days we want to create punches for are checked and the end time for Friday has been changed to 3:00PM. We can now go ahead and create the time punches by clicking the Create Checked Times button. Time Clock MTS will now attempt to create punches for each of the selected days.
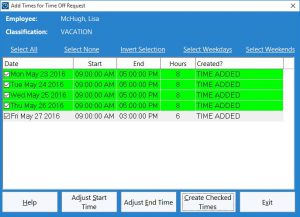
Figure 6 – Times Added
6. Check the Times
As Time Clock MTS creates (or cannot create) a clock in and out for each day the color of each day in the list will change and a message will be displayed alongside of each . Days that successfully have a clock in and out created will be green while those that do not will be red. Above you can see that we’ve created all of the time punches successfully for this time off request. We can now click the Exit button and we’ll be shown the Approval Notes screen.
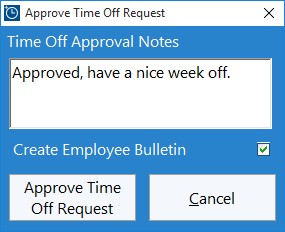
Figure 7 – Entering Approval Notes
7. Enter Approval Notes
On this small screen (see above) we can add some notes to go along with the approval for the time off request. If the Create Employee Bulletin checkbox is ticked then the employee will be shown the approval notes via a popup bulletin the next time they clock into Time Clock MTS. Click the Approve Time Off Request button to proceed back the Administrator Time Off Requests screen. Note that at this stage you can still click the Cancel button to stop the approval process but any time punches created in the previous steps will not be deleted.
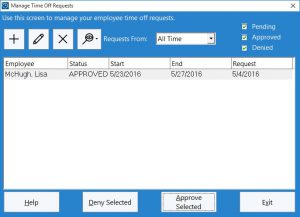
Figure 8 – Request Approved!
8. You’re Done!
In the screenshot above we can see that the time off request now has a status of APPROVED. The time off request approval process is now complete.
by Mark Nemtsas | Nov 27, 2012 | How To, Using the Software
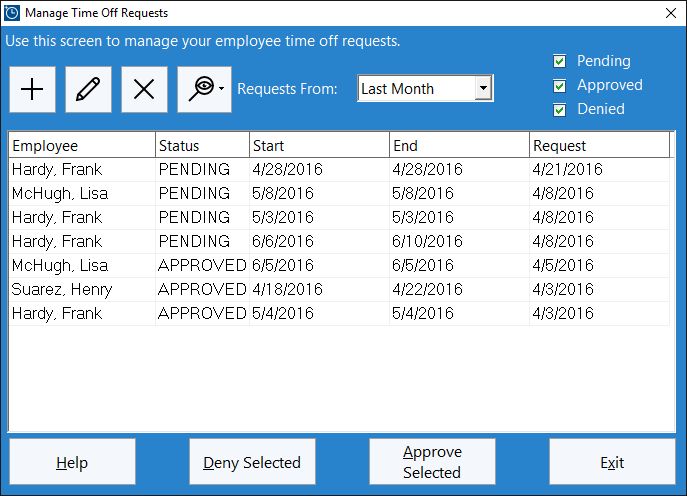
Figure 1 – The Administrator Time Off Requests Screen
The Administrator Time Off Requests screen (see the screenshot above) is used by the Time Clock MTS administrator to manage all employee time off requests. This Time Clock MTS How-To guide takes users through the various functions of this screen.
The Administrator Time Off Requests screen can be reached via the Tools->Time Off Requests menu item from within the Time Clock MTS Administrator program.
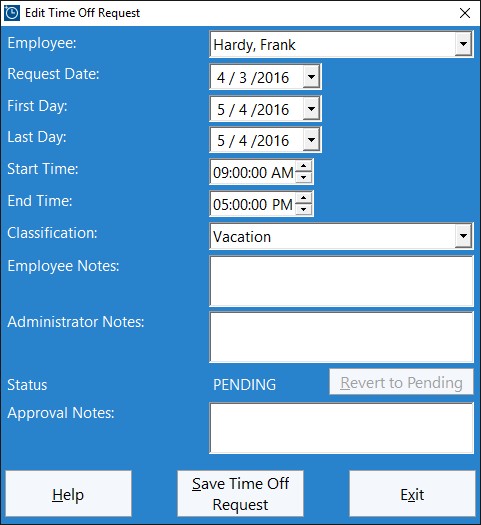
Figure 2 – Adding / Editing an Employee Time Off Request
Creating a New Employee Time Off Request
Under certain circumstances it could be useful for administrators to be able to create new employee time off requests. This could simply be because the method of employees placing time off requests is handled outside of your time clock software or perhaps the administrator wants to create a number of employee clock in / out pairs quickly and easily. To create an employee time off request take the following steps.
- Click the
 button.
- Enter the details of the time off request on the add/edit time off request screen (see Figure 2 above). Care should be taken to ensure the correct dates are selected for the first and last day and that the time classification is set appropriately.
- When the details of the time off request are correct click the Save Time Off Request button to save the time off request.
Editing an Existing Employee Time Off Request
- On the Administrator Time Off Request screen (see Figure 1 above) click on the time off request to be edited and then click the
 button. Alternatively an existing time off request can be edited directly by double clicking on it in the time off request list.
- The details of the time off request will then be displayed on the add/edit time off request screen (see Figure 2 above). Changes can be made as required on this screen. Note that an APPROVED or DENIED time off request can be moved back to PENDING status using this screen.
- When the details of the time off request are correct click the Save Time Off Request button to save the time off request.
Deleting an Employee Time Off Request
- On the Administrator Time Off Request screen (see Figure 1 above) click on the time off request to be deleted.
- Click the
 button. Confirm the deletion of the time off request when prompted.
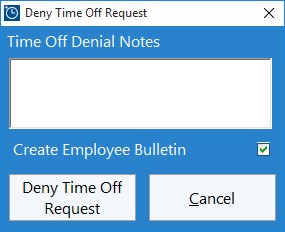
Figure 3 – Deny Time Off Request Screen
Denying an Employee Time Off Request
- On the Administrator Time Off Request screen (see Figure 1 above) click on the time off request to be denied. Note that you’ll only be able to deny requests that are in the PENDING state.
- Click the Deny Selected button.
- The Deny Time Off Request screen will then be displayed (see Figure 3 above).
- Enter any notes giving the reason for the denial of the request into the notes area. Check the Create Employee Bulletin checkbox to have the employee notified of the denial of their request via an Employee Bulletin.
- Click the Deny Time Off Request to confirm the action or the Cancel button to cancel the denial process. Pressing either button will return the user to the Administrator Time Off Requests screen.
Approving an Employee Time Off Request
This process is described in the subsequent how-to article approving a time off request in Time Clock MTS.
by Mark Nemtsas | Nov 22, 2012 | How To, Using the Software
Employees who are recording time and attendance data with Time Clock MTS can request time off using the software. These requests are approved or denied by the time clock administrator and employees can be automatically notified via the Time Clock MTS Employee Bulletin System.
This Time Clock MTS How-To guide takes employees through the process making a time off request. Before employees can make a time off request the time clock administrator must have configured Time Clock MTS to allow employees to request time off.
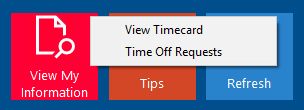
Time Off Requests Drop-Down
1. Select the Employee Name
Select the employee name from the Time Clock MTS employee list (employee time off requests can only be made if you’re using the Employee List Interface). Then click on the View My Information button and select the Time Off Requests option from the drop-down menu.
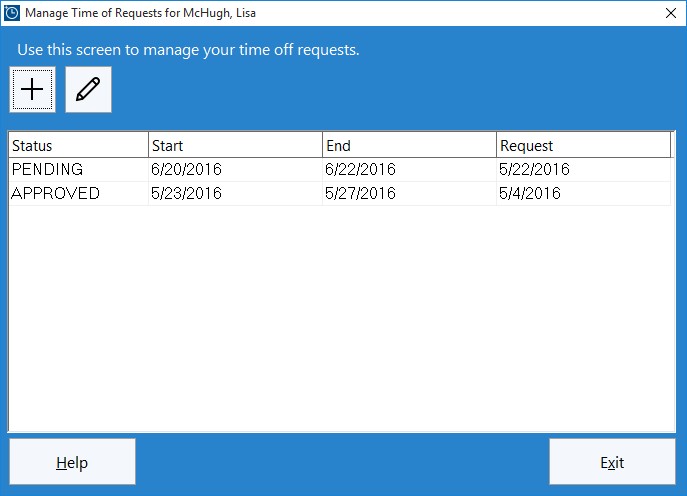
The Employee Time Off Request Management Screen
2. Click the New Time Off Request Button
You’ll then be shown the Employee Time Off Request Management screen (see above). To place a new time off request click the  button.
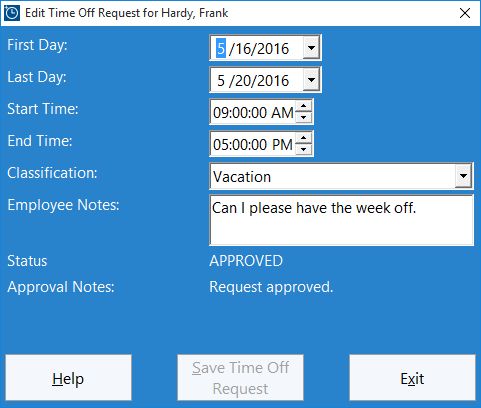
Adding a Time Off Request
3. Enter the Time Off Request Details
Above you can see the screen used to enter your time off request details. You can enter a first day and last day as well as a start time and end time. So, if for example you wanted to take time off from 2 November 2012 to 9 November 2012 you’d enter 11/2/2012 to 11/9/2012 for your first and last day. If your normal work start time and end time is 9:00AM and 5:00AM you’d enter that for your start / end times. Conversely, if you wanted to request the morning off on 2 November 2012 you’d enter 11/2/2012 for your first day and last day and 9:00AM / 12:00PM for the start time/end time.
The Classification allows you to pick what type of time you want to take off. This could be Normal Time, Sick Time, Vacation Time, or Other time depending on how your Time Clock MTS software is setup.
The Employee Notes area can be used to enter a note that will be displayed to the administrator when they are considering your time off request.
The final display fields of interest are Status and Approval Notes. The Status lets you know if your request has been approved or not, while the notes contain any communication from your time clock administrator when they approved or denied your request.
4. Save the Request
To save your time off request click the Save Time Off Request button. You’ll then be returned to the Employee Time Off Request Management Screen where your new time off request will be listed along with a PENDING status. The time clock administrator will be notified of your time off request and once approved or denied you’ll be notified by an employee bulletin the next time you clock into Time Clock MTS.
by Mark Nemtsas | Nov 22, 2012 | How To, Using the Software
Our employee timeclock software, Time Clock MTS, now allows employees to request time off. These requests are communicated to the time clock administrator who can then approve or deny the requests and (if required) automatically create time punches for approved requests. This can greatly streamline the time off request process and help reduce data entry errors.
This Time Clock MTS How-To guide takes you through the process of setting up Time Clock MTS to allow employees to request time off.
Note that employees can only request time off when you are using the Employee List Interface of Time clock MTS.
1. Log in as the Administrator
The first step is to log into the Time Clock MTS Administrator program as the administrator and go to the Tools->Options->Interface Settings screen (see the image below).
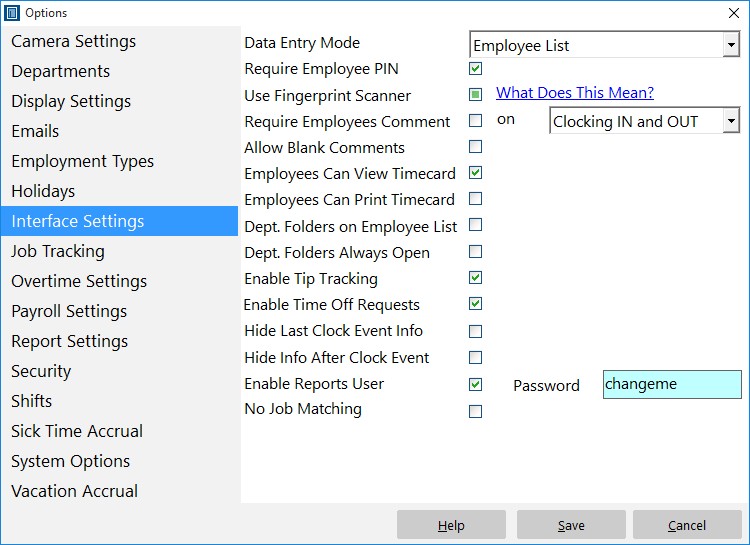
The Interface Settings Screen
2. Check the Enable Time Off Requests Checkbox
When on the Interface Settings screen check the Enable Time Off Requests checkbox and click the Save button to save the changes.
3. Log off Administrator Account
Log out of Time Clock MTS administrator mode by using the File -> Log Off Of Administrator Account menu.

Time Off Requests Drop-Down
4. Employees Can Request Time Off
Employees can now request time off by selecting their name in the Employee List and clicking on the View My Information button and then selecting the Time Off Requests option from the drop-down menu. You can see what this looks like above.
That concludes this How-To article. For more help you should take a look at the Time Off Requests help topics.
Page 6 of 16« First«...45678...»Last »


