by Mark Nemtsas | Feb 6, 2013 | User Testimonials
I’ve never actually paid to have Time Clock MTS reviewed but over the years several websites have done so anyway. I don’t actually put that much stock in time clock software reviews because I believe you should “live” with the software for at least one payroll cycle to see how it will work day-to-day in your business. That being said, a review can be useful as a starting point when you’re just starting out looking for a time clock system for your business. Here’s some reviews of Time Clock MTS that I am aware of.
Don’t forget that many of our users have provided time clock user reviews over on our User Reviews pages. In addition, we’ve had some more comprehensive user reviews over the years too, including from a lawyer, a Church, and a consultant.
Finally, I’m also aware of non-English reviews of Time Clock MTS. Here’s a Portuguese Time Clock Review and a Video Review in Spanish. I don’t pretend to speak either of those languages so I hope they are positive. In any event. as Oscar Wilde said, The only thing worse than being talked about is not being talked about.
by Mark Nemtsas | Jan 15, 2013 | User Testimonials
Michael Satterwhite of Cohen & Associates P.C. sent me an email recently explaining how their office uses our time card software and his personal history with the product. Here’s what he had to say:
by Mark Nemtsas | Jan 3, 2013 | User Testimonials
The First Church in Cambridge has been using Time Clock MTS since 2010. Karen McArthur, a minister at the Church was kind enough to do a user time clock review of Time Clock MTS and let me know what sort of benefits they’ve seen from using it.
by Mark Nemtsas | Dec 23, 2012 | Tips and Tricks, Using the Software
Time Clock MTS includes two distinct methods for employees to clock in and clock out. The first uses the Employee List Interface and the second uses the Keypad Interface. Let’s have a closer look at each method of clocking in and clocking out using Time Clock MTS or you could watch the clock in video tutorial.
Clocking In and Clocking Out with the Employee List Interface
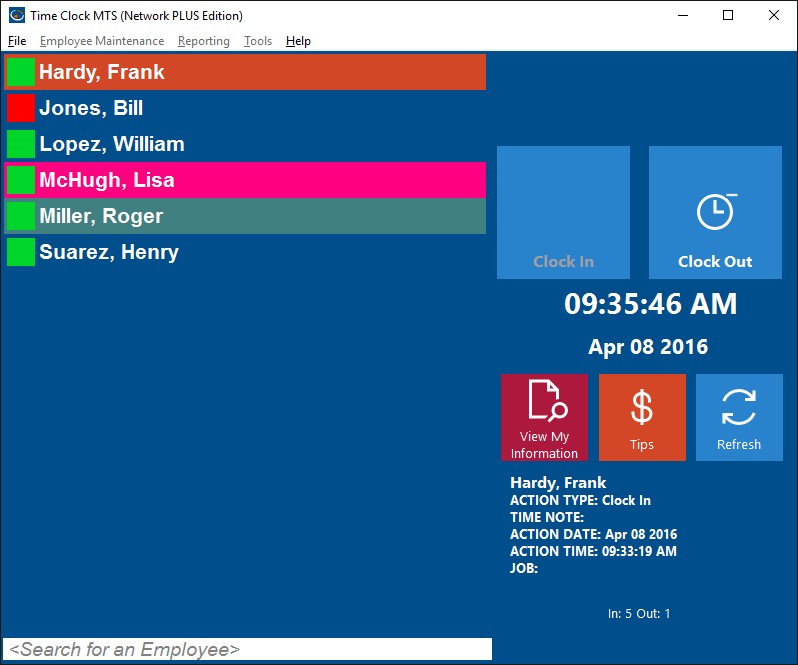
The Employee List Interface
Above you can see the employee list interface of Time Clock MTS. On the left is a list of employees. Next to each employee is a status icon showing the current status of that employee. For example, a green icon indicates an employee is clocked in and a red icon indicates they are clocked out. On the right hand side of the screen are the clock in / out buttons, below that the View My Information button and the status information area. You can use a bar code reader, a magnetic card reader, or even RFID reader with this screen to automatically punch employees in or out without the need to touch a mouse or keyboard. Using the employee list interface to clock in and out is very simple. Just follow these steps:
- Click on the employee’s name in the list who needs to clock in or clock out. Alternatively they can use one of the data input devices (like a bar code scanner) to read an appropriately encoded barcode, magnetic card, or RFID badge and the employee will be punched in or out immediately.
- Depending on their current status either the Clock In or Clock Out button will become active.
- Click on the Clock In or Clock Out button to clock the employee in or out. The employee may have to enter their PIN to complete the action.
- If the clock in or clock out action is successful the status icon for that employee will change and the status information area will show the details of the clock in or clock out.
Clocking In and Clocking Out with the Keypad Interface
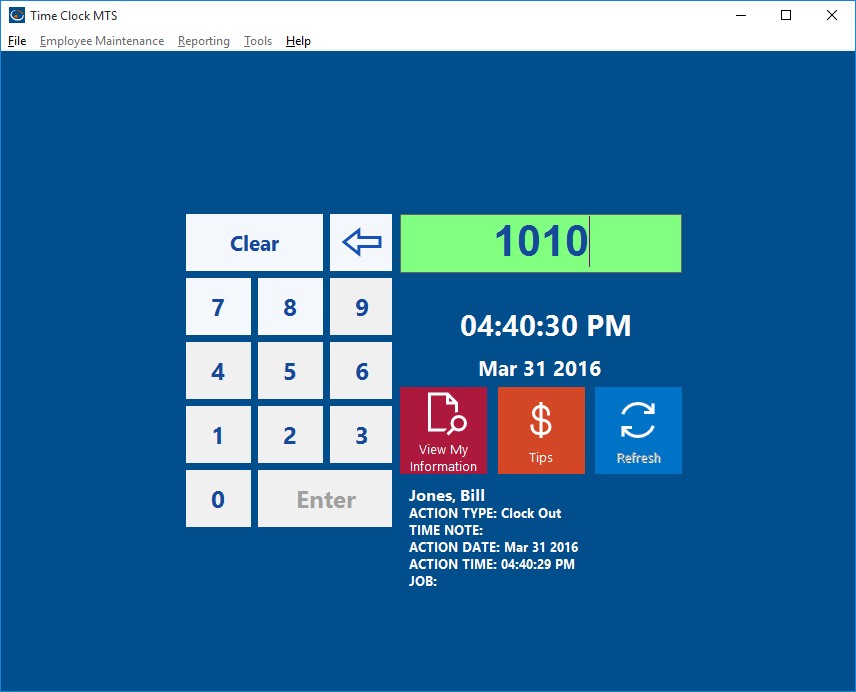
The Keypad Interface
Above you can see the keypad interface of Time Clock MTS. On the left is a virtual numeric keypad and on the right is the employee badge number field (at top) and below that is the status information area. The keypad interface is designed to be used with a touchscreen. Like the employee list interface it can also be used with a barcode reader, a magnetic swipe card reader, or even a prox card. Using the keypad interface to clock in and out couldn’t be any easier.
- An employee needs to know their Time Clock MTS badge number to be able to use the keypad interface. All they need to do is enter their badge number using the virtual timeclock keypad (or via a regular keyboard or one of the other data devices I described above). Then they need to click the Enter button. The employee may then have to enter their PIN to complete the action.
- Time Clock MTS will then check the status of employee with the entered badge number and clock them in or clock them out as appropriate. The status information area will show the details of the employee clock in or clock out.
So, there you have it. Two different methods for employees to clock in and clock out of Time Clock MTS. Both are simple to do and quick for your employees to learn and one of them will, no doubt, be suitable for your company.
by Mark Nemtsas | Dec 8, 2012 | Tips and Tricks, Using the Software
You might think that setting up a barcode time clock is expensive and complicated. If you did think that, you’d be wrong. By my estimation you could setup an old Windows computer with Time Clock MTS, a simple USB barcode scanner, and some “home made” barcode employee badges for under $275. Here’s how I’d do it.
1. Designate a Computer to be your Time Clock Computer
Almost every business has computers these days, and in my experience it’s not unusual for one of these computers to either be highly under-utilized or retired and switched off all of the time. It’s one of these computers that you should use as your time clock station. Cost? In most cases $0.
Total Cost to Date: $0
2. Purchase and Install Time Clock MTS
Time Clock MTS can be purchased for $99 (US). This can track up to 500 employees on a single computer. Once you’ve installed Time Clock MTS, create an employee for each employee you want to track. You could also create many employees at once very easily using the method I describe here. Once you’ve created all of your required employees, print out a Badge Number Report from within Time Clock MTS.
Total Cost to Date: $99 (US)

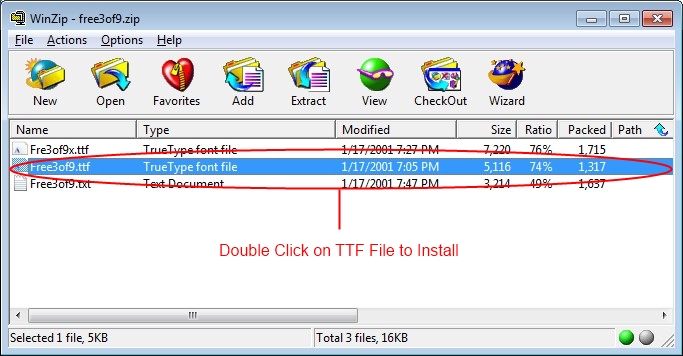
Figure 1 -Installing a Barcode Font
3. Create Your Employee Badges
Creating barcodes is easy. And free. You can do it from within pretty much any word processor or spreadsheet these days. All you need is a barcode font. Yes, a font, just like Arial, or Times New Roman, or Trebuchet. If you do a Google search for “free barcode font” you’ll get a ton of results, and to save you the trouble I did a search and found that this barcode font is free, and works just fine. To install the font just download the ZIP file, unzip it and double click on one of the files with the ttf extension (see the image above). Windows will then auto-magically install the font.
Once the font is installed you can select it from a font selector in your word processor or spreadsheet of choice. You can see below that I created some simple barcodes in Microsoft Word. Note that the barcode font I selected is “Free 3 of 9”. Here’s the tricky bit. You need to decide whether you’re going to use Time Clock MTS in Employee List Mode or Keypad Interface Mode. The barcodes required for each mode are slightly different. If, for example you have an employee with the ID 1000 then the barcodes need to be encoded as follows:
Employee Interface Mode: +1000=
Keypad Interface Mode: 1000
As you can see the only difference is + and = characters around the employee ID on the Employee Interface barcodes. As a further example, if we have an employee with the ID 9999 then the two different barcode formats would be:
Employee Interface Mode: +9999=
Keypad Interface Mode: 9999
When you know the format you need as you create your bar codes you’ll want each barcode to correspond to a Time Clock MTS badge number, the same badge numbers we got from the Badge Number Report we printed out in Step 2 above. In the image below I’ve created badges for the numbers 1010 and 1020 (these badges are for the keypad interface because there’s no + or = characters in them).
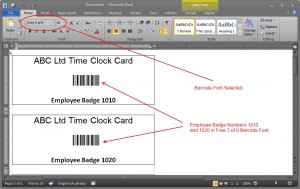
Figure 2 -Simple Employee Badge Design
Now the design of the badge is entirely up to you, in the image above I’ve done a very simple design in Microsoft Word. Given that you’re doing this in a word processor or spreadsheet the sky is the limit really. Once the design is complete print out the cards. I’d suggest a heavy card stock of some type and using a laser printer. I’d also suggest laminating the cards if possible. In any event the cost of the cards is going to be minimal. Less that $0.50 each. For arguments sake let’s say we’re creating 75 badges for 75 employees, giving a cost of $37.50 for the badges.
Total Cost to Date: $136.50
4. Buy a USB Barcode Scanner
Barcode scanners are not expensive items these days. It’s a well known and mature technology and the bugs have well and truly been ironed out. All you need to do is ensure that the scanner comes with the right sort of interface (most likely USB) to plug into your PC and that it can read the barcode that you’re using. Barcodes come in many different types, with names like Code 39 (or type 3 of 9), Code 128, and EAN 2. The free barcode font we downloaded in step 3 is Code 39. While I do need to warn you to check that the reader will be able to understand your barcode type, in the VAST majority of cases readers support pretty much every type of barcode these days.
The actual type of scanner you buy is entirely up to you but I’d stick with better known brands simply for reasons of after sales support and reliability. I’ve used Symbol (made by Motorola) and Gryphon (made by Datalogic) USB Barcode scanners many times in the past and never, ever, had a problem with them. When I wrote this article these could be purchased from Amazon for $120 per unit with $10 shipping.
Total Cost to Date: $266.50
5. Install the Barcode Scanner and Configure Time Clock MTS
When your barcode scanner arrives all you should need to do is plug it into a USB port on your computer. Windows will most likely take care of the rest. You may need to install some drivers though, consult the documentation that ships with your scanner. Once installed the computer should view any data read by your barcode scanner as exactly the same as that entered by a keyboard. Don’t believe me? Try opening up a word processor or Windows Notepad on the computer and scan a barcode, you should see the characters the barcode represents appear in the word processor.

Figure 3 -The Time Clock MTS Keypad Interface
The final step in the process is to configure Time Clock MTS to work with the scanner. If you’ve decided to use the default Employee List mode of Time Clock MTS then you won’t need to configure the software at all. However, if you’ve decided to use the Keypad Interface then I’ve described in some detail how to set that up in the setting up the keypad interface mode article. This shouldn’t take you more than a few minutes.
Total Cost to Date: $266.50
6. Start Employees Clocking in and Out
Once Time Clock is working in your chose mode and you’ve printed out your barcode badges in the correct format then clocking an employee in or out is as easy as scanning one of the badges you made in step 3 above. When you scan the badge Time Clock MTS will read the badge number and then clock the employee with the corresponding badge number in or out as appropriate. Is really couldn’t be any simpler.
Grand Total: $266.50
There you have it, a barcode time clock system for under $275. In my experience a company will likely recoup up to $5 per employee per week when they start using a system like this. This recovery includes indirect costs such as no longer having to waste time using inefficient paper based systems and the associated time spent processing the data created by those systems. The recovery also includes direct costs by largely eliminating employee time clock fraud. $5 per employee per week? If you’ve got 10 employee’s you’ll get your $275 back in just over a month. 20 employees and you’ll get it back in a fortnight. Any more than 20 employees and you should be asking yourself why you’re still reading this and you haven’t started setting up such a system already.