by Mark Nemtsas | Aug 14, 2017 | New Features, New Releases
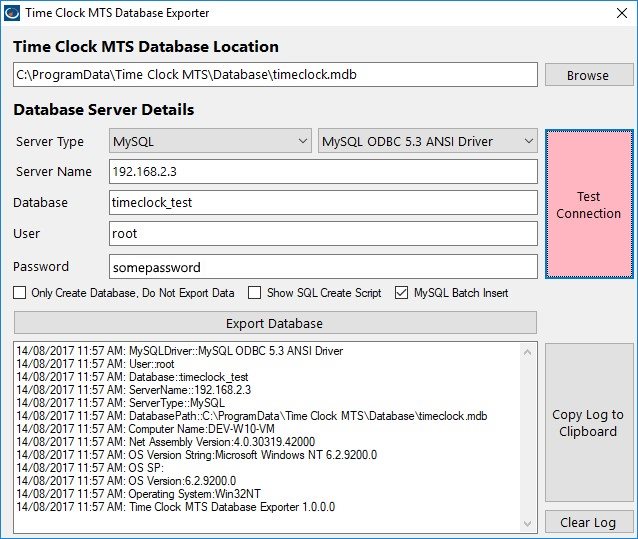
We’ve just made setting up Time Clock MTS to work with a SQL Server Database or a MySQL Database much more quicker and simpler. Our new Database Exporter tool (see the image below) can take all of your existing time clock data and send it straight to an empty SQL Server / SQL Express database or to an empty MySQL database. It makes setting up the Network PLUS Edition of Time Clock MTS a whole bunch easier, allowing your time clock to support up to 100 time clock stations and track up to 1000 employees! You can read more about the Network PLUS Edition of Time Clock MTS here.

The Time Clock MTS Data Export Tool
by Mark Nemtsas | Jun 30, 2017 | New Features, News
The release of version 6.1.1 of Time Clock MTS included a couple of brand new reports. One is aimed at users of the job tracking system, the other useful for working out what employees have (and have not) worked during a given time period.
Job Labor Breakdown Report
If your business tracks time employees spend on jobs, whether that be because you charge your customers to perform those jobs, or because you simply like to know what your employees are working on then the cost of labor is a key piece of information you need to know. The new Job Labor Breakdown Report produces a single table of information showing the time worked on each active job in in Time Clock MTS. The report further breaks the time down into normal hours, OT1 hours and OT2 hours. You can see an example of the report below.
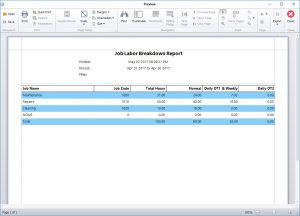
The Job Labor Breakdown Report
This information was certainly available previously in Time Clock MTS, albeit in a much more verbose fashion via the Job Cost Report. However, we’re sure you’ll agree that the new Job Labor Breakdown Report gives a more concise summary of your real job labor costs.
Active in Period Report
It can be useful as an employer to be able to quickly determine who has (or has not) worked during a given period. This might be to determine eligibility for public holidays, to help even out shift work hours, or to simply determine the size of your workforce during a given time period. The new Active in Period simply checks to see if an employee has or has not recorded any time during the reporting period and presents the information in an easy to understand table. You can see the report in the image below.
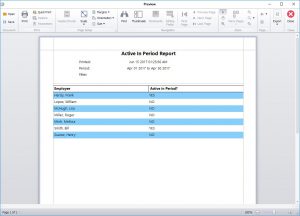
The Active in Period Report
These new reports are configured using the same report configuration screen used for all other reports. You can read more about them (and all the other reports in Time Clock MTS) in our online help system.
by Mark Nemtsas | Jun 28, 2017 | New Features, Tips and Tricks
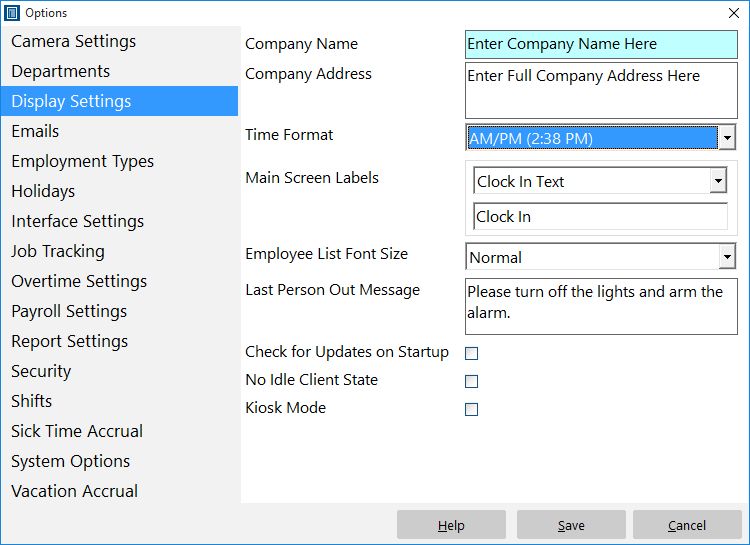
Whether you’re a store, a doctor’s practise, a dentist, a mechanic, or a factory you need to make sure your alarm is armed each day, the back door is locked, your POS system is shut down, and (of course) the lights are switched off. Recently an astute user of Time Clock MTS suggested that the software could help him make sure that all those routine end-of-day tasks that each and every business needs actually get done. How? By showing the last person to punch out a message. Great idea we thought, so we’ve gone ahead and implemented what we’re calling the Last Person Out Message.
Setting the Last Person Out Message
The Last Person Out Message is set on the Display Settings screen. See the image below and look for the Last Person Out Message text box.

Setting the Last Person Out Message
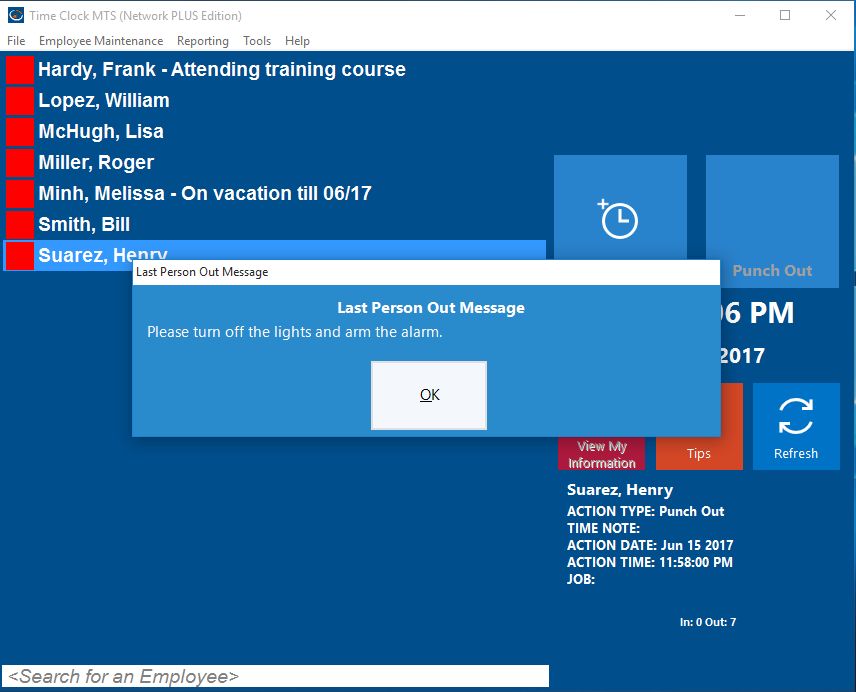
Showing the Last Person Out Message
Display of the Last Person Out Message is simple, the last person who punches out will be shown the message. See what that looks like below:
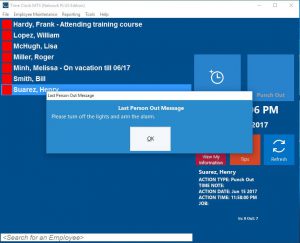
Showing the Last Person Out Message
Be aware that EVERY time the last person punches out this message will be shown, so it could be shown multiple times a day, not just once.
That’s all there is to it, make use of the Time Clock MTS Last Person Out Message to remind your employees of tasks that need to be completed when you’re closing up for the day. It really couldn’t be much easier.
by Mark Nemtsas | Jun 26, 2017 | New Features, Tips and Tricks
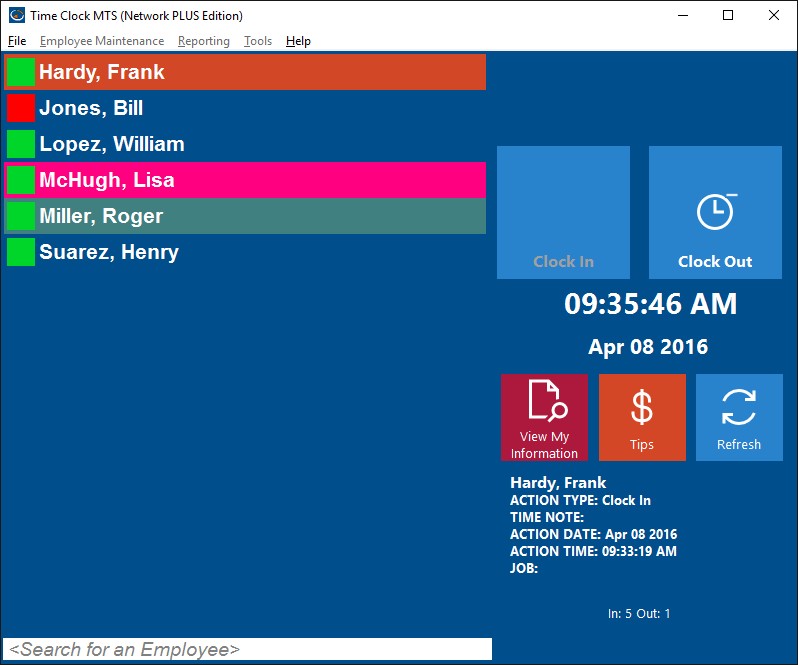
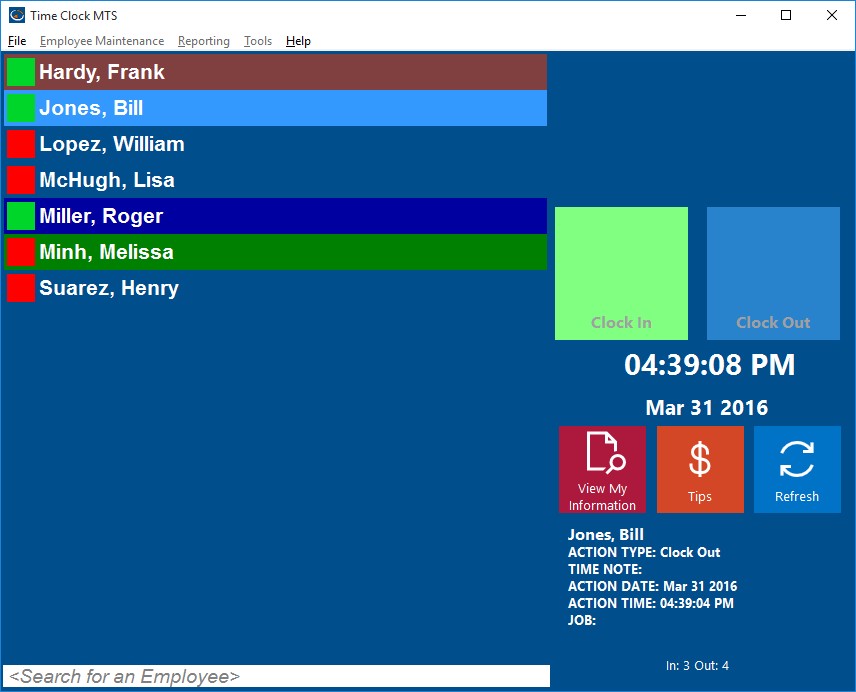
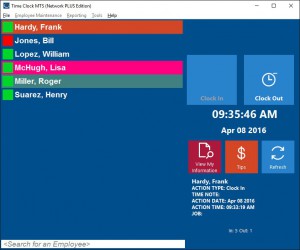
We’ve spoken previously about using Time Clock MTS as an Employee In/Out Board. Using it this way is particularly useful for two main reasons, firstly, your employees will know at a glance if someone is currently at work or not, and secondly, in the case of an evacuation due to fire or other emergency you can easily print a list of employees that are at work. However, what happens if an employee is punched in but they are on vacation and you need to know when they are back? Or what if there is an emergency and an employee is punched in but they are off-site doing a client visit or attending a training course? To handle that situation we’ve got a system called Employee List Messages. These are neat little messages that can be displayed next to an employee’s name if you’re using the Employee List Interface. Those same messages will also be displayed on the Employee Status Report which can be printed quickly in the event of an emergency.
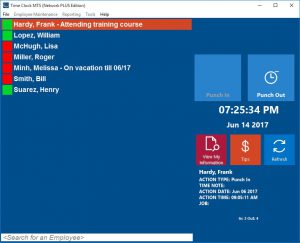
Employee List Messages in Action
Above you can see what employee list messages might look like in action. Note that Frank Hardy has a message next to his name as does Melissa Minh. You’ll see those same messages next to to the employee names when you print the Employee Status Report.
Entering Employee List Messages
Employee List Messages are controlled from the Time Clock MTS Administrator software from the Tools->Employee List Messages menu. You must be logged in as the administrator to access the menu.
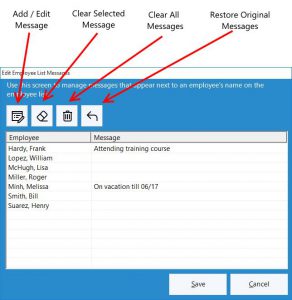
The Employee List Messages Screen
Above you can see the Employee List Messages screen annotated to explain what the toolbar buttons do. Adding a message for an employee is dead simple, just click on the employee’s name in the list and then click the Add/Edit Message button and you’ll be able to enter message for that employee using the screen below:
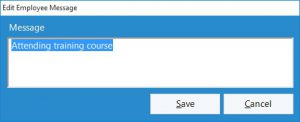
Entering a Message
Note that you can just double click on an employee’s name and you’ll be able to add or edit the message without needing to click the toolbar button first. There are some other useful buttons that make editing messages a bit easier. The Clear Selected Message button will clear the message for the selected employee, the Clear All Messages button will clear the messages for all employees. The Restore Original Messages will reload all messages if you happen to make an unfortunate mistake with the Clear All Messages button.
That’s all there is to it. Employee list messages are a great way of keeping your employees informed of the whereabouts of each other, they are also a great way of keeping an up-to-date employee location list in the case of an emergency. It’s easy to use and something that will prove to be useful to almost any Time Clock MTS user.
by Mark Nemtsas | May 18, 2016 | New Features, New Releases, News
Today sees the release of Version 6 of Time Clock MTS, the culmination of what has been 6 months of work. You’ll only have to take a quick look at the new release of the software to understand how much has changed, the biggest areas being the user interface and the reporting engine.
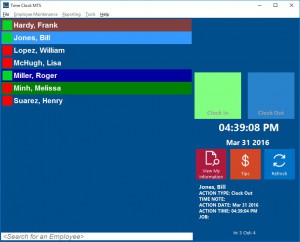
The New Employee List
User Interface
Every form and screen in Time Clock MTS has been upgraded to reflect the latest look and feel that you’re used to seeing in Windows 10 and Windows 8. I won’t bore you with the details but we’re talking about nearly 100 screens and nearly 10,000 screen components that have been improved. Additionally we’ve made just about every button, list, check box, drop down box and label bigger and easier to read, as well as using a clearer font. This makes the software much more pleasant to use on large, high resolution monitors. It’s also much easier for employees to use on touch screens, whether they have big 24” touch screens or are using a 10” screen on a Surface Pro tablet.
You’ll probably also notice that a lot more elements on Time Clock MTS screens provide more instant feedback to your actions. That’s because we’ve upgraded many components with more modern versions that provide you with more responsive interface.
The New Report Display
Reporting
We bit the bullet here and tossed out the old report display and printing engine in Time Clock MTS and re-built it from scratch. The reports you’re used to are still there, but they are now all displayed in an attractive print preview screen which allows you to customize the look and feel of your reports. There are proper tables, grid-lines, headers, footers, and pretty much anything you’d expect to see. Reports can be emailed easily directly from within the software as PDF files or via various Excel formats. Reports can also be easily exported to PDF, HTML, RTF, Excel, CSV, Plain Text and to various image formats such as JPG and GIF..
Registration Keys
The software registration key system has been overhauled. The need to enter the number of clients and employees has been removed and some smarts have been put in place to automatically fill in the registration screen if you’ve copied your registration keys from one of our emails. It certainly works more smoothly and will prevent a lot of frustration for users new and old who are trying to register their software. It should also stop the registration details being dropped from time to time as Windows rolls out major updates.
As is usual with any major version upgrade of Time Clock MTS any user with a current support contract or who has purchased it within the last 12 months is eligible for a free upgrade. You’ll receive an email explaining how to upgrade, or you can view this page for instructions. If you don’t have a current support contract you’re still eligible for a 40% upgrade discount, just contact us and we’ll give you an upgrade coupon.
Other Changes
There’s been a bunch of other things changed in the software that I won’t bother detailing in full here. You can read the full release notes here for more details. However, here’s a few key things that may be of interest:
- The system used to get the time from our internet time server has been re-written a removed to an external component.
- The Add Punch and Insert Missing Punch have been enhanced to allow for easier data entry.
- Jobs can now be entered on the Bulk Add Time screen.
- The size of text on the Employee List has been increased and an extra large text size option added.
- The employee bulletin screen and all the logic behind it have been rebuilt. The way the screen worked before was, uh, interesting, now it’s a lot more logical.
by Mark Nemtsas | Apr 1, 2016 | New Features, New Releases, News
We’ve been working on Time Clock MTS Version 6 for the last four months and as we’re coming to the conclusion of the testing phase we thought it was a good time to share some screenshots of the new version. As you can see the look and feel has changed completely and the reporting system has been completely re-written. Exciting times ahead!
Time Clock MTS Administrator Software

Client Software
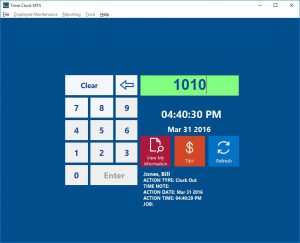
Keypad Interface
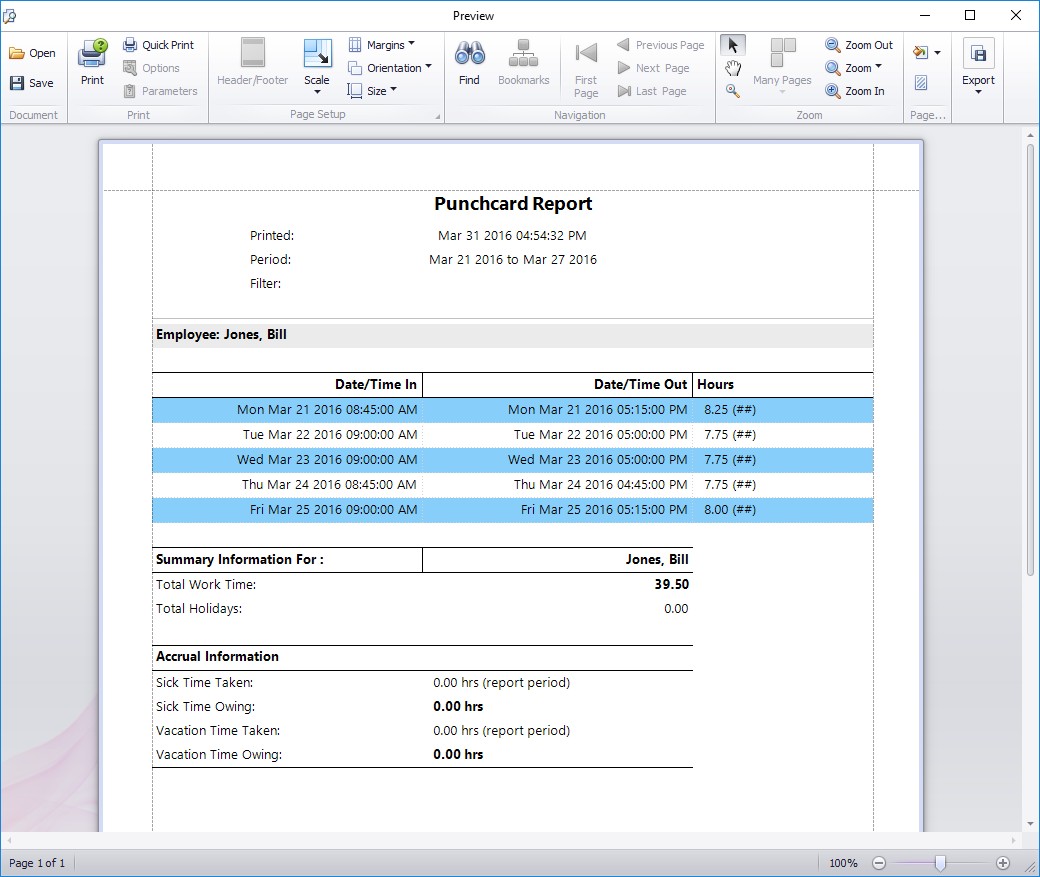
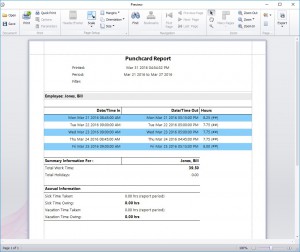
Punchcard Report