by Mark Nemtsas | Mar 17, 2018 | Tips and Tricks, Using the Software
Last weekend’s change to daylight savings time highlight a potential problem with Time Clock MTS if you do not have your Windows time settings set correctly. Here’s the steps that had to be taken to see this issue show up:
- You’re using Time Clock MTS with an internet time server.
- You DO NOT have Windows set to adjust the time automatically for Daylight Savings Time.
- To correct the time on the computer you manually adjust the system clock forward an hour.
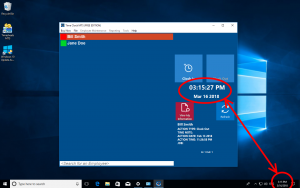
- The time display in Time Clock MTS is now 1 hour BEHIND the time shown on the system clock (see below).

Time Clock MTS clock 1 hour behind system clock
Fixing the problem is simple enough. Just take the following steps:
- Set the system time on your computer BACK one hour. It should now be one hour behind the actual time.
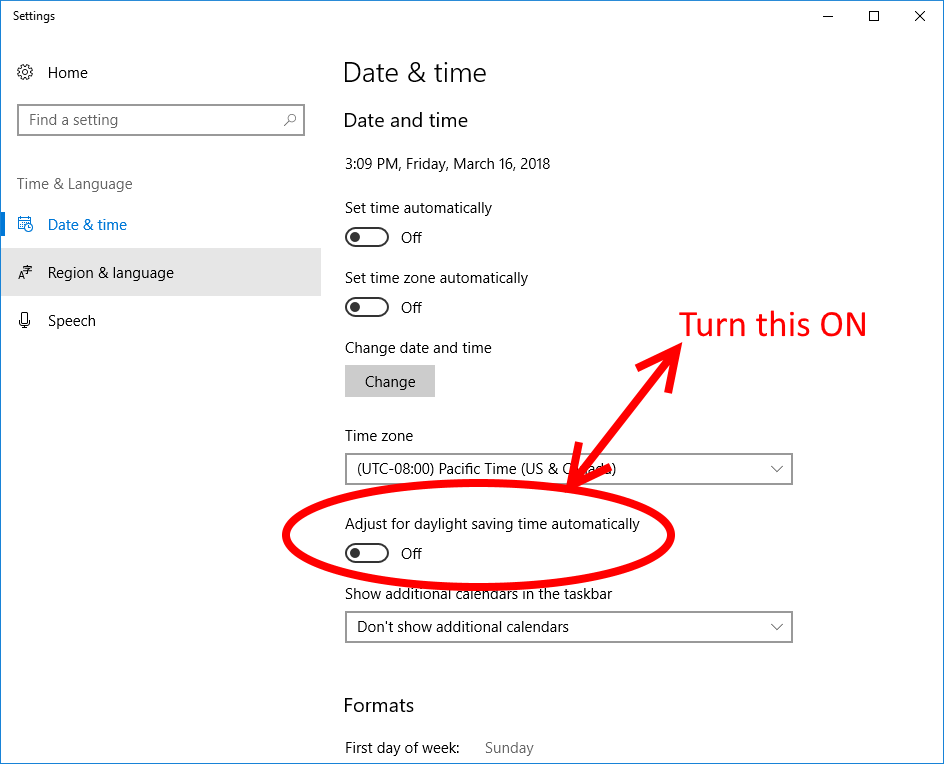
- Change your Windows settings to allow it to adjust the system clock automatically for Daylight Savings. See the image below for how this is done in Windows 10.

Setting Windows to Automatically Adjust for DST
You should find now that the clock in Time Clock MTS matches the computer system clock.
Time Clock MTS clock matches system clock
by Mark Nemtsas | Feb 13, 2018 | Tips and Tricks, Using the Software
This Time Clock MTS How-To guide explains how to restrict the employees displayed on the Time Clock MTS Client Software to a single department. This is useful if you do not want employees from one department seeing employees from another department when punching in and out. It’s even possible to create a department per employee and restrict display to a single employee per time clock computer. Here’s the steps to follow to restrict the employees displayed on the time clock client software to one department:
Create Departments and Assign them to Employees
To learn how to create and assign employees to departments take a look at this how to guide.
Show Department Folders
The next step is to display department folders on the time clock employee list. To learn how to do this take a look at this how to guide.
Configure the Time Clock Client Software to Display a Single Department
On the computer where you want to restrict display of employees to a single department start up the Time Clock MTS Client program. You’ll see that all employees and departments are displayed as per the image below:
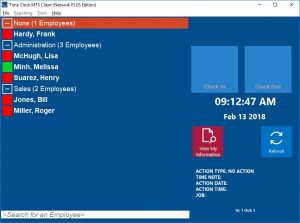
All Departments Visible
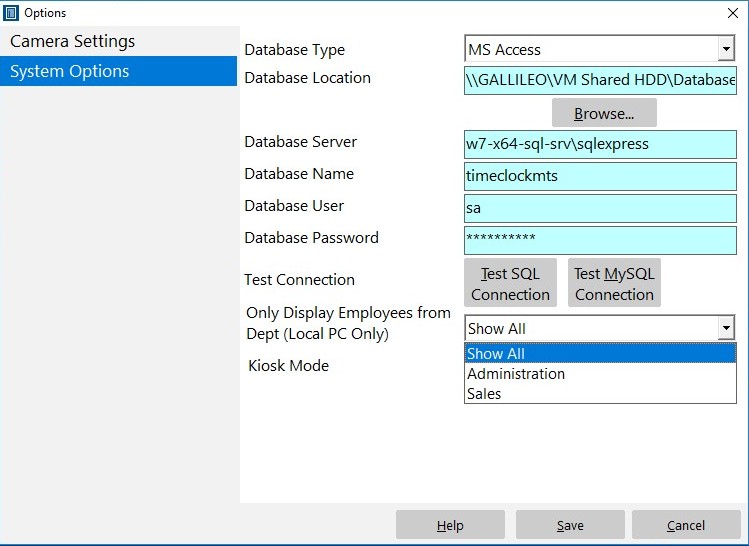
To select a department to display Log in as the Administrator and go to the Tools->Options->System Options screen. Toward the bottom of the screen is a drop down labelled Only Display Employees from Dept (Local PC Only). Click that and select a department to display. See the image below for a visual explanation:
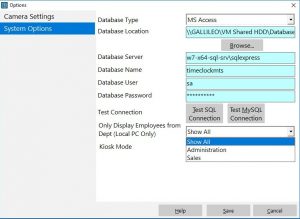
The System Options Screen
Once a department is selected click the Save button and log out of the administrator account using the File->Log Off of Administrator Account menu. The list of employees will refresh and you’ll see that only the employees from the selected department are displayed. See the image below.
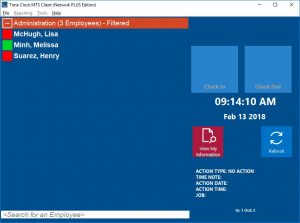
Only One Department Visible
Note that the parent department on the display has Filtered next to it to remind you that you’re seeing a filtered display of employees. Note also that the filtering ONLY takes place when you’re not logged into the Administrator account.
by Mark Nemtsas | Dec 28, 2017 | Tips and Tricks, Using the Software
This Time Clock MTS How-To guide was the result of this question by a Time Clock MTS User:
I have multiple companies under the same timeclock. How do I assign employees to a specific department? Employees are always in the same department. We do not mix the 2 departments at all.
So, how do you set up departments, assign them to employees and then report on those departments? This how-to-guide covers the entire process.
Managing / Creating Departments
The Tools->Options->Departments screen can be used to create and manage any number of departments in Time Clock MTS. Add, edit, or delete departments using this screen. The Manage Departments screen can be seen below in the process of adding a new department called “Manufacturing”.
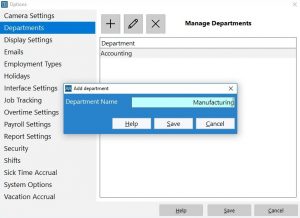
Adding a New Department
Assigning an Employee to a Department
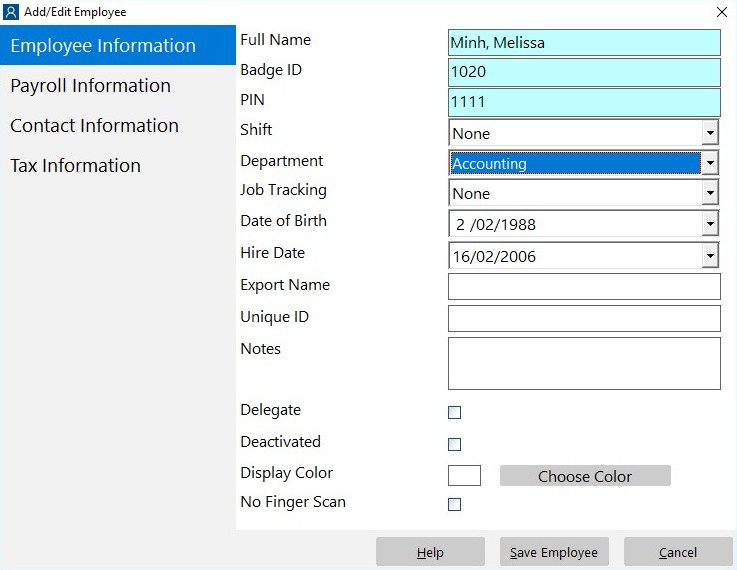
Assign your employees to the correct department once you’ve created your company department list. This is easily accomplished by selecting the employee you want to edit and going to the Employee Maintenance->Edit Selected Employee->Employee Information screen. On this screen towards the top is a dropdown box containing each of your departments. Just select the department you want your employee to work in from this drop down and click the Save Employee button. Below you can see what this screen looks like while we’re assigning an employee to the “Accounting” department.
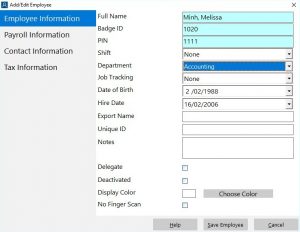
Assigning the Employee to the Department
Running a Payroll Report for a Department
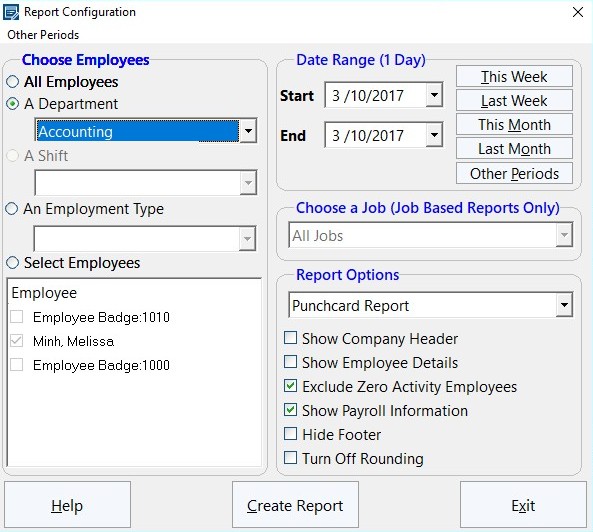
You’re going to want to report on their activity once you’ve got employees assigned to a department and they are punching in and out of Time Clock MTS every day. This is usually done by running a payroll report from the Reporting->Payroll Reports menu. Select a department from the Department drop down box at the top left of the Report Configuration screen (see image below). Making a selection from this drop down allows you to filter any report by department.
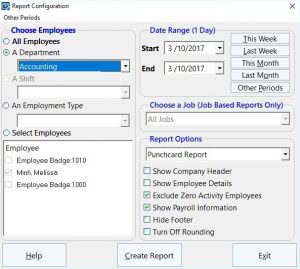
Running a Departmental Payroll Report
Some payroll reports are specifically designed to create departmental information. These include the Departmental Wages Report and the Simple Wages (Departmental) Report.
That concludes this how-to article. It should be noted that this method will only work if your employees always work in one department. If your employees split their time between departments then you’d want to use the Time Clock MTS Job Tracking System. If, for example, you’re a restaurant and your employees split their time between front-of-house and the bar then you could create a job called “front-of-house” and one for “bar” and have your employees punch in and out each job as required. But that is really the subject of another how-to article!
by Mark Nemtsas | Nov 21, 2017 | Tips and Tricks
The Stand Alone Edition of Time Clock MTS can only be used on one computer. However, if you ever need to move it to a new computer (perhaps because the old one died) you’ll want to move your time clock software and data file to the new computer. When you run the Stand Alone Edition on the new computer for the first time you might be confronted by this screen:
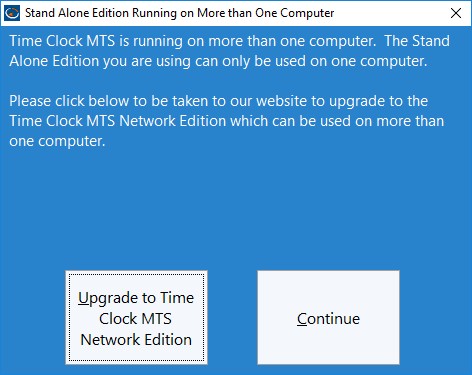
Warning : Time Clock MTS is running on more than one computer
This can happen because your old computer died while Time Clock MTS was running and some cleanup to your data file didn’t happen as it should. Rectifying the problem is simple. Just click the Continue button and then log in as the administrator and go to the Tools->Manage Connections screen.
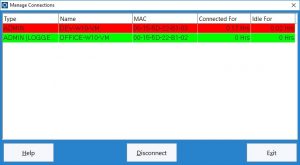
The Manage Connections Screen
On this screen you’ll see something like that above. The red line indicates the old computer’s connection to your time clock data file. All you need to do is click on that line and then click the Disconnect button. This will remove the entry and you should see something like this:
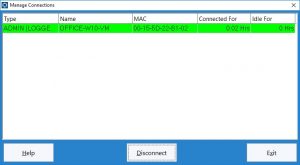
The old connection is now gone and you’re ready to use your new Stand-Alone installation without further interruption!
by Mark Nemtsas | Nov 17, 2017 | Tips and Tricks
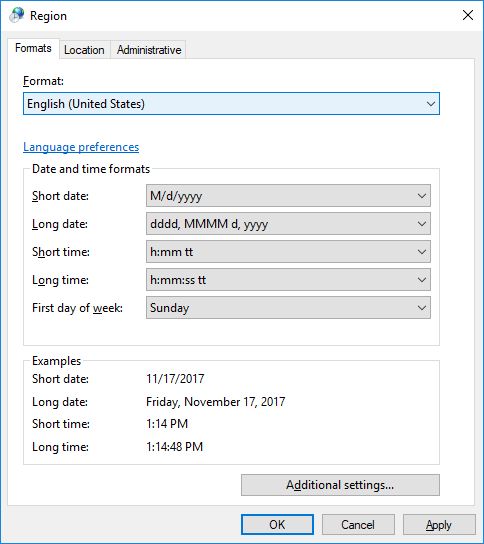
From time to time we get asked how to change the date format on the report configuration screen. In fact, you cannot change the format from within our software because the format used is retrieved from the Windows regional date format setting. However, you can certainly change the format, from say, MM/DD/YYYY to DD/MM/YYYY but you’d have to change the regional date format that Windows uses and then restart Time Clock MTS to pick up the new setting.
For example here’s the relevant part of the Report Configuration screen with the Windows 10 Region Format set to English (United States):
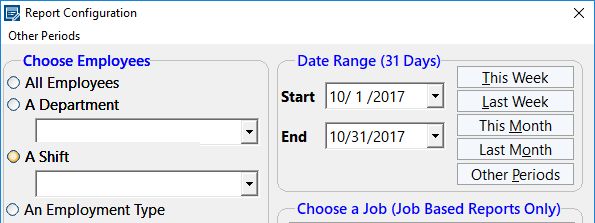
English (United States) MM/DD/YYYY Format
And here’s what it looks like with the Windows 10 Region Format set to English (Australia):
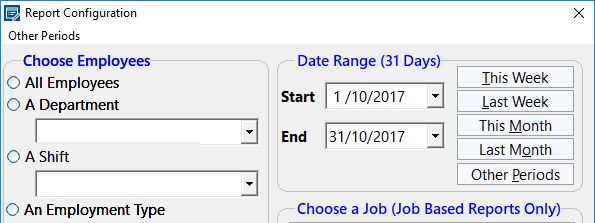
English (Australia) DD/MM/YYYY Format
Now, how you change your Windows regional date format is really beyond the scope of this article. But if you’re on Windows 10 type “region” into the taskbar search box and choose the Region & Language Settings option. Then choose the Additional date, time, & regional settings option which you’ll see part way down the screen. Finally on the Clock Language, and Region window choose the Change date, time, or number formats and choose your regional format from the window that then appears.
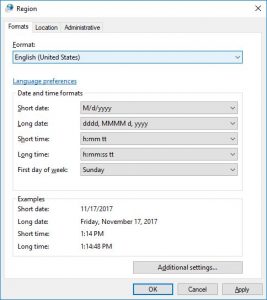
Choosing the Date Format Region (Windows 10)
by Mark Nemtsas | Nov 6, 2017 | How To, Tips and Tricks
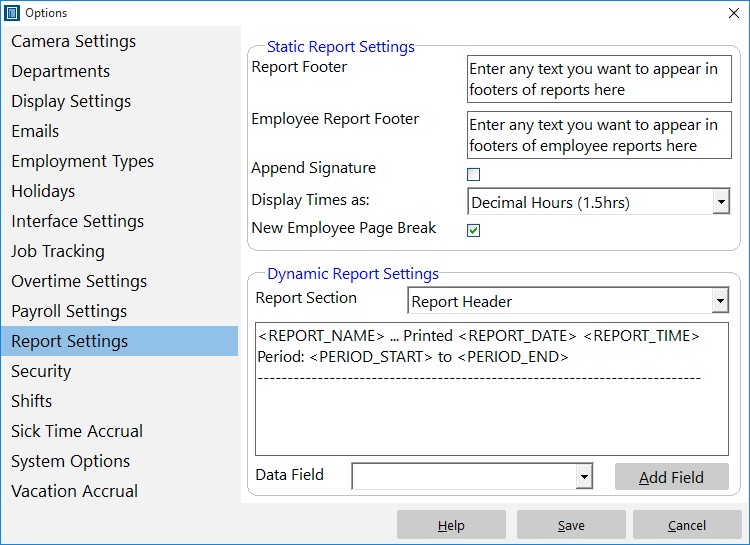
Time Clock MTS records all time punches accurate to the second. It can display elapsed times between time punches in either hours and minutes (1:30) or decimal hours (1.50). Hours and minutes are typically used for timesheets in most businesses. Decimal hours are usually used when time needs to be tracked, costed, and even charged out. Obviously it’s a lot easier to cost out 10.85 hours at $50 / hr than it is to cost out 10 hours and 51 minutes at $50 per hour. Changing how times are displayed in Time Clock MTS is controlled from the Tools->Options->Report Settings Screen.
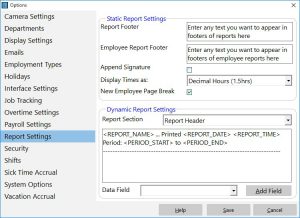
Change the Time Display Format on the Report Settings screen.
Choosing between the two time display formats is simply a matter of choosing an option from the Display Times as drop down.
A Comparison of the Two Time Display Formats
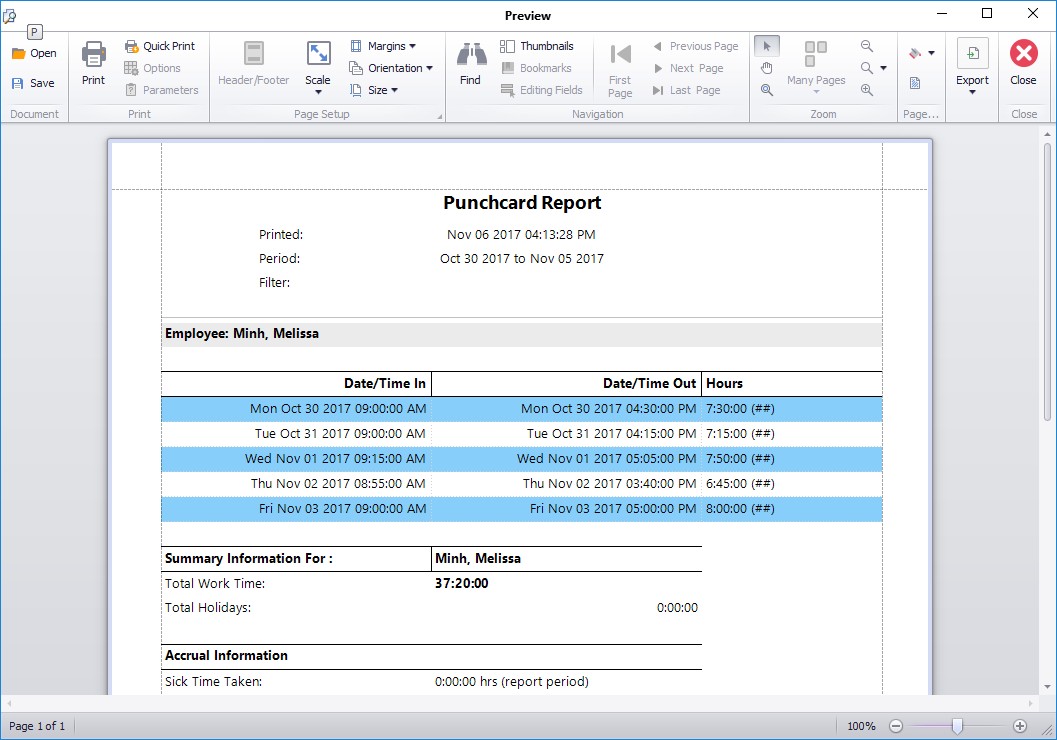
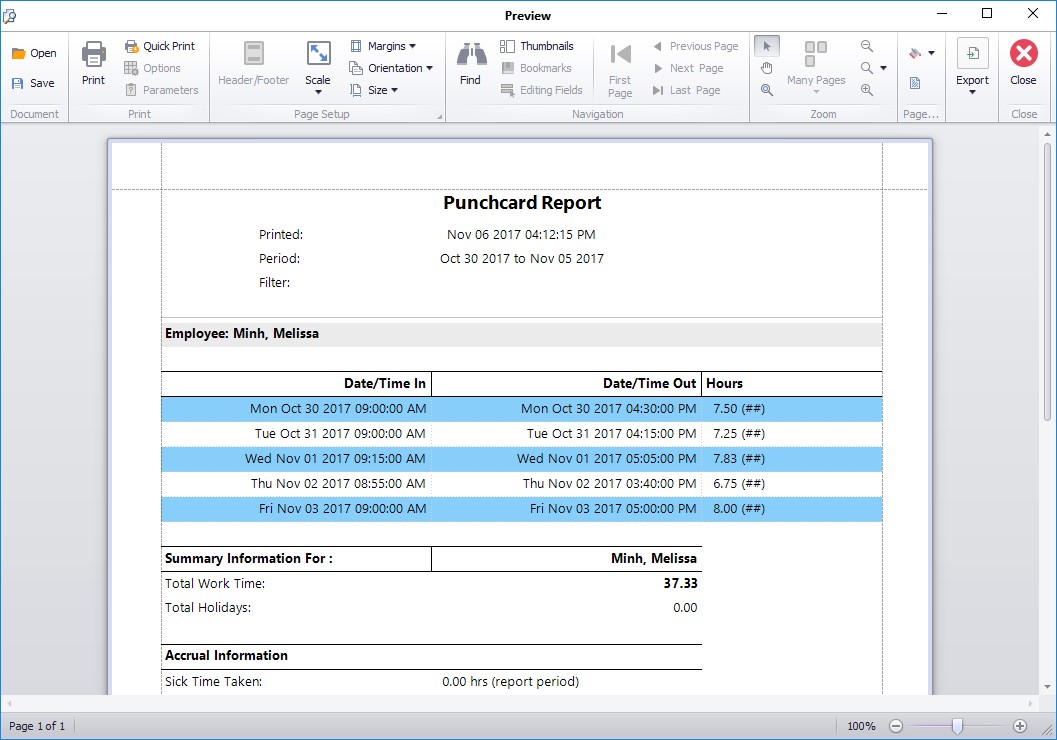
Below is a side-by-side comparison of the same time card displayed with hours and minutes (left) and decimal hours (right).
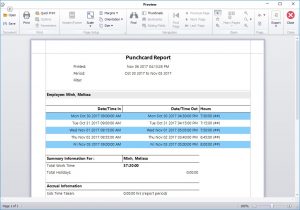
Hours and Minutes
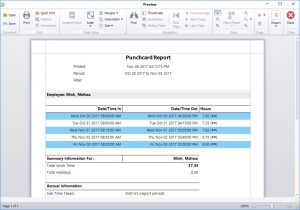
Decimal Hours
Some examples to note are the first time punch, recorded as 7 hours and 30 minutes on the left and as 7.50 hours on the right, and the second punch recorded as 7 hours and 15 minutes on the left and 7.25 hours on the right.
Page 1 of 2312345...1020...»Last »