by Mark Nemtsas | Oct 28, 2017 | How To, Tips and Tricks
Here’s a question we got recently from a user:
I’m wondering how to setup our overtime rules. Our overtime is calculated based off a Sunday to Saturday work week. Any hours worked over 40 should be paid at overtime rate.
There’s two things to answer here, firstly, how to setup the work week, and second, how to setup the simple 40 hour weekly overtime. The first day of the work week can be configured from the Tools->Options->Payroll Settings screen, which is only accessible when you’re logged in as the time clock administrator. The Payroll Settings screen scan be seen below.
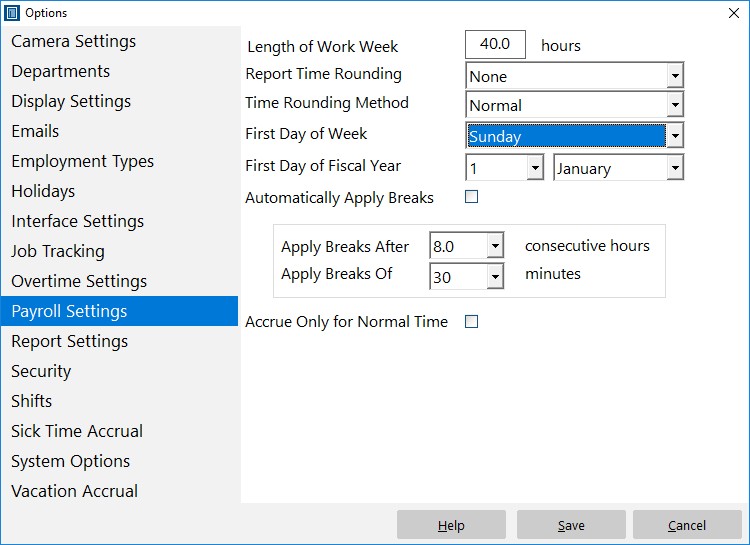
Simple Overtime – Payroll Settings
To change the First Day of the Week choose an option from the First Day of Week dropdown. In this case we’re going to choose Sunday. This means that overtime calculations will start on Sunday of each week. Next we need to adjust the overtime settings to suit, overtime settings are available on the Tools->Options->Overtime Settings screen (see below).
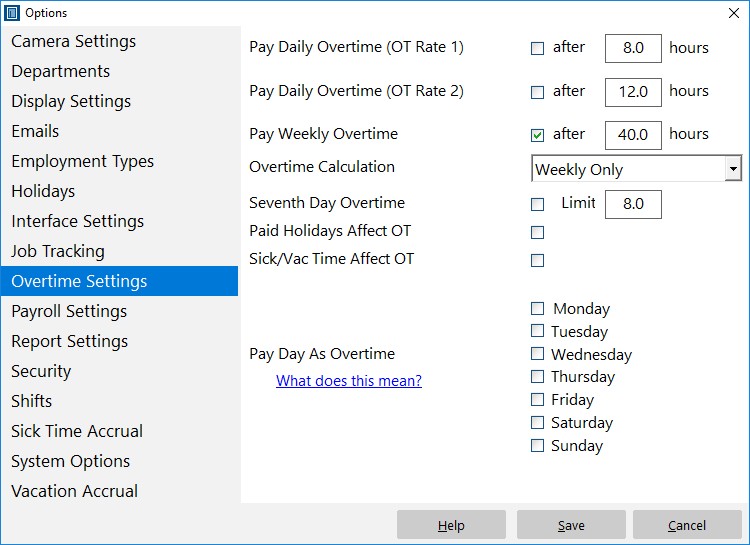
Simple Overtime – Overtime Settings
Setting up weekly overtime using this screen is quite simple. Make sure ALL boxes are unchecked except for the Pay Weekly Overtime box. Enter the Weekly Overtime Limit in the text box next to this checkbox, in this case 40 hours. The final step is to choose a Overtime Calculation method from the Overtime Calculation dropdown box. We’ll choose “Weekly Only” in this case. When you’re happy with settings click the Save button and you’re done!
by Mark Nemtsas | Jul 7, 2017 | How To, Tips and Tricks
Deactivating employees in Time Clock MTS is a great way of preventing people from punching in and out or to temporarily mark an employee account as inactive. That can be useful if your workforce has a seasonal element and you do not want seasonal workers filling up your employee list when they are not actually working. Deactivated employees are hidden by default on the normal employee list to prevent access to those employees, but those same employees are visible when you’re logged in as the time clock administrator. However, there is a way of hiding them, this how-to-article explains that process.
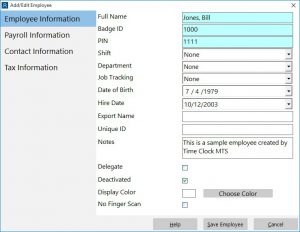
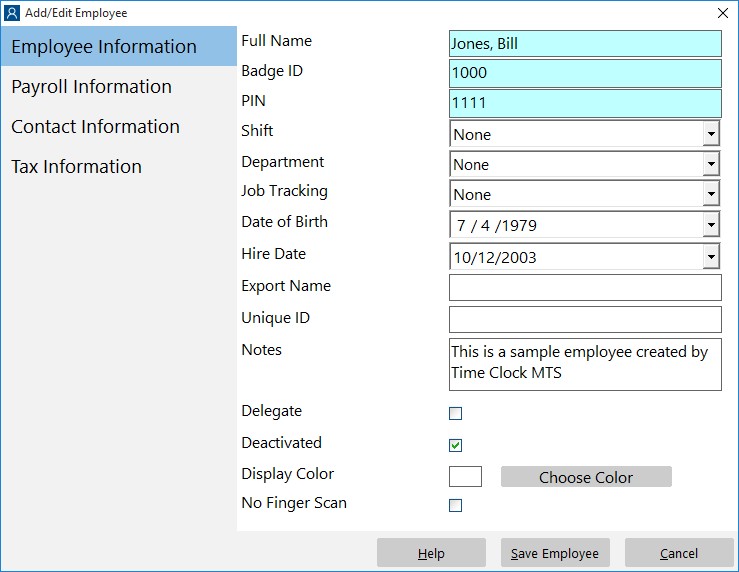
The Employee Information Screen
You’ll need to be signed in as the Time Clock administrator to perform these actions. Firstly, we’ll mark an employee as deactivated using the Employee Information screen (see above). Just check the Deactivated checkbox and then click the Save Employee button.
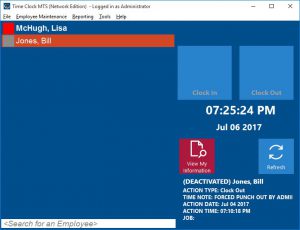
Deactivated Employee Visible
Now if you look at the Employee List you’ll see that the icon next to the employee has changed to gray indicating they are marked as deactivated.

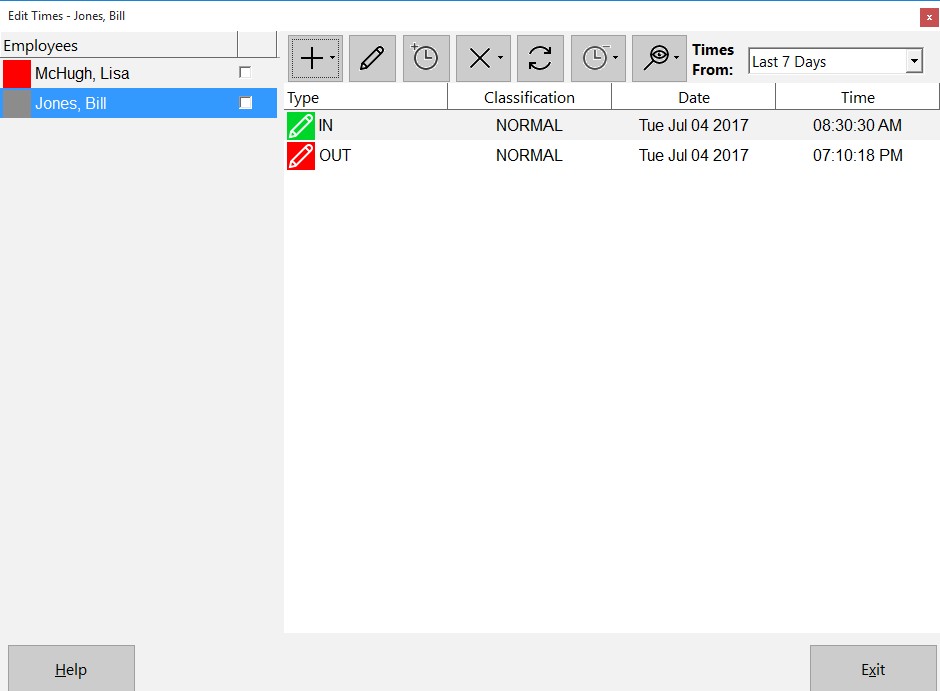
Also Visible on Edit Times Screen
If you head over to the Tools->Edit Time screen you’ll also note that the deactivated employee is also visible here.

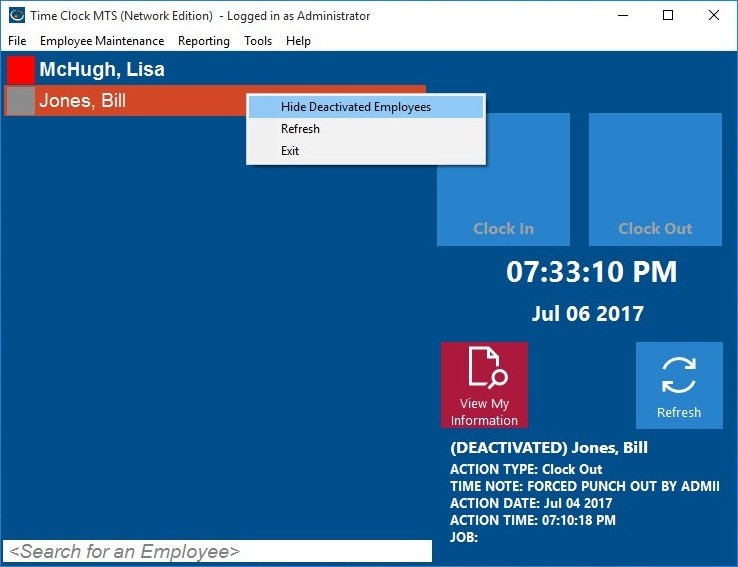
Hiding Deactivated Employees
So let’s hide the deactivated employee. Go back to the Employee List and click your right mouse button on the employee list and you’ll be shown the above popup menu. Choose the Hide Deactivated Employees. And……
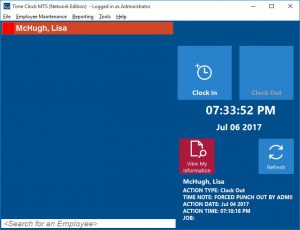
Deactivated Employee Hidden
Presto chango! The deactivated employee is now hidden. Let’s take a look at the Edit Times screen again.
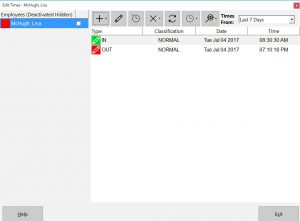
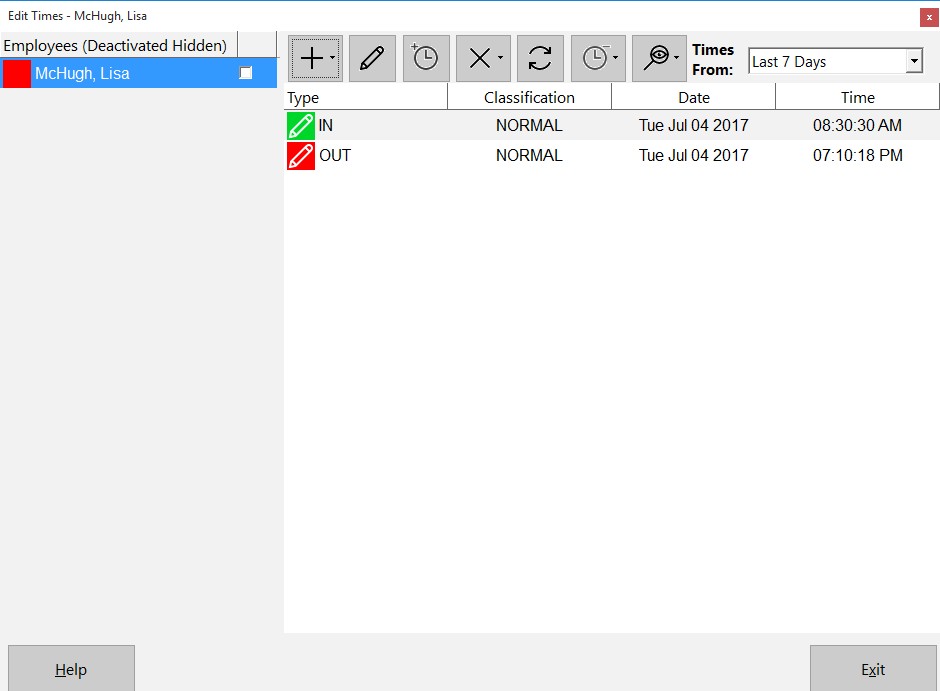
Also Hidden on Edit Times Screen
Note that they are hidden there too. And that’s all there is to it!
If you want to show the hidden deactivated employees again right click on the employee list and you’ll be shown a popup menu again, just select the Show Deactivated Employees option and they’ll appear again.
by Mark Nemtsas | Jul 5, 2017 | How To, Tips and Tricks
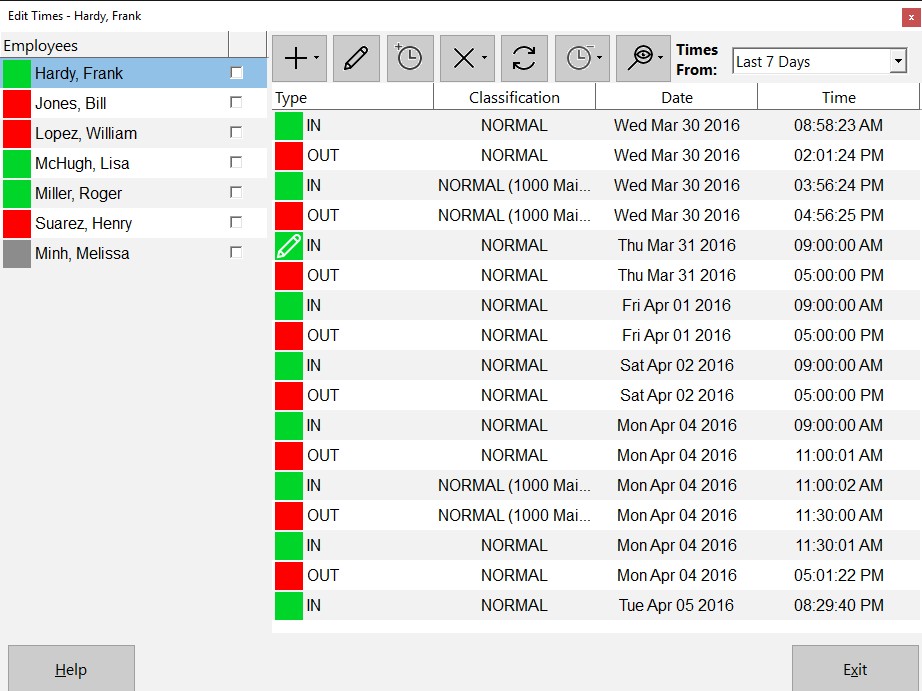
The Edit Times Screen
This Time Clock MTS How To Article covers how the Time Clock Administrator can quickly and easily select a group of employees and punch them in or out. This is of most use if a group of employees with the same start time or end time forget to punch in or out of Time Clock MTS when they start or stop work for the day.
To select a group of employees to punch in or out of Time Clock MTS follow the steps below.
- Firstly, you must log into Time Clock MTS as the administrator, this How To Article explains how to log in as the time clock administrator.
- Go to the Tools->Edit Times screen and you’ll be shown the screen above.
- Click the Punch In / Out
 button and you’ll be shown the drop-down menu below.

Selecting a Group of Employees
- The options are fairly self explanatory. The Selected Employee options affect only the employee you have selected on the Edit Times employee list. The Checked Employees options affect only the employees that have the checkbox next to their names ticked. Obviously, the ALL options affect all employees in the list.
- Choose the required option to affect the group of employees you need and you’ll be shown the screen below to set a Punch In or Punch Out time.
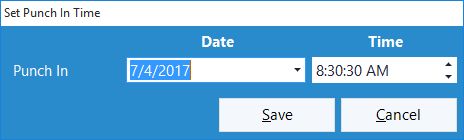
Setting the Punch In / Out Time
- Confirm that you want to Punch In / Out the selected group of employees.
- The required action will now be performed on the group of employees you’ve selected. It’s important to note that employees that are currently Punched In cannot be punched in again and vice versa. Those employees will remain unaffected by the action you try to perform on them.
If this article isn’t what you were looking for you might find the How to Punch In All Employees article or the How to Punch Out All Employees article useful.
by Mark Nemtsas | Jul 5, 2017 | How To, Tips and Tricks
The Edit Times Screen
This Time Clock MTS How To Article covers how the Time Clock Administrator can punch in all employees that are currently clocked out quickly and easily. This can be useful if a number of employees have forgotten to punch in when they arrived at work.
To punch in all employees that are currently punched out just follow the steps below.
- Log into Time Clock MTS as the administrator. Read this this How To Article to learn how to log in as the time clock administrator.
- Go to the Tools->Edit Times screen and you’ll be shown the screen above.
- Click the Punch In / Out button and choose the Punch In All Employees option from the menu that pops up.
- When Punching In a group of employees from the Edit Times screen you’ll be given a chance to set a Punch In time using the screen below.
Setting the Punch In Time
- Confirm that you want to Punch In all employees in the confirmation window that is then shown.
- All employees that are currently Punched Out will be Punched In to Time Clock MTS using the time you set.
If this article isn’t what you were looking for you might find the How to Punch Out All Employees article or how to Punch a Group of Employees In or Out article useful.
by Mark Nemtsas | Jul 4, 2017 | How To, Tips and Tricks
At the bottom of the Display Settings screen is a checkbox labelled Kiosk Mode. This innocuous checkbox allows you to transform a windows computer into a dedicated employee time clock. To turn on Kiosk Mode check the box and click the Save button. Log out of the administrator account and Time Clock MTS will enter Kiosk Mode. Kiosk Mode has the following features:
- Time Clock MTS will fill all the available screen space.
- Time Clock MTS will be the top-most Windows app and even sit on top of the Windows task bar.
- The window size cannot be changed, the window cannot be moved, and the window cannot be minimized.
- Users cannot exit the software without entering the time clock administrator password.
- Kiosk mode features do not take effect while you are logged in as the time clock administrator.
Essentially this means if your time clock computer is running with the software in kiosk mode and is being used with a touchscreen or without a keyboard that Time Clock MTS will be the only app that is accessible to users. Of course if there is a keyboard then users can still use certain windows keyboard shortcuts to get around these restrictions so you should strongly consider removing access to the keyboard on your dedicated time clock computers.
Kiosk Mode on Specific Computers
Kiosk mode will always effect computers running the Time Clock MTS Administrator or Stand-Alone Edition software if you’ve got the setting turned on globally. However, if you’ve got the Time Clock MTS Network Edition or the Network PLUS Edition you can turn Kiosk Mode on (or off) on a specific computer overriding the global setting. On a computer with the Time Clock MTS Client software on it log in as the time clock admin and go to the Tools->Options->System Options screen (see image below).
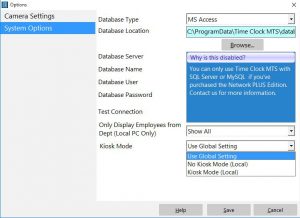
Client Kiosk Mode Setting
At the bottom of the screen there is a client specific Kiosk Mode setting. You can see there are three options available, Use Global Setting, No Kiosk Mode (Local)Kiosk Mode (Local). The first setting just uses the global Kiosk Mode setting, the other two override that setting locally. It’s probably easier to understand how the global (and local) settings work by considering some usage scenarios.
- Kiosk Mode on ALL Time Clock Computers – Turn on the global Kiosk Mode setting from the Time Clock MTS Admin software.
- Kiosk Mode on ALL Time Clock Computers and NOT the admin computer – Turn on the Kiosk Mode (Local) setting on all Client computers.
- Kiosk Mode on ONE Time Clock Client Computer ONLY – Turn on the Kiosk Mode (Local) setting on the selected Client computer.
- Kiosk Mode on SELECTED Time Clock Client Computers ONLY – On each Client computer turn on the Kiosk Mode (Local) setting.
- Kiosk Mode on ALL Time Clock Computers EXCEPT for selected Client Computers – Turn on the global Kiosk Mode setting from the Time Clock MTS Admin software and then on selected Client computers turn on the No Kiosk Mode (Local) setting.
Conclusions
If you need to dedicate a computer to being used solely as a time clock computer and want to prevent employees from accessing other apps on the computer then Kiosk Mode is exactly what you’re looking for. The ability to override the global setting for specific time clock clients means you’re not forced to use the Kiosk Mode on every time clock computer.
by Mark Nemtsas | Jun 30, 2017 | How To, Tips and Tricks
This How-To Article explains how the time clock administrator can force Time Clock MTS to run the database update routine against the time clock data file. Typically Time Clock MTS performs this routine when you install a new version of the software. This should happen automatically but under certain circumstances it can be useful to force the process. To force Time Clock MTS to run the database update routine follow the steps below:
-
- This process can only be performed using the Time Clock MTS Stand Alone Edition or the Time Clock MTS Administrator software (if you're using the Network or Network PLUS Editions). It also cannot be used in versions of the software prior to Version 6.1.1.
- Once Time Clock MTS is running Log in as the Administrator.
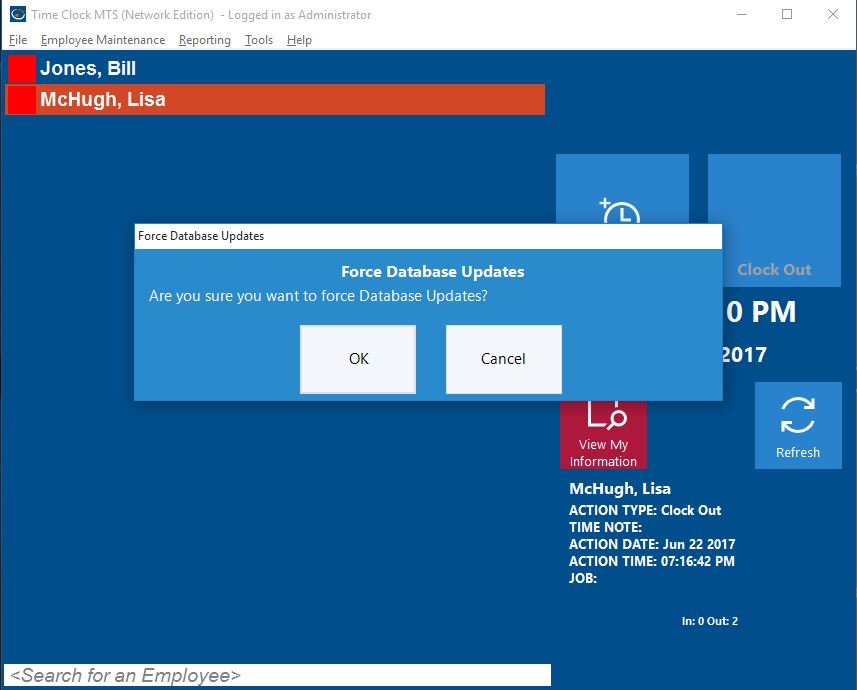
- Hold down the ALT and the U key on your keyboard. You'll then be shown the screen below:
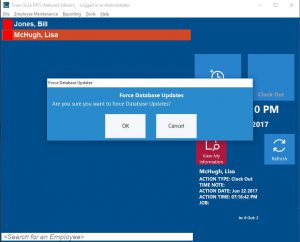
Forcing Time Clock Database Updates
- Click the OK button and Time Clock MTS will then perform the required updates.