by Mark Nemtsas | Jul 3, 2014 | Tips and Tricks, Using the Software
If you’ve bought an upgrade to the latest version of Time Clock MTS then within a few hours you’ll receive a new set of registration keys via email. These registration keys need to be entered into Time Clock MTS to unlock the software and remove the 30 day trial period. It all sounds pretty simple but from time to time people do have trouble getting their new registration keys to work. This article takes those people through the possible reasons why they keys are not working and how to fix it. The solutions presented below are in decreasing order of likelihood, so the first solution (You Haven’t Upgraded the Software Yet) is the most LIKELY reason your registration keys don’t seem to be working.
You Haven’t Upgraded the Software Yet
The registration keys DO NOT UPGRADE THE SOFTWARE FOR YOU. You have to actually upgrade Time Clock MTS to the latest version BEFORE the registration keys will work. You can tell if you’re using the latest version of Time Clock MTS by looking at the Help->About screen (see the image below) in the software and comparing the version number with the current version number of the software that you can see on our support page. If the version numbers do not match then you need to upgrade your software BEFORE trying to use your new registration keys.
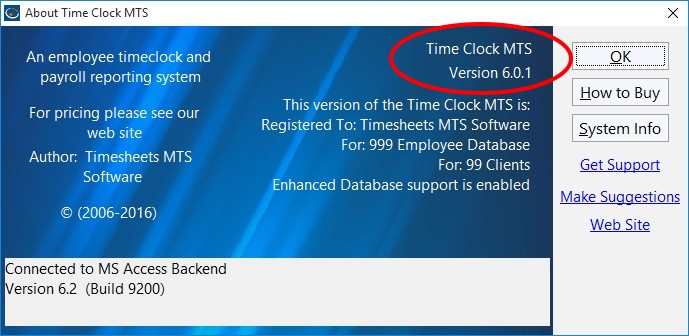
What Version Are You Using?
If you’re not sure how to upgrade Time Clock MTS then you should watch this video. Remember that the latest version upgrade installers can always be downloaded from our website. Make sure that you upgrade ALL computers that you have Time Clock MTS installed on, including the time clock administrator computer and all the client computers.
You Bought the Wrong Thing When Upgrading
Sometimes mistakes happen you’ll find out you’ve simply bought the wrong thing when you upgraded. Perhaps you needed the Network Edition of Time Clock MTS and you bought the Stand Alone Edition. Or perhaps you needed the Network PLUS Edition (to support SQL Server) and you only bought the Network Edition. Regardless, this is easily fixed. Just contact us and we’ll supply you with a purchase link to the correct version of Time Clock MTS as well as a coupon code to credit you for your previous purchase. Once the purchase is made you’ll be issued with a new registration key.
You’re Just Not Entering the Registration Key Details Correctly
Occasionally it turns out that the reason your registration key isn’t working is….well it’s because you’re just not entering it properly. Whether it be the key itself, the registration name, the number of employees or the number of clients. It’s possible to enter any one of those wrong and the registration key simply wont work. There’s a great video demo here covering how to register Time Clock MTS and what pitfalls to look out for. It’s worth a watch to work out where you might be going wrong.
You’ve Bought a Previous Upgrade That Has Not Been Taken Into Account
Sometimes users have bought previous upgrades for Time Clock MTS (such as upgrades to allow for more employees or more time clock clients) that our internal systems have not accounted for. So when you purchase an upgrade to the latest release our automatic systems don’t account for these previous upgrades and your registration keys don’t either. Fixing this is dead simple, contact us, let us know what previous upgrade has not been accounted for and we’ll adjust our records and issue you with a new registration key.
Our Systems Have Generated the Wrong Key
Generation of your registration keys is carried out completely automatically by our systems without any intervention by us. And generally those systems do a fantastic job of generating the right registration keys for Time Clock MTS users. However, sometimes things do go wrong and a key is generated that doesn’t match the requirements of the Time Clock MTS user. Nothing to panic about, just contact us and we’ll get a bit of human intervention happening and make sure you get the RIGHT registration key as soon as possible.
Hey I Don’t Think It’s Any of Those! What do I do now?
If you believe your case doesn’t fit one of the situations above then just contact us and we’ll get things sorted out for you.
by Mark Nemtsas | Jul 3, 2014 | Tips and Tricks, Using the Software
I got a good email from a new user of the software this morning and I thought it was worth posting up their question and my response here.
I am interested in time clock MTS but I have a few questions. Is there any way to input what vacation has been accrued to date? Also, I would like vacation to be accrued per # of hrs worked. Is there any way to input this so that employees and admin are able to view what is avail at any time? Does the program need to be linked to a single server in order for employees/admin to be able to use different computers etc? Is $199 a ONE time purchase fee? Thank you.
And here’s my reply.
1) Yes, each employee can have a starting balance. This is set on each employee’s payroll information screen. You can see the employee payroll information screen here:
Employee Payroll Information Screen.
2) Employees can view their own time card (which includes vacation balance). To set that up see these instructions:
Employees Viewing their time cards.
3) The time clock database needs to be stored on a server that can share the file for it to be used on multiple computers. It doesn’t need to be a server, it could be a NAS or even just a regular PC that has a mapped network drive.. Setup instructions are here:
Setting up the Time Clock MTS Network Edition.
4) The $199 includes a lifetime license to use version 5 of Time Clock MTS and one year of email support and access to software updates. Support/updates after the first year is $50 (US) for the Network Edition but your software will keep working whether or not you renew support.
by Mark Nemtsas | Jun 18, 2014 | Tips and Tricks, Using the Software
I’m getting the error Clear Administrator Connection and I don’t know why?
If you’ve recently upgraded Time Clock MTS on the computers your employees punch in and out from, or perhaps you’ve had to re-install the software on a computer due to a hardware failure then you might be seeing the screen below whenever you start up the software:
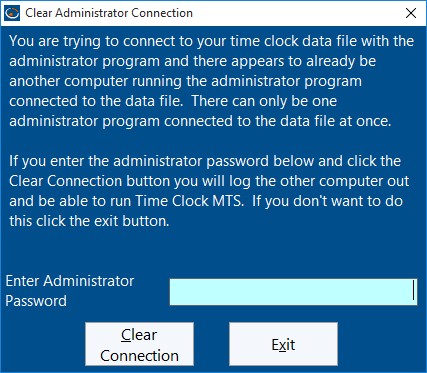
Clear Administrator Connection Screen
There’s a bit of text to read there but if we cut the chase, this screen is telling you that you’ve got the Time Clock MTS Administrator software installed on this computer and that the software is also installed on another computer. Generally you only want the administrator software installed on ONE computer. It’s almost certain that you’re seeing this screen because you inadvertently installed or upgraded the administrator software instead of the Time Clock MTS Client software. This might have been because you either installed the Administrator software from scratch on the computer OR you ran our upgrade installer for the administrator software when you should have run the client upgrader. Either way, the fix is quite simple.
How to fix this?
The best way to fix this issue is to uninstall the Time Clock MTS Administrator program from this computer and install the client. If you’re not sure how to uninstall a program then you should watch this video on the Microsoft Help website. Once you’ve uninstalled the software you can install the Time Clock MTS client. The latest installer version can always be found on our website download page. If you’re not using the latest version then you need to talk to your IT Staff or time clock administrator to find where the installer for the client software your company is using can be found.
As always, if you have an problems or need further clarification on this issue please contact us for further help.
by Mark Nemtsas | Jun 10, 2014 | Tips and Tricks, Using the Software
I’ve had a series of support emails from a Time Clock MTS user recently complaining that some of her time punches were always being calculated as less that the actual elapsed time. They were kind enough to email through some of their payroll reports so I could check what was happening. There’s a section of one of their reports below.
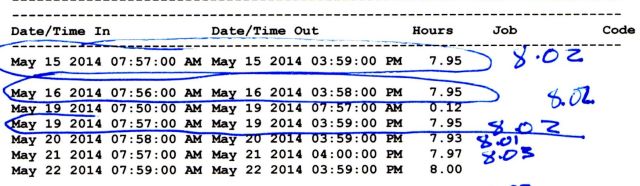
Payroll Report showing “incorrect” Punches
You can see that a number of the punches clearly have a an elapsed time of more than eight hours but Time Clock MTS has calculated the times at under 8 hours. There’s a couple of clues as to what’s going on here. First is that the two punches that are 8 hours or under are calculated correctly. And second is that the time punches that appear to be incorrect are all out by about 0.08 of an hour. 0.08 of an hour is 288 seconds or just under 5 minutes. So what could make all time punches of over 8 hours be calculated, apparently incorrectly under by 5 minutes each? Of course, the answer is the automatic break deduction feature. When enabled automatic break times will be deducted from any time punch that exceeds a given time limit. In the case of this particular use I suspected that they had the limit set at 8 hours and for it to deduct 5 minutes.
I confirmed this when they emailed me their time clock database so I could check their exact settings. A screenshot of their Payroll Settings screen can be seen below.
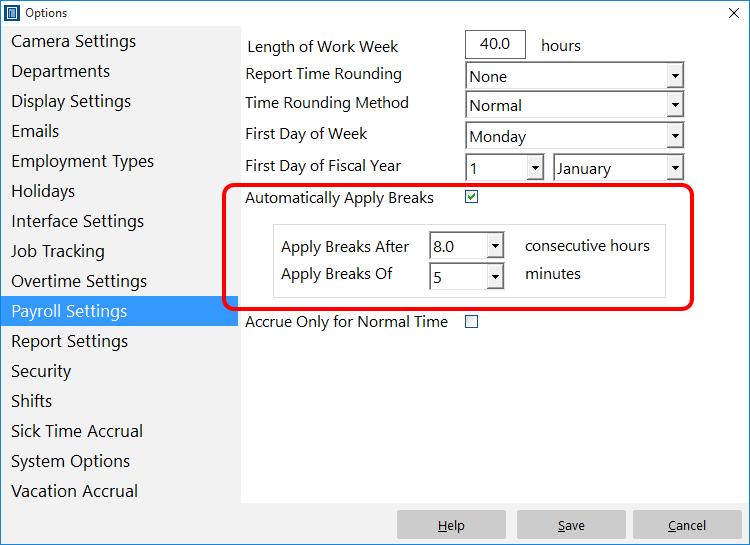
Payroll Settings with Automatic Breaks Enabled
You can see they’ve got their system setup to deduct 5 minutes of time from each punch that exceeds eight hours. Mystery solved.
It’s worth mentioning that automatic breaks are not the only reason that payroll figures in Time Clock MTS can appear “wrong”. There’s also an issue that pops up from time to time with salaried employees and their hours on payroll reports. In that case you should modify your payroll reports to display actual hours worked for salaried employees.
by Mark Nemtsas | Apr 12, 2014 | How To, Tips and Tricks
Recently we’ve had a large number of people asking us about moving Time Clock MTS away from Windows XP to a newer version of Windows (such as Windows 10 or Windows 8.1). This how-to guide gives users a step by step process to doing so.
Step 1: Gather Information
Before starting this process you’re going to need to gather some information.
- Is the computer running the Time Clock MTS Client or the Time Clock MTS Administrator program? You can work this out by going to the Help->About Time Clock MTS menu and looking at the title of the window. It’ll be “About Time Clock MTS” for the Time Clock MTS Administrator program and “About Time Clock MTS Client” for the client program.
- While on the Help->About Time Clock MTS screen note down the version of the software. That’s going to look something like “Version 4.1.2” and is in the top middle of the window.
- Log into Time Clock MTS as the administrator and go to the Help->Registration screen and copy down all of the registration details including the Registration Name, Number of Employees, Client Connections, and the Registration Key.
- While still logged in as the administrator go to the Tools->Options->System Options screen. Look at the middle right of the screen and you’ll see a text box called “Database Location”. That’s the path to your Time Clock MTS database and you need to note that down.
- Locate your Time Clock MTS installation files. Ideally you’ll have kept a copy of the installers you used to install Time Clock MTS originally. These will be called timeclock_install.exe (the administrator program installer) and timeclock_client_install.exe (the client program installer).
Step 2: Do You Have the Time Clock MTS Installers?
If you have your original Time Clock MTS Installers and you don’t want to upgrade to the latest version of the software skip to Interlude : Go Take a Walk or Get a Cup of Coffee and ignore the rest of this step.
Of course we have installers available for the latest version of Time Clock MTS on our website. While we recommend that you use the latest version of the software we do also have downgrade installers that will downgrade Time Clock MTS from the latest version to either Version 4.1.7 or Version 3.3.9. Note that you MUST downgrade the latest version of Time Clock MTS to Version 4.1.7 BEFORE downgrading it to Version 3.3.9.
If you wanted to install a version of Time Clock MTS other than these then you’re out of luck, these are the ONLY installers we provide.
Step 3: I Want to Upgrade to the Latest Version of Time Clock MTS
If you cannot find your current installers or you want to upgrade to the latest version of Time Clock MTS then you can do so easily. Sometimes our users are entitled to a free upgrade and if you’re not we offer discounted upgrade pricing. To check if you’re eligible for a free upgrade or to get access to discounted upgrade prices please contact us with your Time Clock MTS registration name that you noted down in Step 1 asking about upgrading and we’ll get back to you. If you’re entitled to a free upgrade or decide to purchase an upgrade we’ll supply you with some new Registration Keys that will work in the latest version of Time Clock MTS.
Interlude : Go Take a Walk or Get a Cup of Coffee
*phew* this process is rather long and complicated and this is a good point to stand up and move away from your computer and take a walk around the office or grab a quick coffee. When we come back we’ll actually be installing and moving software and datafiles!
When you’re ready to proceed move onto Step 4: Are you moving the Client or Administrator Program?.
Step 4: Are you moving the Client or Administrator Program?
If you are moving the Client program go to Step 5: Moving the Client Program. If you are moving the Administrator program go to Step 6: Moving the Administrator Program.
Step 5: Moving the Client Program
Use your Time Clock MTS Client installer to install the client program on the new computer. When you run the software for the first time it will prompt you to navigate to where your time clock database is. Remember that you noted this location down in Step 1. When connected to your database you should see the normal Time Clock MTS screen. Log in as the time clock administrator using the File->Log in as Administrator menu and go to the Help->Registration screen and enter your registration details to register the software. If you need help registering the the software you should view this video tutorial.
That’s it, you’re done. You can ignore the rest of this guide..
Step 6: Moving the Administrator Program
Before moving the Administrator program you need to determine if your Time Clock MTS datafile is stored locally on the old Windows XP computer or somewhere on your network. Remember that we noted down the Database Location in Step 1 of these instructions. Take a look at that location and if it looks something like this:
C:\Documents and Settings\All Users\Application Data\Time Clock MTS\Database\timeclock.mdb
then your database is stored locally. If the location doesn’t look exactly the same as that but starts with the letters c:\ then it’s stored locally too. If your Database Location doesn’t look like this then it’s most likely that your database is stored on your network. If your database is stored locally then go to Step 7: My Database is Stored Locally. If your database is stored on your network skip to Step 8: My Database is Stored on My Network
Step 7: My Database is Stored Locally
If your Time Clock MTS database is stored locally on your Windows XP computer then your going to have to move your datafile to your new computer AND install the software on the new computer. We’ve written about moving the software and datafile to a new computer and you can read those instructions here: moving Time Clock MTS to a new computer. Once you’ve followed those instructions log in as the time clock administrator using the File->Log in as Administrator menu and go to the Help->Registration screen and enter your registration details to register the software. If you need help registering the the software you should view this video tutorial.
That’s it, you’re done. You can ignore the rest of this guide..
Step 8: My Database is Stored on My Network
If your database is stored on your network then moving your Time Clock MTS Administrator program is actually the same process of setting up a second administrator computer. To learn how to do that you should follow the instructions we’ve written here. Once you’ve followed those instructions log in as the time clock administrator using the File->Log in as Administrator menu and go to the Help->Registration screen and enter your registration details to register the software. If you need help registering the the software you should view this video tutorial.
That’s it, you’re done.
by kathryn@timeclockmts.com | Feb 23, 2014 | How To, Tips and Tricks, Using the Software
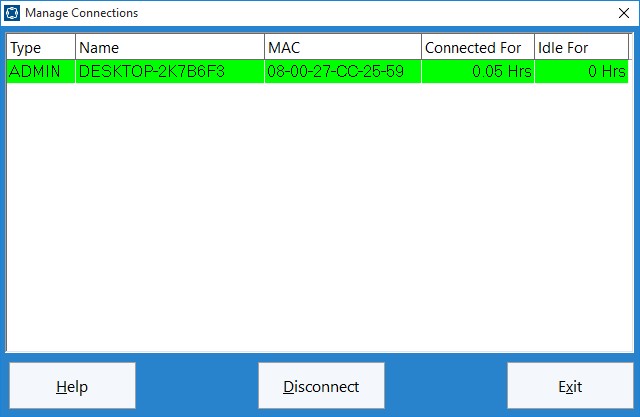
The Manage Connections Screen
Above you can see the Manage Connections screen. This screen is used to view and manage the connections to your Time Clock MTS database. Generally you won’t need to use this screen for much, but every now and again you may need it to delete old, stale connections that are using up your Time Clock MTS Client Licenses. This can commonly happen two ways. Firstly, you’ve installed the Time Clock MTS Client software on too many computers and you’re continually using up your client licenses (you should only install the Time Clock MTS Client software on as many computers as you are licensed for). The second reason is that perhaps a computer with the client software on it has suddenly died or shutdown incorrectly and you’re going to install the software on a new PC because the old one is kaput. In this case the connection record for the old computer can often not be deleted correctly and you’ll need to remove it manually.
This blog describes the process to remove a connection record from Time Clock MTS.
1. Find the connection you want to remove in the list on the Manage Connections screen. You can identify the computer the connection is coming from by the name of the computer or the MAC address of the computer.
2. Ensure that the computer named is no longer running the Time Clock MTS Client software.
3. Click on the connection record you want to delete.
4. Click the Disconnect button to remove the connection record.
That’s all there is to it, but as always if you have any problems please Contact Us and we’ll do our best to help you out!
Page 6 of 23« First«...45678...20...»Last »