by Mark Nemtsas | Nov 17, 2009 | How To, New Features, Using the Software
Employee List with Department Folders
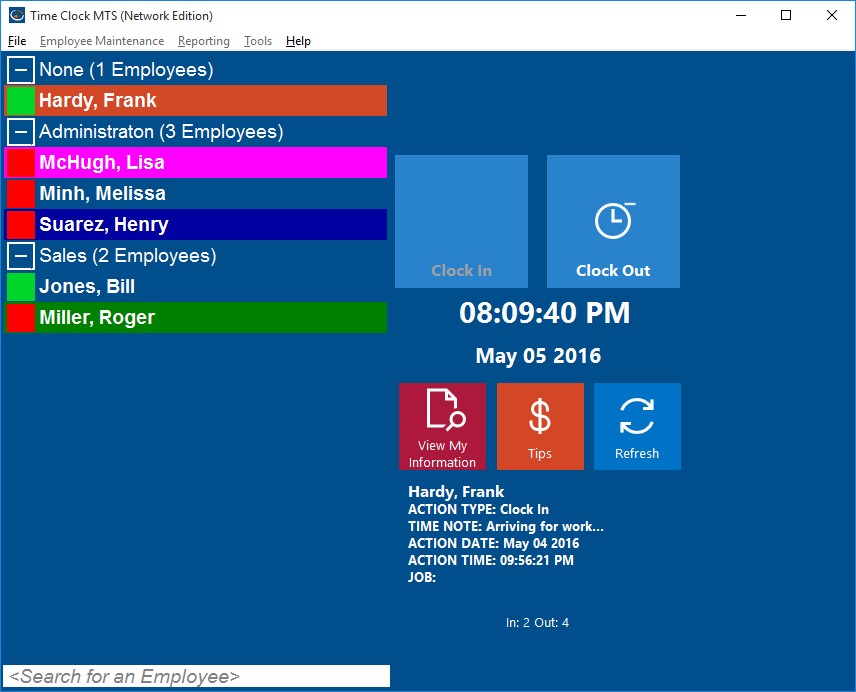
Version 2.5.0 of Time Clock MTS included an interesting new feature that allows you to split the Employee List Interface into departmental folders. This can be extremely useful if you have a lot of employees or if you have separate Time Clock MTS client stations located around your business on a department by department basis. In the screenshot above you can see how the employees are split up by department and that the department groups can be expanded or collapsed as required. Time Clock MTS will remember which departments you have expanded or collapsed when you restart the software so you can setup (for example) a single Time Clock MTS Client to just display the employees from a single department.
Turning on the department folder view of Time Clock MTS is very easy. Just login as the Administrator and then go to the Tools->Options->Interface Settings page. When you’re on this screen check the Dept. Folders on Employee List checkbox and then click the Save button to commit the changes. When you return to the employee list you should see that it is now split up by departments. Of course you’ll need to have some departments defined and have assigned your employees to the departments.
by Mark Nemtsas | Oct 29, 2009 | News, Tips and Tricks
It’s not often that I get to visit a company that is making use of Time Clock MTS but today I had the pleasure of visiting a local company that does use it. They are a job based truck body re-fitter and track their employee’s time against the particular job that they happen to be working on at the moment. It is vital that they keep track of the actual time spent on a job so that they do not under quote their customers and so they know how to value their current work in progress.
Their old system consisted of a pen/paper register with each job recorded in a notebook along with a job number and customer. When employees needed to book time to a job they manually recorded it on a job card for that job. At the end of the job the cards were tallied manually and the job billed accordingly. It is interesting to note that the employees had separate manual time cards that were used to determine wages. Let’s take a quick look at the inefficiencies in this system:
- Recording time spent on jobs took up to a minute per entry and was error prone due to bad handwriting and poor time-keeping.
- There was considerable duplicated effort on behalf of the employer in tallying up job sheets and employee time cards separately.
- The manual tallying was both time consuming and prone to error.
- Referring to past records was painful at best. To find a customers job record tool several minutes of scanning through the job register finding the job reference and then locating the right job card in a filing cabinet full of job cards.
- It was impossible to know how far through a job they were without sitting down with the job cards and tallying things up manually.
So let’s take a look at their setup now with Time Clock MTS and what improvements they’ve seen:
- There is just one time keeping system now that keeps track of both employee attendance and time spent on jobs.
- Actually recording attendance and time spent on jobs is now extremely quick and accurate.
- Manual tallying of times has been completely eliminated as have calculation errors and time keeping errors.
- The owner can determine how much time has been spent on a particular job in about 20 seconds.
- Archival data is easily obtained and referenced, saving 10-15 minutes each and every time they need to refer back to an old job. The company has also suggested a new report that will be added to the software to significantly improve this process even more!
I must thank the company in question for allowing me to take a look at their operations. They couldn’t be happier with the software and the return on their (US$69) investment in Time Clock MTS is extremely impressive. There are real productivity improvements in both the production and administrative sides of the business, as well as an owner who is much better informed about the current state of his business. If you’re interested in using Time Clock MTS in the same way that this company is you should take a look at the getting started with Time Clock MTS and the job tracking time clock page.
by Mark Nemtsas | Oct 14, 2009 | How To
We received an interesting email today that contains a little tip that could be handy to some Time Clock MTS users.
When we print a summary report of all employees it prints each employee on a separate sheet, can it print them all on one sheet (or as many as it can fit)?
My Reply:
Go to the Tools->Options->Report Settings page and uncheck the ‘new employees page break’ setting.
If you’re wondering what page this is you can take a look at the Report Settings Help Topic for more information. Putting a page break in between employees on reports was one of the most requested features for the software, and wouldn’t you know it as soon as it was changed people started asking for it to be changed back! Now Time Clock MTS has the flexibility to print reports either way.
by Mark Nemtsas | Oct 4, 2009 | News
We’ve written a quick tour of Time Clock MTS in an effort to help new users understand how the software works and what some of the capabilities of the software are. The tour covers the main aspects of the software and what some of the real benefits of using it are. The tour is available from the top menu bar of the website. Individual sections of the quick tour can be found below:
by Mark Nemtsas | Sep 15, 2009 | How To, Using the Software
A lot of businesses either want to track employee costs based on what tasks they’re working on, or perhaps on a customer based project by project basis. In Time Clock MTS we call this ‘job tracking’. This Time Clock MTS How To Article describes how to easily setup Time Clock MTS to track jobs in your employee time clock and then leads you briefly through the process of how an employee would record their time against a job as they use Time Clock MTS.
Creating and Editing Jobs
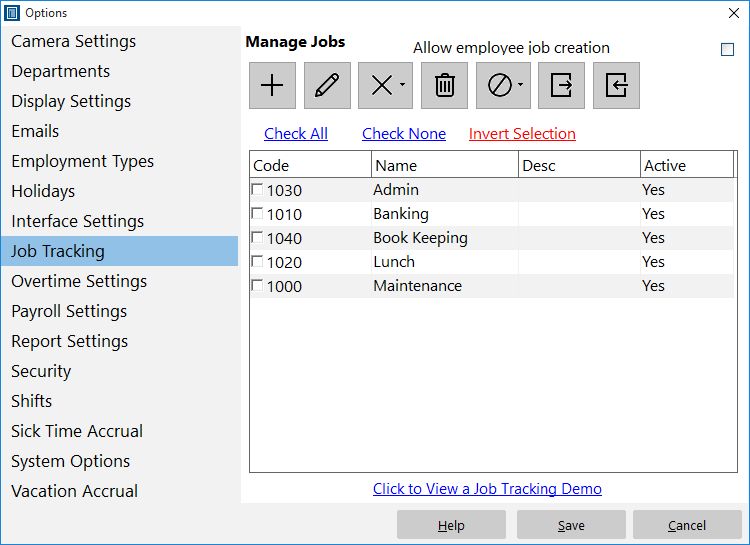
Step 1 : Defining Jobs
Firstly log into Time Clock MTS as the administrator. How you log in as the administrator was covered in this Time Clock MTS How To Article. Once you’ve done this go to the Tools->Options->Job Tracking screen, where you’ll see the screen above. To create a new job just click the new job button and you’ll be shown the screen below.
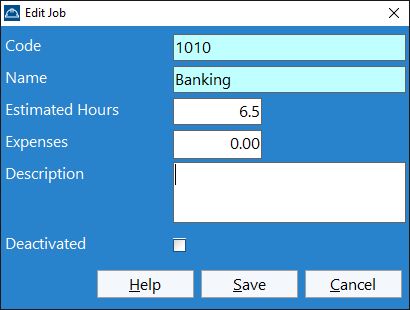
Creating a Job
To create a job give it a unique numerical job code, give the job a name, and if you like a description. If you do not have your own job numbering system Time Clock MTS will automatically assign each new job a unique job code. You can also disable a job to prevent employees booking time to that job. This might be useful if you’re just setting your system up, or your customer isn’t paying you for that job anymore, or perhaps your internal budget for a project has been exceeded.
Employee Details
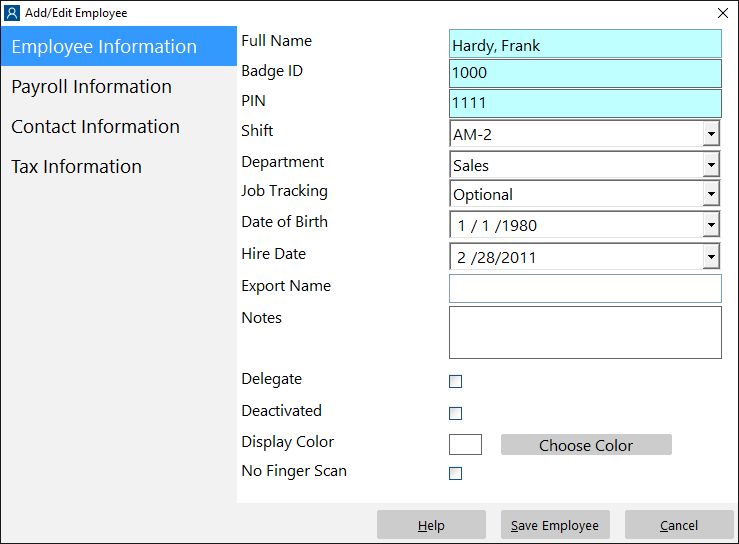
Step 2 : Deciding Which Employees will Use Job Tracking
The next step is to decide which employees will have to use job tracking and how they will use it. Select an employee on the employee list and go to the Employee Maintenance->Edit Selected Employee screen (which you can see above). On the employee information screen use the job tracking drop down box to define how an employee will use job tracking. They can either not use it, use it optionally (they can choose not to enter a job code when they clock in) or must use it (they must enter a job code when they clock in).
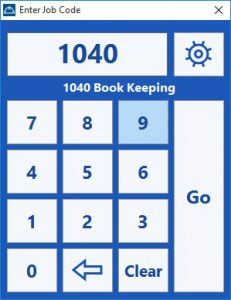
Entering a Job Code
Step 3 : Employees Entering Job Codes
Entering job codes for employees couldn’t be any easier. When employees clock in they’ll be shown the enter job code screen above. Employees need to enter the job code for the job they want to book the time to either via keyboard or via the numeric buttons on the screen (with a mouse click or via a touchscreen). Time Clock MTS will try to auto complete the job code for the employee and show the job details so that the employee is sure he or she is booking their time to the correct job. It would be very useful to have printed out the Active Job Report and have this next to your Time Clock MTS computers so that the employees have a readily available list of the jobs they can book time to.
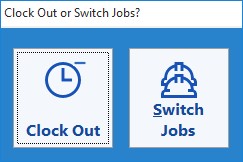
Switching Jobs
Employees can quickly switch jobs by clocking out of Time Clock MTS (via either the employee list or keypad screens of Time Clock MTS). The screen above will be shown to employees where they can either clock out or switch jobs. If they switch jobs the enter job code screen will be shown again and the employee can enter a new job code and switch to a new job.
Step 4 : Reporting on Jobs
The Job Time Report provides the Time Clock Administrator with all the information they’ll need to understand how time is being booked to jobs. It shows a break down of each job defined in Time Clock MTS, and how much time each employee has logged against each job.
