by kathryn@timeclockmts.com | Jul 18, 2008 | Tips and Tricks, Using the Software

Employee Maintenance Dropdown
Time Clock MTS allows you to track attendance of employees that work for you. However, as employees leave your organization you may wish to either delete or deactivate an employee’s record in Time Clock MTS. You may want to do this to declutter the employee list or to prevent the employee from recording any more attendance information. When you Deactivate an employee you can Reactivate the employee while logged in as the administrator and using the Employee Maintenance->Re-Activate An Employee menu item. However, when you Delete an employee there’s no way of undeleting that employee from within Time Clock MTS.
However, the deletion is not permanent. The actual employee data and all of their employee attendance information is actually still present in the Time Clock MTS database. All you need to do is email us your Time Clock MTS database and let us know which employee you want undeleted. We’ll do it for you and email your database promptly and you’ll find that the employee record is now visible again.
by Mark Nemtsas | Jul 17, 2008 | How To, Tips and Tricks, Using the Software
In part 1 of customizing Time Clock MTS Reports I covered the basic structure of reports and how you could customize them. In this second part I’ll cover some of the Report Sections and the Data Fields that are available to each. If you don’t know what a Report Section or Data Field is then go back and take a look at Part 1 of this topic.
Report Header Section
- Report Name – the name of the report that is being run
- Period Start – the report start date
- Period End – the report end date
- Report Time – the date and time the report is run
- Shift Filter – the shift the report is filtered on (if applicable)
- Employee Filter – the employee(s) the report is filtered on (if applicable)
- Department Filter – the department the report is filtered on (if applicable)
- T – inserts a TAB space, used for alignment and formatting purposes
Company Header Section
- Company Name – the company name as set on the Display Settings page
- Company Address – the company address as set on the Display Settings page
- T – inserts a TAB space, used for alignment and formatting purposes
Employee Details Section
Employee Header Section
In Part 3 of this report customization series I’ll cover the remaining report sections.
by Mark Nemtsas | Jul 9, 2008 | How To, Tips and Tricks, Using the Software
Version 2 of Time Clock MTS included a complete re-work of the way reports functioned, and allowed you do configure the appearance of reports to suit your requirements. In this weblog entry I’ll cover the basic elements of customizing reports, in subsequent entries I’ll take a look in detail each aspect of doing so.
Report Structure
Each Time Clock MTS report has the same basic structure, this is best illustrated by the following simple diagram.
<Report Header>
<Company Header>
<Employee Header>
<Employee Details>
<Report Data>
<Employee Summary>
<Employee Accruals>
<Payroll Information>
The first 2 report sections are displayed once per report, the last 6 sections are displayed for each employee you choose to run the report on. All of these report sections except the <Report Data> section can be customized to your requirements. The report data section contains the data for the report that you are currently running.
How Are Report Sections Customized?
Reports are customized by configuring each report section using the Tools->Options->Report Settings page.
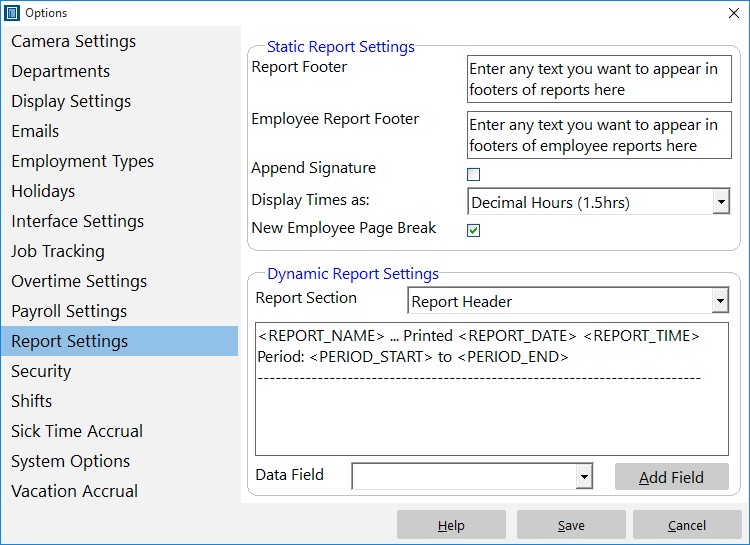
Control how reports are formatted to suit your requirements.
You can read more about this page in the Report Settings help topic. In basic terms you use this screen to customize report sections by selecting a report section, and configuring the section template using either free text or by inserting data fields using the Add Field button and drop down.
What is a Section Template?
A section template is simply the text that defines the format of a Report Section. A section template can contain any text you like and can contain Data Fields. Each section template has a number of Data Fields that can be added to it.
What is a Data Field?
A Data Field is text that can be included in a section template that is automatically replaced by Time Clock MTS when reports are generated. For example, if you include the Data Field in your section template it will be replaced by the name of the report when your report is run.
Next time, in part 2 of report customization I’ll cover some of the report sections and the data fields that are available to each.
by Mark Nemtsas | Jul 2, 2008 | Tips and Tricks, Using the Software
A common question I get is how exactly does payroll time rounding work? So I thought it would be worthwhile to cover it in some more detail to help Time Clock MTS users.
How is Report Rounding Turned On?
You can turn on report rounding on the Tools->Options->Payroll Settings page. For more information take a look at the Time Clock MTS Payroll Settings help topic.
How Does Rounding Work?
Rounding is applied to time information at report time only. The rounding used is just normal arithmetic rounding. Here’s an example, let’s say we have the time rounding set to 15 minutes and the normal clock in time for your employees is 7:30 AM. In this example, anything on or before 7:37:29 AM is rounded down to 7:30 AM, and anything on or after 7:37:30 is rounded up to 7:45 AM.
What Does the Least Quantity Checkbox Do?
Checking this box over-rides the rounding scheme as shown above. The most basic way of explaining it is that all clock ins are ROUNDED UP and all clock outs are ROUNDED DOWN. So, in our example above any employee clocking in after 7:30:00 AM will have their time rounded up to 7:45:00 AM. Let’s say the normal clock out time for the above example is 4:30:00 PM. When the Least Quantity check box is marked, any employee clocking out between 4:30:01 PM and 4:44:59 PM will have their clock out time rounded down to 4:30:00 PM. The practical effect of the Least Quantity check box is that the hours worked are minimized.
What Effect Does Rounding Have on Stored Time Information?
None, clock in and clock out data is still stored to the nearest second, the rounding takes effect when you run a report. In fact, you can now generate reports and suppress the rounding so you can view your raw time information. To do this all you need to do is check the Turn Off Rounding checkbox on the Report Configuration screen.
Why Would you use Time Rounding?
To comply with either your workplace payroll rules or government payroll regulations. A lot of workplaces have a minimum amount of payable overtime, so rounding can be easily used to prevent employees accumulating small amounts of overtime by clocking in slightly early, or clocking out slightly late. Another reason could be to allow for some leeway in clocking in or out, clearly not everyone can clock in exactly on time so time rounding allows for this. For example, Californian labor law allows for some leeway in rounding of time, allowing employers to not pay overtime for employees who clock in slightly early or out slightly late (provided they are not actually working of course).
That about sums it all up, if you have any questions, as always post a comment or email us.
by Mark Nemtsas | Jun 20, 2008 | New Features, Using the Software
A key problem with any time clock system is that of employees that clock in and out for each other. This is known as ‘buddy punching’ and is the main method by which employees try to manipulate their time card information. The use of magnetic cards, proximity devices, and PINs can help reduce buddy punching, but of course it does not prevent employees sharing their card, prox device, or even their PIN with a co-worker and still providing fraudulent data.
There are a couple of ways of eliminating buddy punching, one of these is capturing an employee image at the time of clocking or out. Using a computer along with Time Clock MTS and cheaply available web cameras allows you to have a very secure time and attendance solution that can largely eliminate buddy punching and help reduce your payroll costs accordingly.
Camera Hardware Requirements
You don’t need anything special to allow Time Clock MTS to capture images when employees clock in and out. Time Clock MTS will work with almost any sort of USB or integrated web camera, if your version of Windows can detect your web camera then Time Clock MTS can probably use it.
Software Requirements
There are no additional software requirements, if you have Time Clock MTS Version 2.0.2 or newer then you have all the software you require to use a camera with Time Clock MTS. You can always download Time Clock MTS from here.
Setting Up Time Clock MTS to Use a Web Camera
Just make sure your web camera is plugged into your computer and then run Time Clock MTS and log in as the administrator. Go to the Tools->Options->Camera Settings page. You’ll see the following screen:

Capture employee images when they punch in or out.
If your camera is connected properly and is accessible by Time Clock MTS just check the Enable Image Capture check box. See below for a range of configuration options to setup image capture to suit your requirements:
- You can decide when you want to capture images (clock in, clock out or clock in and out), it is recommended that you capture images on both events for maximum security.
- The image capture location can be easily set using the Set button. By default it will have the location set to the same directory that your Time Clock MTS database is stored in.
- Because captured images take up disk space you may decide to only keep the recorded images for a certain amount of time. Time Clock MTS can delete older images based on their age, you can decide to keep images for a week, a month, 6 months, or forever.
- If you have more than one camera attached to your Time Clock MTS computer you can choose which one to use by clicking the Change Camera button. Time Clock MTS will default to the first camera attached to your computer if the selected camera is no longer attached to the PC.
- Time Clock MTS captures images into JPEG format.
Viewing Captured Images
If you suspect that buddy punching is going on in your work place then you can view captured images easily from within Time Clock MTS. While you are logged in as the administrator go to the Tools->Edit Times screen.
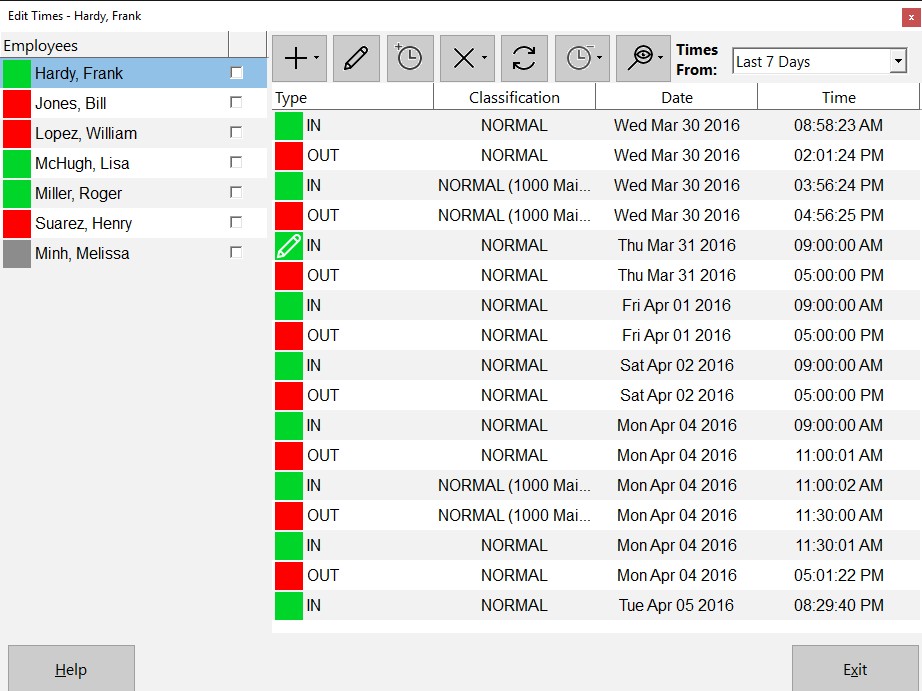
The Edit Times Screen
You will see a the View button in the toolbar above the list of times, this is the button with an eye and magnifying glass icon on it. Just select the time you wish to view the captured image for, and then click the View button. You’ll then be shown the following screen showing your captured image along with the clock in/out and user details that are associated with the captured image.
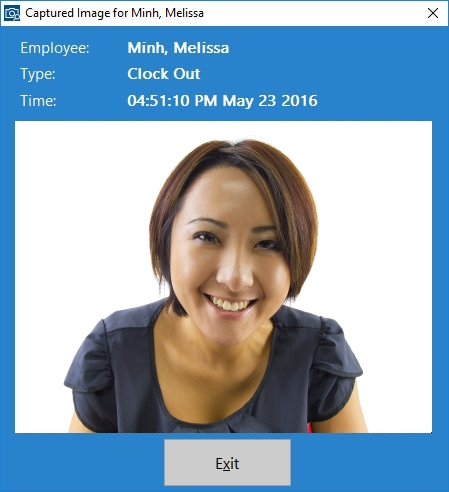
This screen allows administrators to view images captured when employees clock in or out.
That’s all there is to it. If you have a web camera and want to ensure that your time clock information is secure and accurate then I’d strongly recommend using this feature to help reduce your payroll costs!
by Mark Nemtsas | Jun 19, 2008 | How To, Tips and Tricks, Using the Software
One change to Time Clock MTS is simply a new item added to the Employee Maintenance menu. This deceptively simple menu item Copy Selected Employee fixes up one of the most common complaints I had about Time Clock MTS. Usually the complaint went something like this:
“How can I add employees to Time Clock MTS without having to type in all the details for every single one?”
Well, prior to Version 2, the answer to this question was you just can’t add a number of employees quickly and easily. Right though, with the addition of the menu item above the job of adding many employees to Time Clock MTS has suddenly become a lot easier.
Here’s how to quickly add an employee using another employee record as a template:
- Add the employee you want to use as a template, give them all the settings you require including payroll, assigning to a department, a shift, and whatever else you need. For the sake of this example we’ll call this employee ‘John Smith’.
- Select the employee ‘John Smith’ in the employee list and then select the Employee Maintenance->Copy Selected Employee menu item.
- The employee maintenance screen will now been displayed with all the details already filled in, the name of the employee will be set to ‘Copy of John Smith’. All you need to do now is edit the details you want to change for this employee (such as the name, address, and PIN) and in just a few seconds you’ve created a new fully configured employee.
That’s it, there’s nothing else to it. Remember, when you do need to add an employee, and you want the employees record to be based on some existing employee you’ve already set up, then make use of the new Copy Selected Employee menu item!
Page 22 of 23« First«...10...1920212223»