by kathryn@timeclockmts.com | Dec 8, 2014 | How To, Tips and Tricks
As a busy administrator here’s one quick Time Clock MTS tip that’s going to make your life much easier. Did you know that if you double click on an employee name in the employee list home screen then it immediately gives you the option to either edit the employee or edit employee times? In a busy office we know you’ve got better things to do than your often tiresome payroll and this is exactly where Time Clock MTS takes the hairpulling out of this staff management process. We understand you might not know all the menus and features like we do which is why we try and make the user interface of the software as easy as possible to navigate. This neat little feature will save you valuable time. You could of course browse the menu and find the Employee Maintenance -> Edit Selected Employee or the Tools -> Edit Times, but why bother when you know this handy little quick tip.
Time Clock MTS Logged in as the Administrator
When logged in as the administrator on the main Time Clock MTS home screen you can simply double click on the employee name in the employee list that you need to edit then a popup window will appear. You can then decide whether to edit that employee or edit the employee times so you can quickly and easily make your changes or do the payroll for this reporting period. Whichever you choose you’ll be immediately taken to that screen to make your adjustments. Could it be any easier!
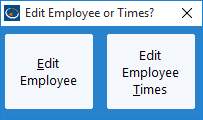
Edit Employee or Times?
by Mark Nemtsas | Dec 1, 2014 | How To
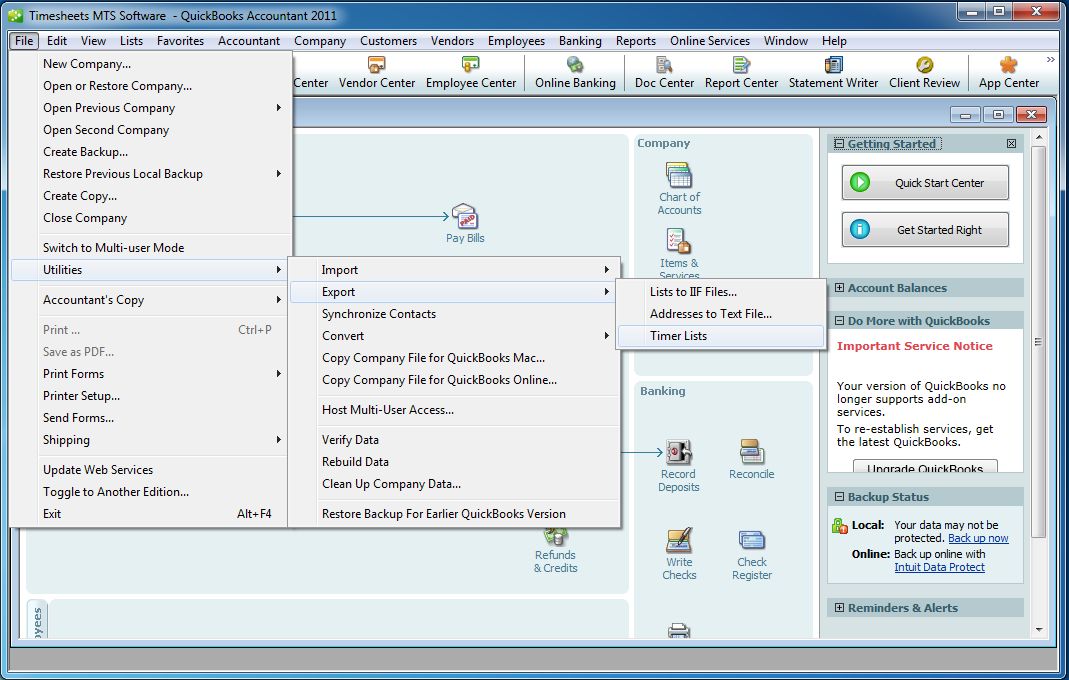
The easiest way of configuring Time Clock MTS to export data to QuickBooks is to import a QuickBooks Timer List file. This file is easily created from QuickBooks and includes information about your QuickBooks company file that Time Clock MTS needs to create a valid export data file that can be used by QuickBooks. Here’s how to create a Timer Lists file from within QuickBooks.
- Log into QuickBooks as the administrator
- On the File menu choose the Utilities->Export->Timer Lists menu (see image below)

Exporting the Timer Lists File
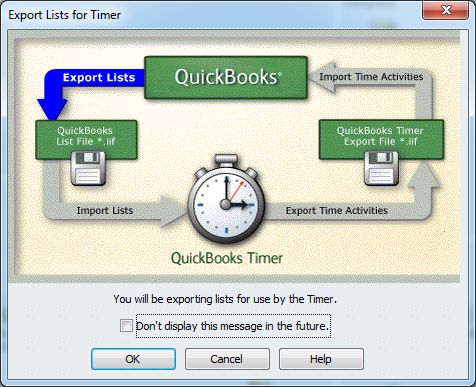
- You’ll then be asked by QuickBooks to confirm the export. See below:

Confirm the Export
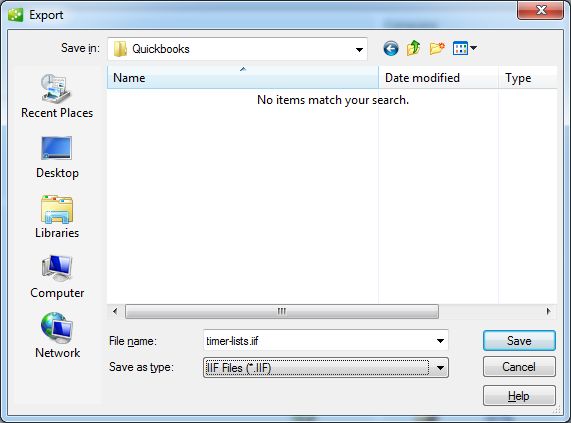
- Once confirmed you’ll need to choose a save location and file name for the export file. Note that the default extension for QuickBooks export and import files is .iif. Make sure you leave the file extension intact. In the image below the export file is being saved to a folder I’ve called (rather imaginatively) QuickBooks.
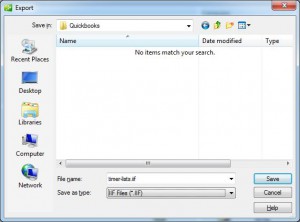
Choosing the Save File Name and Location
- Click the SAVE button and your export file will be saved with your chosen file name into your chosen location and QuickBooks will inform you of success.

There’s some instructions on how to do the same thing on the QuickBooks Support Site. Look for the section titled Export your Pro Timer Lists from QuickBooks.
Of course you’re going to want to note down the file name and location of the timer lists file so you can import it into Time Clock MTS.
by Mark Nemtsas | Nov 25, 2014 | How To
Time Clock MTS can be set to get the time from an internet time server. This means that the times recorded when an employee punches in or out are independent of the time on the computer and it’s an excellent way of securing your time clock and preventing employee time clock fraud. However, from time to time certain time servers become unavailable for a period of time or are removed from service completely. If you’re experiencing problems with time sychronization in our software here’s some steps to take to fix the issue.
Use the Dedicated Time Clock MTS Time Server
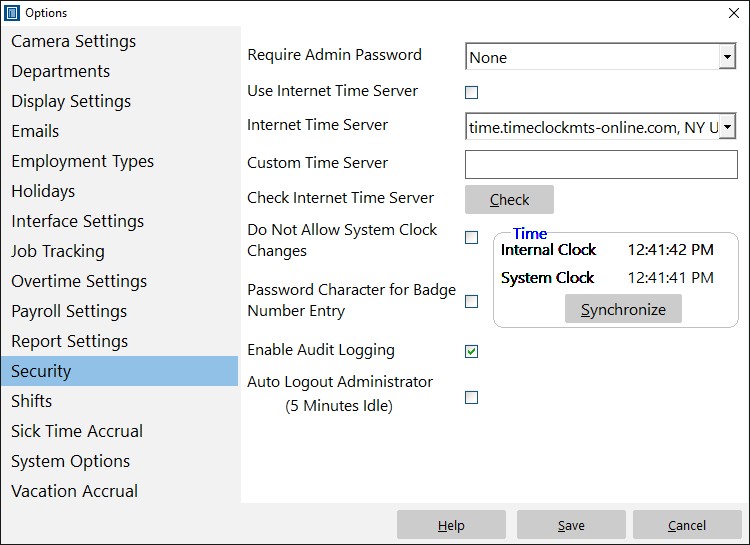
The Time Clock MTS Security Screen
We’ve got our own dedicated time server and it’s available 100% of the time. Try using that instead of one of the servers run by third parties. You can change the time server on the Security Settings screen within Time Clock MTS. That screen is available via the Tools->Options->Security menu.
- Log in as the administrator and go to the Tools->Options->Security screen. If you cannot see the Security screen then you’re using the Time Clock MTS Client software. You MUST be using the Time Clock MTS Administrator software to change this setting.
- Choose the time.timeclockmts-online.com server from the Internet Time Server drop down box.
- If you’re using an old version of Time Clock MTS and and the time.timeclockmts-online.com option is not available choose the Custom Time Server option from the drop down and type time.timeclockmts-online.com into the Custom Time Server box.
- Click the CHECK button to check your connection to our internet time server. When the check returns a successful message you’ve got things set up correctly.
- Click SAVE and you’ll now be using the dedicated Time Clock MTS Time Server.
by Mark Nemtsas | Oct 30, 2014 | How To, Tips and Tricks
Quite a few users of Time Clock MTS have decided that they need more than one administrator installation of the software. This might be because they want to run reports from one location and administer the database from another, or perhaps because they want to control employees from different departments from different computers. Time Clock MTS can accommodate this, with a couple of provisos, firstly you must have a license for the second PC, and secondly, only one of the admin computers at a time can be logged in. This blog entry will show you how to setup the second administrator installation.
- Setup and configure your first administrator installation and move your Time Clock MTS database somewhere on your computer network. The database file must be visible from the computer you plan on installing the second administrator license on. The second computer must also have full read/write/execute/delete permissions on the folder that the database is in. You can read how to move your database here here.
- Install the admin software on the second computer and run it. You’ll be asked to enter a password, go ahead and do that and take note of what you set the password to.
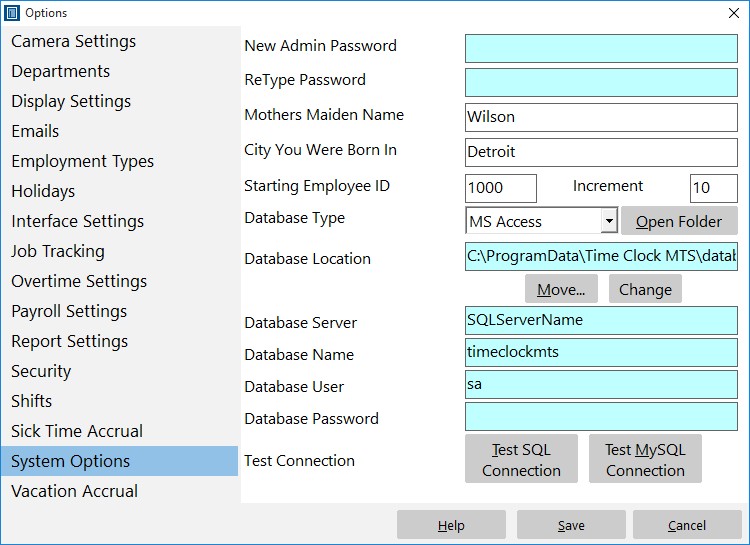
The System Options Screen
- Log into the software as the administrator and go to the Tools->Options->System Options screen (see image above).
- Click the CHANGE button which can be seen on the right of the above screen about half way from the top.
- You’ll then be given a chance to browse to where you moved your time clock database in step 1. Find it, select it, and click OK.
- Click the Time Clock MTS SAVE button to save the changes. You’ll now be taken back to your employee list where you should see all of your employees.
That’s all there is to it. You’ve just set up a new time clock administrator computer. As always contact us if you have any problems.
by Mark Nemtsas | Oct 30, 2014 | How To, Tips and Tricks
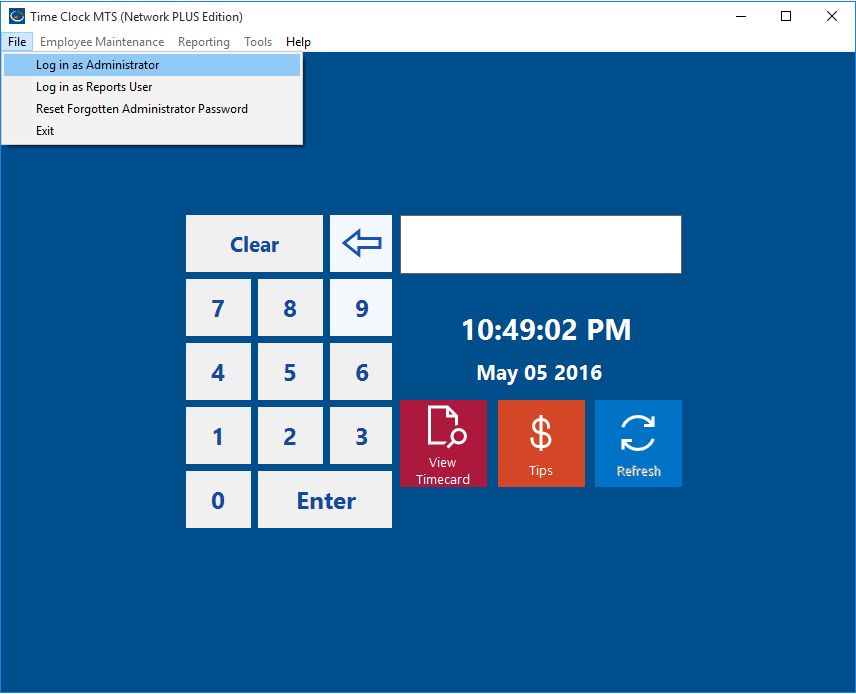
To access payroll reports and to be able to configure Time Clock MTS you must be using the software in Administrator mode. This Time Clock MTS How To Article covers how to log into Time Clock MTS as the administrator and thus access the Administrator mode.
Logging in as Administrator
When Time Clock MTS is operating in Normal mode and you want to log in as the administrator you must use the File->Log in as Administrator menu as shown in the image above. Once you’ve selected this menu item you’ll be shown the Enter Administrator Password screen as shown below.
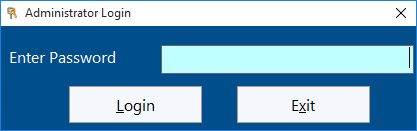
Administrator Login Screen
Your administrator password was set by you when you first installed Time Clock MTS. Remember that is is cASe SenSITive and that you (or someone else with administrator access to Time Clock MTS) may have changed it. Once you’ve entered the password correctly and clicked the Login button you’ll be logged in correctly and Time Clock MTS will be operating in Administrator mode. If you’ve forgotten your password then you’ll need to reset your administrator password.
by Mark Nemtsas | Jul 11, 2014 | How To, Using the Software
I thought I’d continue with the Time Clock MTS Q&A format of the last few posts on our blog. Today we have a question from Martha Buhman who is a long time user of the software.
hi, i have time clock installed on one of my computers and i want to use it on a new one – how can i do that? thanks! i have used this for a number of years and i LOVE it — it has saved me so much time keeping track of projects
This is certainly the most common support question we get and because of that we’ve got an entire how-to article dedicated to answering it. Key points the article covers include downloading and installing Time Clock MTS on your new computer, moving your data file across to the new PC, and then registering the software with your registration keys. If your registration keys do not work on the newly installed computer then you’re going to want to read this blog article covering what to do when your keys don’t work in the latest version of the software.
Page 4 of 16« First«...23456...10...»Last »