Version 2.0.3 Released
Just a minor release today. For some reason the default settings for report section templates we not being set. This is now fixed.
Just a minor release today. For some reason the default settings for report section templates we not being set. This is now fixed.
A key problem with any time clock system is that of employees that clock in and out for each other. This is known as ‘buddy punching’ and is the main method by which employees try to manipulate their time card information. The use of magnetic cards, proximity devices, and PINs can help reduce buddy punching, but of course it does not prevent employees sharing their card, prox device, or even their PIN with a co-worker and still providing fraudulent data.
There are a couple of ways of eliminating buddy punching, one of these is capturing an employee image at the time of clocking or out. Using a computer along with Time Clock MTS and cheaply available web cameras allows you to have a very secure time and attendance solution that can largely eliminate buddy punching and help reduce your payroll costs accordingly.
Camera Hardware Requirements
You don’t need anything special to allow Time Clock MTS to capture images when employees clock in and out. Time Clock MTS will work with almost any sort of USB or integrated web camera, if your version of Windows can detect your web camera then Time Clock MTS can probably use it.
Software Requirements
There are no additional software requirements, if you have Time Clock MTS Version 2.0.2 or newer then you have all the software you require to use a camera with Time Clock MTS. You can always download Time Clock MTS from here.
Setting Up Time Clock MTS to Use a Web Camera
Just make sure your web camera is plugged into your computer and then run Time Clock MTS and log in as the administrator. Go to the Tools->Options->Camera Settings page. You’ll see the following screen:

Capture employee images when they punch in or out.
Viewing Captured Images
If you suspect that buddy punching is going on in your work place then you can view captured images easily from within Time Clock MTS. While you are logged in as the administrator go to the Tools->Edit Times screen.
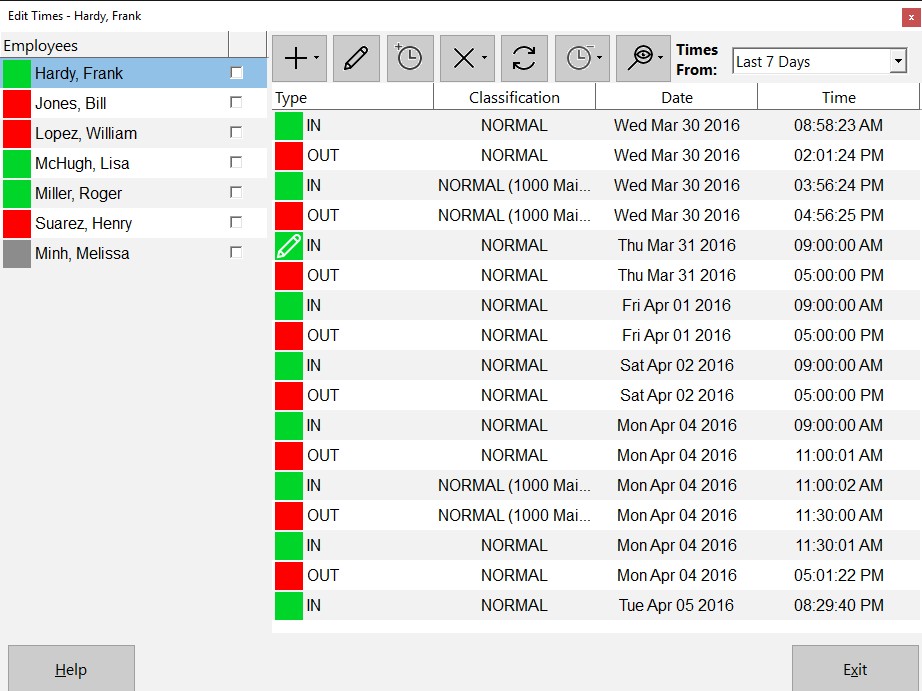
The Edit Times Screen
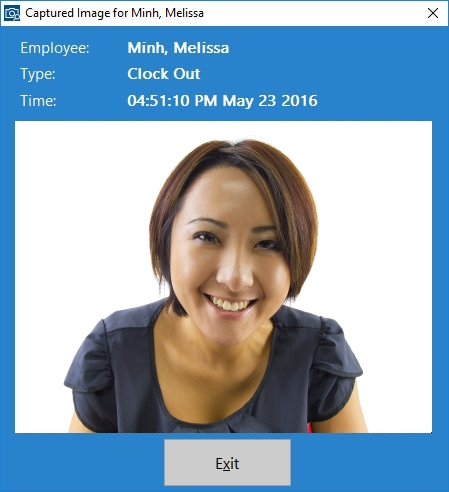
This screen allows administrators to view images captured when employees clock in or out.
That’s all there is to it. If you have a web camera and want to ensure that your time clock information is secure and accurate then I’d strongly recommend using this feature to help reduce your payroll costs!
I’ve just released Version 2.0.2 which contains a number of fixes to problems introduced by the last release plus adds one major new feature. Changes made include:
There were a number of other minor fixes, for more information take a look at the Release Notes page. In the next day or two I’ll write a longer post covering the new image capturing feature of Time Clock MTS, what it does, how it works, and how you might use it.
One change to Time Clock MTS is simply a new item added to the Employee Maintenance menu. This deceptively simple menu item Copy Selected Employee fixes up one of the most common complaints I had about Time Clock MTS. Usually the complaint went something like this:
“How can I add employees to Time Clock MTS without having to type in all the details for every single one?”
Well, prior to Version 2, the answer to this question was you just can’t add a number of employees quickly and easily. Right though, with the addition of the menu item above the job of adding many employees to Time Clock MTS has suddenly become a lot easier.
Here’s how to quickly add an employee using another employee record as a template:
That’s it, there’s nothing else to it. Remember, when you do need to add an employee, and you want the employees record to be based on some existing employee you’ve already set up, then make use of the new Copy Selected Employee menu item!
The Simple Wages Report is a new addition to Version 2 of Time Clock MTS.
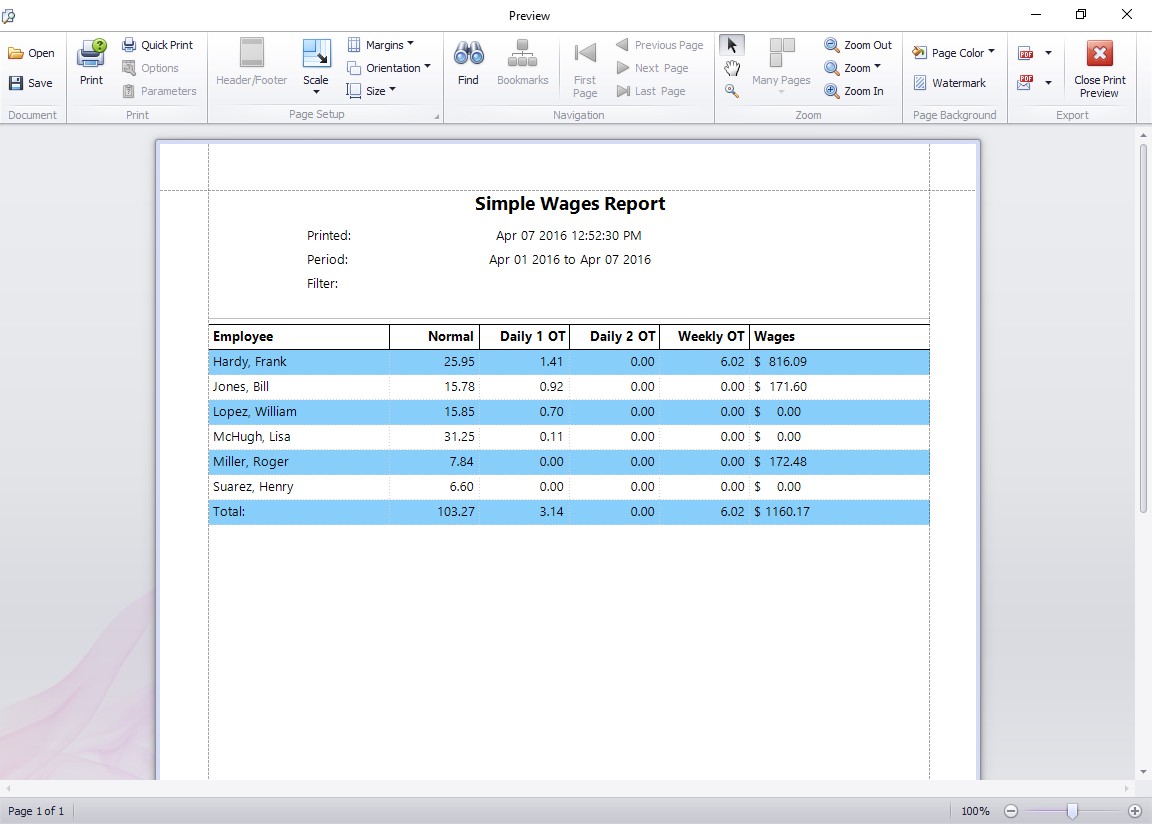
The Simple Wages Report
Available from the report configuration screen gives a simple summary of activity across a time period. The summary is a simple line per employee. You can see at a glance the hours worked for the week, the hours of daily overtime, and the hours of weekly overtime. Total salary payable is also displayed.
This report is useful for supply to payroll departments for entry into payroll software, or even as a simple management report that gives key information without too much detail.