by Mark Nemtsas | Oct 31, 2016 | New Releases, News
Time Clock MTS Version 6.0.9 has been released. There’s a couple of months of work in this new release with most of our effort targeted at two main areas. First, the complete replacement of the camera system used previously with what should be a far more reliable and better supported system. The second area of focus was the elimination of delays when employees punched in or out. These delays were only seen on some computers primarily running Windows 10. We’re pretty sure we’ve identified where and how the delays were occurring and have fixed them up.
A complete list of the changes can be found below:
- New camera and image capturing system developed to replace the existing unreliable system. This new system should perform a lot better across all Windows versions and have improved support for USB and integrated web cameras. It also offers image capture to JPG files, the ability to reduce the size of the camera window, and provides visual feedback when images are captured.
- Fixed up various issues on the employee maintenance screens when cancelling out changes and not all employee data was entered correctly.
- Fixed up some inconsistencies in the decimal places of various sick time and vacation time accrual values.
- If checking the time from an internet time server on software startup fails users are now given the opportunity to re-check without having to re-start the software.
- Various program settings are now cached on software start rather than re-checked while the software is running. Aimed to eliminate delays some users were seeing when punching in or out.
- Fixed an error that was being thrown if the Length of Work Week on the Payroll Settings screen was cleared and the changes saved.
- Signature Block no longer appears twice in some reports.
- Images are now captured correctly if set to capture on “Clock in and Clock Out”.
- Added extra data logging to the database backup functionality to understand why some users are getting an error when attempting to back their data file up.
- Fixed up some button styling issues when employee punches fail due to the system clock being changed or an internet time server check failure.
- Some extra data logging has been added to the punch in / out procedures to try to determine where delays are occurring.
by Mark Nemtsas | Sep 8, 2016 | How To
This post details the first way that the Employee List Interface of Time Clock MTS can be used with some sort of data reader (such as a barcode scanner, magnetic card reader, or RFID reader). This method relies on badges, bar codes, or RFID fobs being encoded with the employee name and a couple of other characters.
Badge Format
You must be able to print your barcodes, or encode your magnetic cards or RFID badges to a standard format for them to function with Time Clock MTS while it is operating with the Employee List Interface. The required format begins with the standard = character, is followed by each letter of the employee’s full name set on the Employee Information screen, and then concluded with the + character.
Thus, an employee with the name Hardy, Frank would need to be encoded as:
=Hardy, Frank+
While an employee with the full name Bob Jones would need to be encoded as:
=Bob Jones+
Clocking In and Out
Clocking in and out is simply a matter of encoding your barcode, magnetic cards, or RFID fob or badges as described above for each employee in Time Clock MTS. Once you’ve done that, plug the device into your computer and ensure it’s working correctly. You’ll need to make sure it’s either plugged into the keyboard port on the PC or in the case of a USB device make sure your “software wedge” is installed. To test if things are working correctly start up Windows Notepad and make sure it is the active Windows application. Scan your properly encoded employee barcode, card, or RFID badge and some text should appear in Windows Notepad that looks something like what we talked about earlier, =Bob Jones+ where Bob Jones is the Time Clock MTS employee name.
Once you’ve verified that the badges are working correctly start up Time Clock MTS and make sure it’s the active Windows application. Scan one of the employee badges and you should see that employee either clocked in or out. The software will clock someone in who is clocked out, and vice versa for someone who is clocked out.
by Mark Nemtsas | Sep 8, 2016 | How To
This post details the second way that the Employee List Interface of Time Clock MTS can be used with some sort of data reader (such as a barcode scanner, magnetic card reader, or RFID reader). This method relies on a unique identifier being stored with each employee and changing a single setting on the Interface Settings screen.
Data and Scanner Requirements
The first requirement for this method to a unique number of identifiers that are stored on a bar code, proximity card, or magnetic card. It doesn’t matter too much what the identifiers are as long as they are 255 characters or shorter. They could be pre-programmed fobs, bar codes generated in Excel using a barcode font, your internal ID badges, or a national identity card. Of course you must have means of reading this data and inputting it into a computer via a keyboard wedge or software wedge, which is the de-facto method most card, RFID, and bar code readers use.
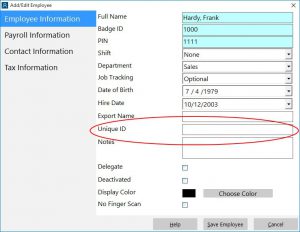
Storing an Employee’s Unique ID
Store Unique ID’s with Employee Records
The first step in the process is to store a unique ID against each employee’s record in Time Clock MTS. This is done on the Employee Information screen (see above). Once you’ve got the employee’s information showing select the Unique ID field and scan the card, RFID fob, or barcode you’ve decided to allocate that employee. Your data reader will populate the field. Once done click the Save button. Repeat for each employee, remembering of course to allocate a different card, fob, or barcode to each employee.
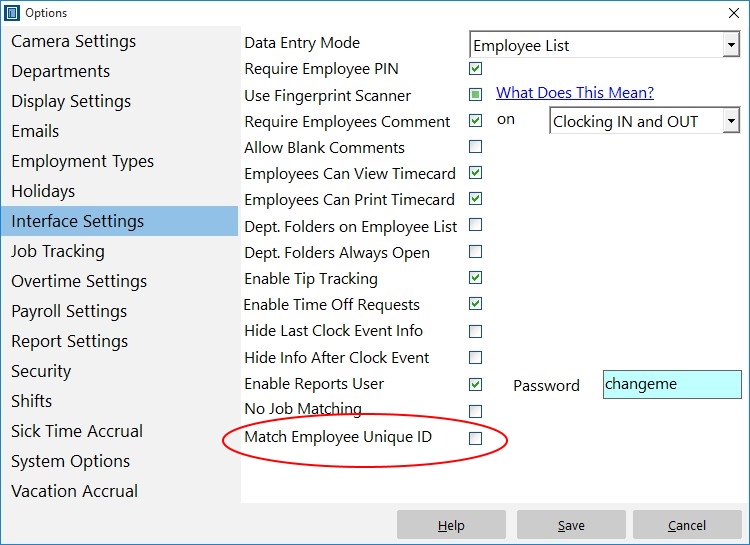
Enable the Match Unique ID Setting
Enable the Match Employee Unique ID Setting
The next step is to enable the Match Employee Unique ID setting on the Interface Settings screen (see above). Simply check the box and click Save.
Start Scanning Your Unique ID’s!
The final step is simply to start scanning your employee ID’s using your data scanner of choice. Of course, you must have the employee list interface selected for this to work. When an ID is scanned using your barcode scanner, or magnetic card reader, or your RFID fob reader (see below) Time Clock MTS will attempt to match the employee with that ID and punch them in or out depending on what their current status is. By the way the RFID scanner below was purchased for less than $20 along with 10 pre-programmed fobs like that shown. So it’s really not expensive to set this sort of system up!
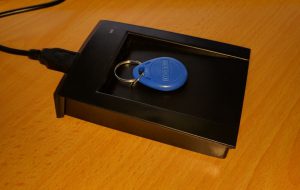
USB RFID Reader and Fob
by Mark Nemtsas | Sep 7, 2016 | New Releases, News
Time Clock MTS Version 6.0.8 has been released. Details of the changes made in this version can be found below.
- Added a new way of using a bar code scanner, magnetic card reader, or proximity card reader to punch employees in or out. That makes three distinct ways of doing so. This new method only works on the Employee List Interface. Employees have a new “Unique ID” setting available which can be populated with some sort of unique identifier such as a scan from an ID card or perhaps from pre-programmed proximity fobs. Turn on a new setting on the Interface Settings screen called “Match Employee Unique ID” and when you scan an employee’s unique ID they will be matched and then punched in or out. A blog post detailing this method will be posted at a later date.
- Employees can no longer see de-activated employees on the employee list when checking their own time card details.
- Pressing N on the main screen no longer pops up the Internet time server debug screen. ALT-N is required now.
by Mark Nemtsas | Aug 5, 2016 | New Releases, News
Version 6.0.6 of Time Clock MTS is uploading as I write this entry. Changes made to this version include:
- If the “Enable Tip Tracking” checkbox is not checked the TIPS button on the main screen is now hidden.
- All database update code is now version dependent. This should (vastly) improve the startup speed of the software.
- Altered the way some data logging occurs for MySQL and SQL Server.
- Fixed up an issue with the tblEmployees.blnAlwaysPaySalary column. When using SQL Server no default value was provided which could prevent new employees being created.