by Mark Nemtsas | Sep 22, 2008 | How To
You can now easily change the main clock in and clock out screen of Time Clock MTS to any language that you like. This is especially useful if your work force does not understand English and you want the software to be as easy as possible for them. You can now configure all of the text on the Time Clock MTS employee list interface to any text or language that you like (including non Latin characters like Japanese, Cyrillic, or Chinese).
To setup Time Clock MTS to use a different language on the employee list interface log in as the administrator and go to the Tools->Options->Display Settings screen. Select the Main Screen Label you want to edit from the drop down box and then enter the text you want to set to be displayed for that item on the Employee List Interface. When you’re done you can get a result like the following images.
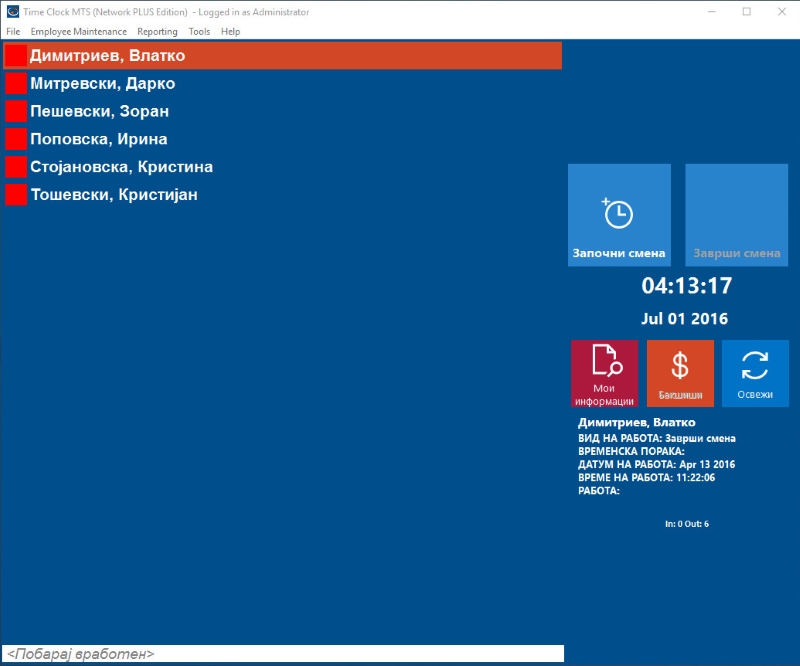
Time Clock MTS translated to Macedonian
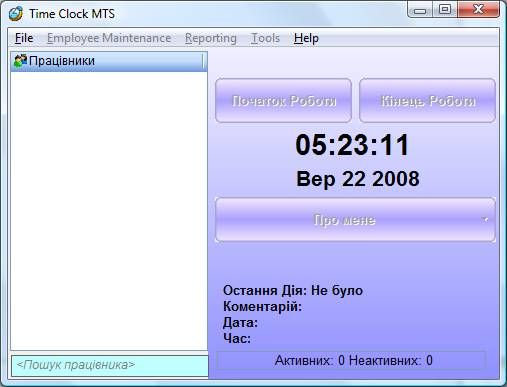
Time Clock MTS Translated to Ukrainian
by Mark Nemtsas | Sep 9, 2008 | How To, Using the Software
The Keypad Interface
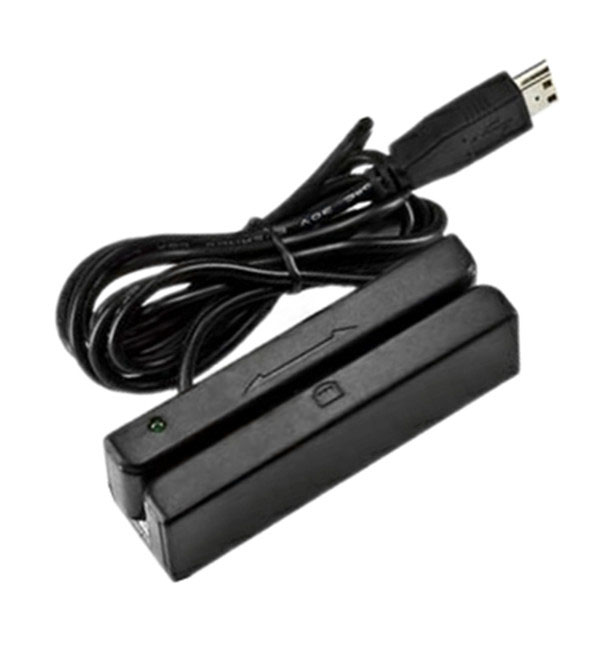
If required Time Clock MTS can be used without a keyboard by using a touch screen or a magnetic card reader or a barcode reader. Today I’ll talk about using Time Clock MTS with a magnetic card reader. In its most simple form a magnetic card simply has normal text characters (like those you’d type on your keyboard) stored in the magnetic stripe on the card. In fact, some of the simplest magnetic card readers can plug into the keyboard port or USB port on your computer and output text characters to the computer EXACTLY the same way that a keyboard does. This is known as a “keyboard wedge”. If your card reader doesn’t allow this you’ll usually find that it comes with some software that allows it to emulate a keyboard, which is known as a “software wedge”.
So, for example, if you had a magnetic card with the characters “hello world” stored in the magnetic strip and you had a magnetic card reader plugged into your keyboard port (or emulating a keyboard with a software wedge) and you scanned the card while you had a text editor (like MS Word) running then you’d see the characters “hello world” appear on your monitor. And in all likelihood you’d get the “enter” or “return” character at the end of the line. Most magnetic card readers output the “return” character at the end of the data scanned from a magnetic card by default so that you know you have all of the data from the magnetic card.
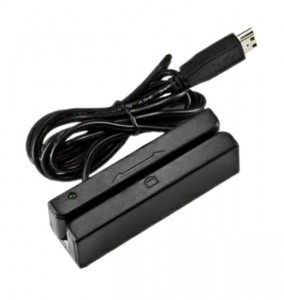
A Magnetic Card Reader
If you’re using the Employee List Interface of the software and you want to use it with a Magnetic Card reader then you should follow the detailed instructions shown here.
However, if you’re using the keypad interface of Time Clock MTS you’ll need to use the card reader a little bit differently. On keypad screen you can use a magnetic card reader to output characters to the employee ID/badge number field and the “return” or “enter” character “presses” the Enter button on the screen to clock the employee in or out. So, the practical upshot of this is if you have magnetic cards encoded with Time Clock MTS employee badge numbers (or employee ID’s) then you can use them to clock your employees in or out of Time Clock MTS very quickly and easily. In summary here’s a checklist of what you should look for in a magnetic card reader:
- Look for a magnetic card reader that can plug into the keyboard port (PS2) or USB port of your PC and output text exactly like a keyboard which is typically known as a “keyboard wedge”. If it cannot do this, check to see if it comes with a software program that allows it to emulate a keyboard, known as a “software wedge”.
- Look for a magnetic card reader that can output a return or line feed character at the end of the data read of a swipe card.
- You only need the most basic of magnetic cards, they only really need one ‘stripe’ and the data doesn’t need to be encrypted or anything fancy.
- Get your magnetic cards encoded with the Time Clock MTS Badge/Employee ID’s. These ID’s are setup on the Employee Information Screen.
- Stick to the default employee numbering in Time Clock MTS (which starts at 1000 and increments by 10 for each new employee). This will allow you to buy pre-encoded magnetic cards that can be used as your company expands. So your cards would be encoded with the numbers 1000, 1010, 1020 etc etc.
by Mark Nemtsas | Aug 5, 2008 | How To, Tips and Tricks, Using the Software
In part 2 of customizing Time Clock MTS Reports I covered some of the report sections and data fields used to customize the reports in the software. In this third part I’ll cover the remainder of the report sections and data fields.
Employee Summary Section
- Full Name – the name of the employee as set on the Employee Information Screen
- Total Work Time – the total hours worked by the employee for the report period
- Total Holidays Time – the total public holiday hours for the employee for the report period
- T – inserts a TAB space, used for alignment and formatting purposes
Employee Accruals Section
- Sick Time Taken Period – the sick time taken by the employee for the report period
- Sick Time Taken Fiscal – the sick time taken by the employee for the current fiscal year
- Sick Time Taken All Time – the sick time taken by the employee since they were employed
- Sick Time Owing – the current sick time owing to the employee
- Vacation Time Taken Period – the vacation time taken by the employee for the report period
- Vacation Time Taken Fiscal – the vacation time taken by the employee for the current fiscal year
- Vacation Time Taken All Time – the vacation time taken by the employee since they were employed
- Vacation Time Owing – the current vacation time owing to the employee
- T – inserts a TAB space, used for alignment and formatting purposes
Payroll Information Section
- Full Name – the name of the employee as set on the Employee Information Screen
- Total Work Time – the total hours worked by the employee for the report period
- Total Holidays Time – the total public holiday hours for the employee for the report period
- SSN – the social security number of the employee as set on the Payroll Information Screen
- Regular Hours – the number of hours worked by the employee during the report period that were paid at the normal rate
- Daily OT Hours – the number of hours worked by the employee during the report period that were paid at the daily overtime rate
- Weekly OT Hours – the number of hours worked by the employee during the report period that were paid at the weekly overtime rate
- Normal Rate – the normal rate of pay
- OT Rate – the overtime rate of pay
- Normal Earnings – earnings during the report period at the normal rate of pay
- Daily OT Earnings – earnings during the report period at the daily overtime rate of pay
- Weekly OT Earnings – earnings during the report period at the weekly overtime rate of pay
- Total Earnings – the total earnings for the report period
- T – inserts a TAB space, used for alignment and formatting purposes
by Mark Nemtsas | Jul 17, 2008 | How To, Tips and Tricks, Using the Software
In part 1 of customizing Time Clock MTS Reports I covered the basic structure of reports and how you could customize them. In this second part I’ll cover some of the Report Sections and the Data Fields that are available to each. If you don’t know what a Report Section or Data Field is then go back and take a look at Part 1 of this topic.
Report Header Section
- Report Name – the name of the report that is being run
- Period Start – the report start date
- Period End – the report end date
- Report Time – the date and time the report is run
- Shift Filter – the shift the report is filtered on (if applicable)
- Employee Filter – the employee(s) the report is filtered on (if applicable)
- Department Filter – the department the report is filtered on (if applicable)
- T – inserts a TAB space, used for alignment and formatting purposes
Company Header Section
- Company Name – the company name as set on the Display Settings page
- Company Address – the company address as set on the Display Settings page
- T – inserts a TAB space, used for alignment and formatting purposes
Employee Details Section
Employee Header Section
In Part 3 of this report customization series I’ll cover the remaining report sections.
by Mark Nemtsas | Jul 11, 2008 | How To, New Features, Tips and Tricks
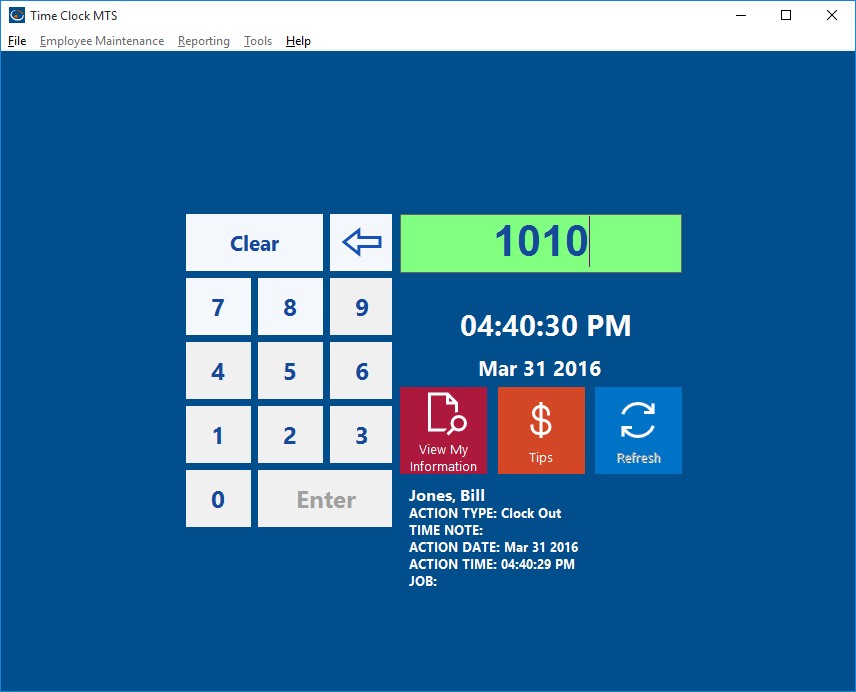
Time Clock MTS Versions 2.0.1 and higher include a new setting to allow you to force a time pair to be paid as overtime. You can do this via the Tools->Edit Times menu. Just select the time pair you want to force as overtime and click the Edit Time button and you’ll be shown the Edit Time screen.
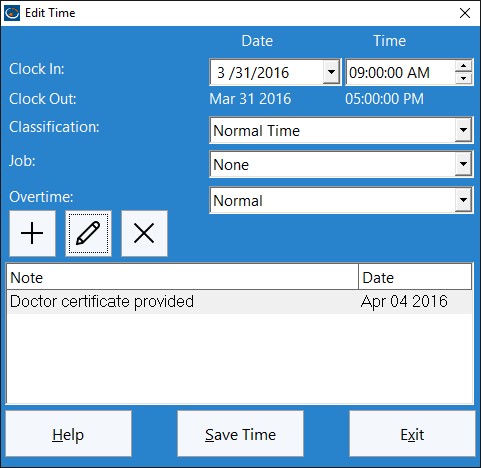
The Edit Time Screen
To force a time to be paid as overtime all you need to do is select the ‘Force Overtime’ option for the time, and click the Save Time button to save the change. For overtime purposes this time will now be forced to be paid as overtime regardless of other overtime settings. Let’s examine how this would work with some examples.
Example 1
No daily overtime, weekly overtime limit set at 40 hours. Employee works a 5 day week of 8 hrs, 8 hrs, 8hrs, 8 hrs, and 6 hrs for a total of 38 hrs. The last day of 6 hours happens to fall on a holiday for which the employee is entitled to overtime rates. The Time Clock MTS Administrator has flagged the time pair as ‘Force Overtime’. Time Clock MTS will report this week as 32 normal hours, and 6 hours of daily over time.
Example 2
No daily overtime, weekly overtime limit set at 40 hours. Employee works a 5 day week of 9hrs, 9 hrs, 8hrs, 8 hrs, and 8 hrs for a total of 42 hrs. The employee has agreed to fill in for someone else for 4 hours on the last day and the employer has agreed to pay them overtime rates for doing this. The Time Clock MTS Administrator has flagged the time pair as ‘Force Overtime’. Time Clock MTS will report this week as 36 normal hours, with 4 hours of daily over time on day 5, and 2 hours of weekly overtime on day 5. You can see in this case the employee still gets their weekly overtime entitlements as well as the time forced as overtime.
Why Use this Setting?
There are a few reasons why you’d want to make use of this setting:
- It’s a way of giving employees overtime rates on holidays. Many employers do not pay employees for holidays not worked, but if the employee does work on the holiday they are entitled to overtime rates. The holiday pay system in Time Clock MTS wont handle this sort of system by default, so this new setting is a way of achieving what is required.
- You may have some sort of overtime regime that is not handled properly by Time Clock MTS, this new setting pretty much allows you infinite flexibility to assign any amount of time to be paid as overtime.
- It allows for ad-hoc agreements between employers and employees. For example, you might not have an overtime policy but sometimes agree to pay employees at a higher rate for doing extra work, for performing unusual duties, or simply as a method of rewarding them.
Next time I’ll take a look at the other new overtime setting for individual times, the Ignore for Overtime setting.
by Mark Nemtsas | Jul 9, 2008 | How To, Tips and Tricks, Using the Software
Version 2 of Time Clock MTS included a complete re-work of the way reports functioned, and allowed you do configure the appearance of reports to suit your requirements. In this weblog entry I’ll cover the basic elements of customizing reports, in subsequent entries I’ll take a look in detail each aspect of doing so.
Report Structure
Each Time Clock MTS report has the same basic structure, this is best illustrated by the following simple diagram.
<Report Header>
<Company Header>
<Employee Header>
<Employee Details>
<Report Data>
<Employee Summary>
<Employee Accruals>
<Payroll Information>
The first 2 report sections are displayed once per report, the last 6 sections are displayed for each employee you choose to run the report on. All of these report sections except the <Report Data> section can be customized to your requirements. The report data section contains the data for the report that you are currently running.
How Are Report Sections Customized?
Reports are customized by configuring each report section using the Tools->Options->Report Settings page.
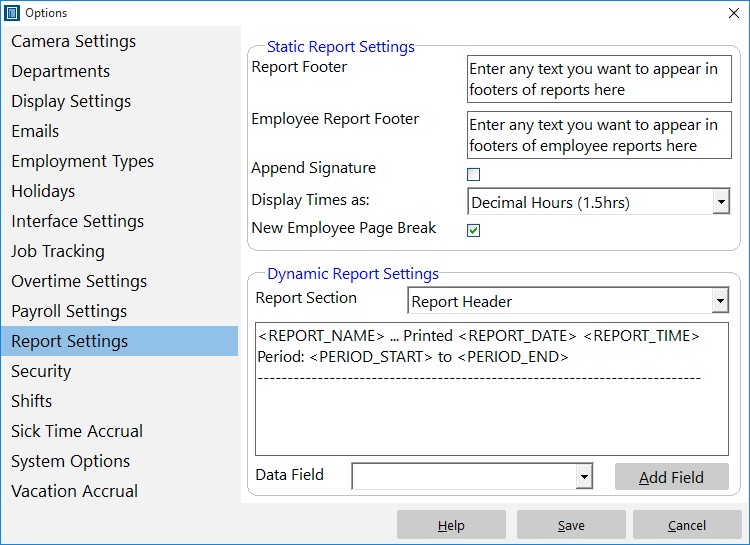
Control how reports are formatted to suit your requirements.
You can read more about this page in the Report Settings help topic. In basic terms you use this screen to customize report sections by selecting a report section, and configuring the section template using either free text or by inserting data fields using the Add Field button and drop down.
What is a Section Template?
A section template is simply the text that defines the format of a Report Section. A section template can contain any text you like and can contain Data Fields. Each section template has a number of Data Fields that can be added to it.
What is a Data Field?
A Data Field is text that can be included in a section template that is automatically replaced by Time Clock MTS when reports are generated. For example, if you include the Data Field in your section template it will be replaced by the name of the report when your report is run.
Next time, in part 2 of report customization I’ll cover some of the report sections and the data fields that are available to each.
Page 15 of 16« First«...1213141516»