by Mark Nemtsas | Oct 31, 2011 | Tips and Tricks, Using the Software
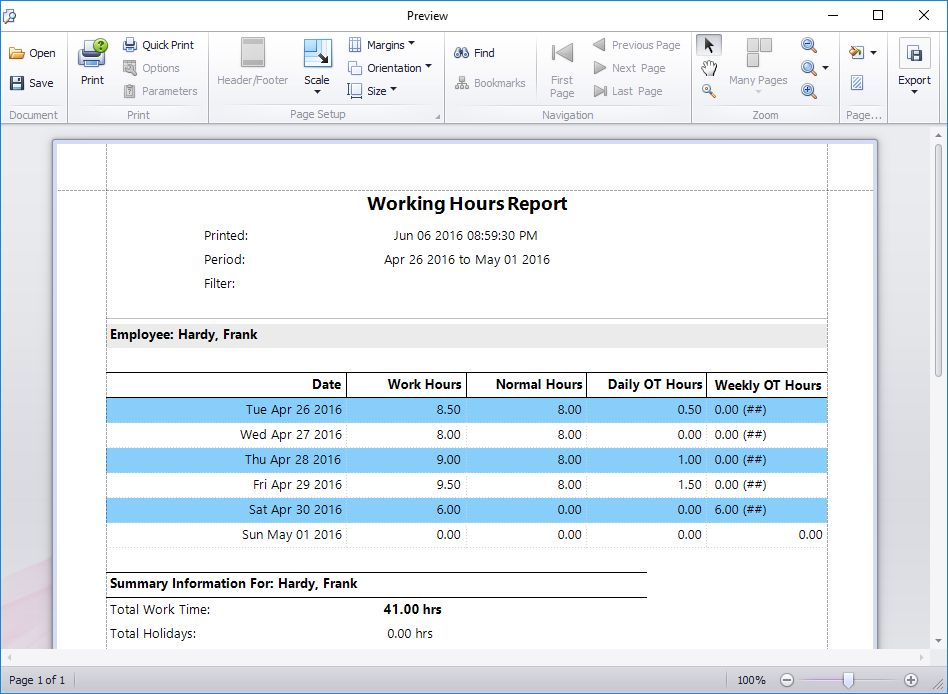
Report Run Tuesday to Sunday
Above you can see a working hours report run for a period from Tuesday 11 October through to Sunday 16 October. In this case our multi-user time clock software is setup with the first day of the week being Monday and to adhere to California Overtime Rules, with overtime paid after 8 hours in a day and after 40 normal hours in a week.
Close examination of the Weekly OT Hours column shows what appears to be, at first glance, what appears to be a mistake. On Saturday April 30 the software has calculated that the 6 work hours are all to be paid at Weekly OT rates. However, if we add up the hours in the Normal Hours column it appears that this employee has only worked 32 normal rate hours to that point, which clearly doesn’t exceed the 40 hour limit stated above. So what is going on here?
What is going on is that even though the report isn’t showing the times for Monday 25 April Time Clock MTS is still taking those hours into account to calculate the weekly overtime. Let’s look at the report including Monday’s data.
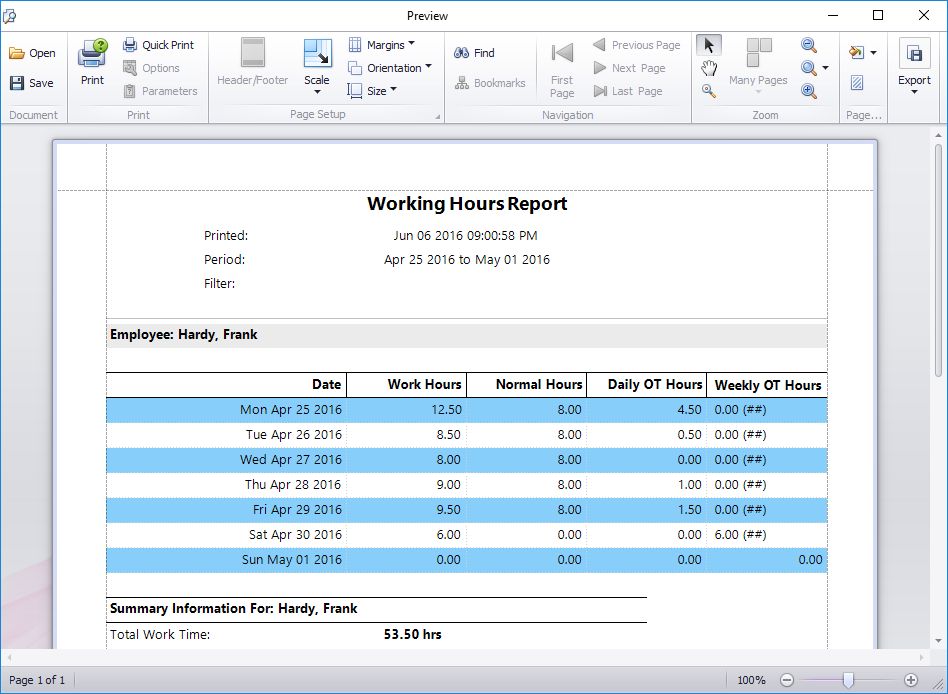
Report Run Monday to Sunday
We can see that the employee has worked 12.5 hours on Monday. This takes the normal hours tally for Saturday 30 April up to 40 hours and Time Clock MTS is indeed correct in calculating those 6 hours as weekly overtime.
I’ve written about this example to highlight that Time Clock MTS calculates weekly overtime using ALL of the data from a given week regardless of the report period you’ve chosen to display. This is of particular importance to employers who use irregular pay periods like bi-monthly or monthly. Employers with pay periods like these that do not always start on the same weekday could easily end up with cases where hours from the previous pay period impact on overtime calculations for the current pay period.
by Mark Nemtsas | Oct 25, 2011 | How To, Tips and Tricks
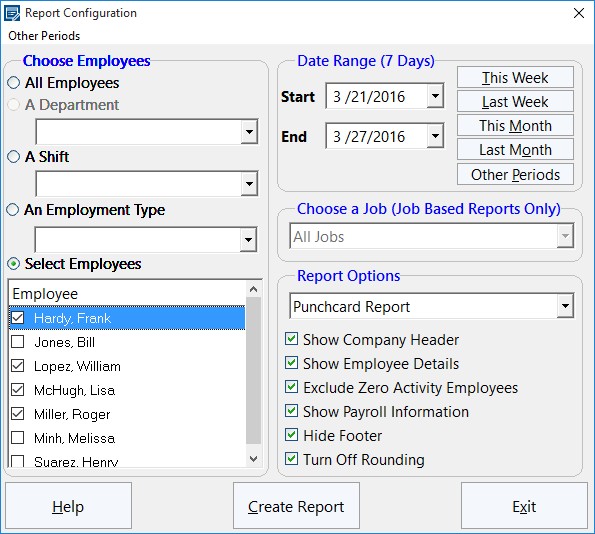
The Generate Payroll Reports Screen
One of the features that businesses look for when choosing an employee attendance tool is the ability to export data to other software programs. Many people that use a time clock system will often need to export data to spreadsheets, word processors and other such database packages. If this can be done easily, quickly and effectively, it will save time and hassle for the business. This Time Clock MTS How To Article covers the steps to follow if you want to create a payroll report and export it to another software program.
- Open Time Clock MTS and log into your administrator account. Once you are logged in, go to Reporting -> Payroll Reports. This is the part of the time clock tool that allows you to control which reports are created. This is where you should go whenever you need to create any sort of report. You can create reports on employees, departments, shifts and many other things. If you don’t want reports generated on all of the employees (or departments etc.), you can choose the ones you want to see reports about from a list.
- Once you have opened the Report Configuration screen, you can choose what report you want to create (here is a Full List of Time Clock MTS Reports). You can select different employees, departments, shifts and employment types. Additionally, you can choose a specific date range and the type of report that you would like. You can choose the type of report by using the drop-down menu on the right-hand side of the screen. There are various other options on the screen that you can choose, for example, you can choose whether you want the company header to be displayed on the report, the employee details and any other information.
- Now that you have chosen exactly what you want the reports to be about, you can go ahead and create it. To create the reports, simply click Create Report at the bottom of the screen. The report will appear almost instantly and will contain information such as the total hours worked, total vacation time and total earnings.
- Once the screen containing the report has appeared, you can now export the data by clicking any of the buttons at the bottom of the screen, e.g. Export CSV.
You can choose either Export CSV, Export Tab or Export Excel. Exporting the data takes a few seconds and exports the report(s) onto the software of your choice. You may also choose to print the report, which can be done by clicking Print.
Time Clock MTS has many features like this that make it an ideal time and attendance tool for both large and small businesses. By following the above steps, you can create reports for whatever you want and export it in a matter of a few seconds.
by Mark Nemtsas | Oct 13, 2011 | Tips and Tricks, Using the Software
A while back I wrote about setting up Time Clock MTS to comply with California overtime legislation. An interesting question has come up from a user this week that is worth looking into further. The question relates directly to California Labor Code Section 500-558 (which you can see here). In particular it relates to this text:
Any work in excess of eight hours in one workday and any work in excess of 40 hours in any one workweek and the first eight hours worked on the seventh day of work in any one workweek shall be compensated at the rate of no less than one and one-half times the regular rate of pay for an employee.
It is easy to assume on reading this that all hours worked during a week are used in calculating hours in excess of 40 being worked. However, this is not the case as is illustrated by this memorandum from the Californian Department of Industrial Relations. The section of particular interest in this memorandum is this:
The statute also provides that “nothing in this section requires an employer to combine more than one rate of overtime compensation in order to calculate the amount to be paid to an employee for any hour of overtime work.” This is consistent with DLSE’s enforcement of the pre-1998 wage orders. It simply means that there is no “pyramiding” of separate forms of overtime pay for the same hours worked. Once an hour is counted as an overtime hour under some form of overtime, it cannot be counted as an hour worked for the purpose of another form of overtime. When an employee works ten hours in one day, the two daily overtime hours cannot also be counted as hours worked for the purpose of weekly overtime.
The basic upshot of this is that once an hour has been used towards calculating daily overtime it cannot be used to calculate weekly overtime. In practical usage this means that only Normal rate hours are used to calculate overtime due to exceeding the weekly work limit of 40 hours.
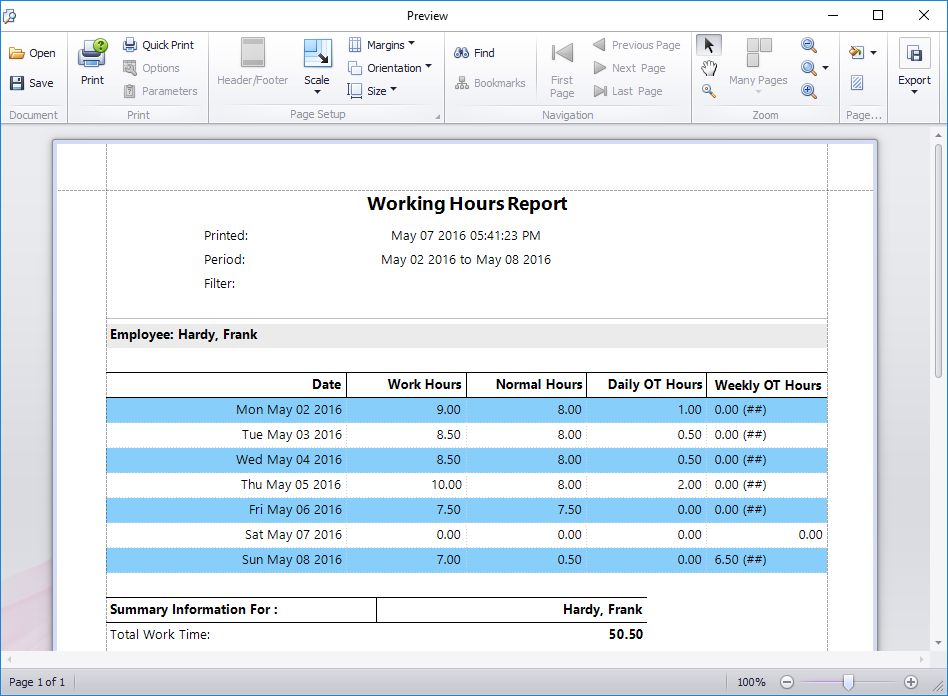
Above you can see how Time Clock MTS handles this situation. In this example the employee actually exceeds 40 hours worked on Friday May 6th but 4 hours have already been counted towards daily overtime and thus cannot be used to calculate the weekly overtime limit. In fact, the employee exceeds 40 normal hours worked after half an hours work on Sunday May 8th and the remainder of work on that day (6.5 hours) is counted as weekly overtime.
I hope this example explains how Time Clock MTS handles overtime calculations when configured to suit California Overtime Regulations.
by Mark Nemtsas | Oct 13, 2011 | News
It’s not unusual for a time clock software package like Time Clock MTS to include a employee scheduler because in a lot of cases employee scheduling or time tabling go hand in hand. However, we’ve always wanted Time Clock MTS to be a low cost and easy use and maintain employee time and attendance system. Because of this we’ve never added an employee scheduler to it. However, we’re happy to say that we’ve been working with a company (Sensible Software) in New York state who have been developing their own employee scheduling software called Employee Scheduling Pro. We’ve got a long standing relationship with Sensible Software and we were involved in the testing process for Employee Scheduling Pro and we’ve found it to be just like Time Clock MTS, powerful yet simple to use. It’s ideal for any company wanting to develop and schedule their employee work times and we heartily recommend it to anyone looking for a employee scheduler to complement Time Clock MTS.
by Mark Nemtsas | Sep 26, 2011 | How To, Using the Software
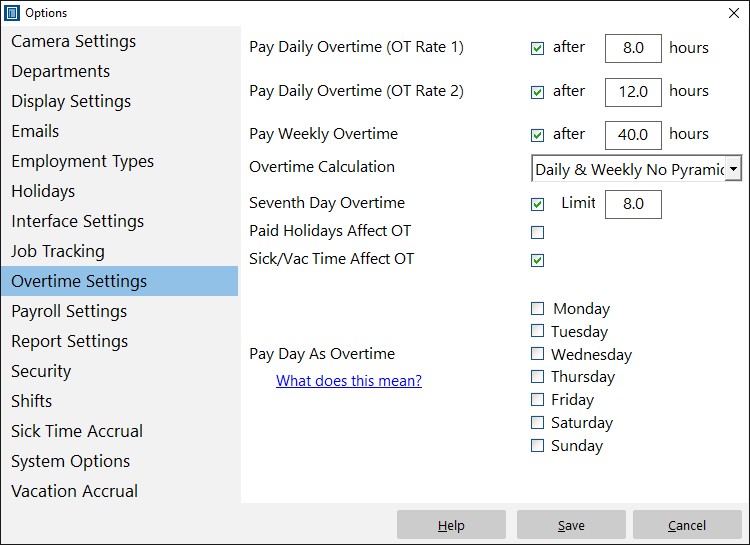
The Overtime Settings Screen
This Time Clock MTS How To Article will show you the four simple steps that you will need to follow in order to pay a given weekday as overtime using the Time Clock MTS tool. Using the tool, you can change the settings to pay your chosen employees overtime on certain days of the week. This is particularly useful if your employee’s employment agreement, pay scale, or union agreement requires a certain weekday (typically Sunday) to be paid as overtime.
Here’s the steps to follow to pay all time on a given weekday as overtime:
Step 1. Make sure that you are logged into the administrator account, otherwise you will not have access to any of the settings and will not be able to edit employee information. If you have only just downloaded Time Clock MTS, you will need to create a password for the administrator account and log in once it has launched.
Step 2. Next, you will need to set the overtime rates so that you are paying the correct amount per hour. This can be different for each employee. In order to set the overtime rates, select one of your employees from the list. Click Employee Maintenance->Edit Selected Employee->Payroll Information. You can then set it using the boxes labelled “OT 1 Rate/hr” and “OT 2 Rate/hr”.
Step 3. Click Tools->Options->Overtime Settings to pay a given day as overtime. To do this, select Employee Maintenance->Edit Selected Employee->Payroll Information and select the box next to the particular day that you want to pay as overtime.
Each employee can have different pay rate for overtime. You may decide to pay a small handful of your employees more overtime pay than others, and all this can be set by selecting the Payroll Information of each employee and setting it as you wish. You can also choose to pay certain days as overtime; if you choose this, the whole day will be paid as overtime and normal overtime limits do not apply. The whole day will be paid as the hourly rate that you have set for Overtime 1, regardless of how many hours during the day the employee works.
As you can see, Time Clock MTS is very useful if you have employees that are receiving various amounts of pay for the different hours that they work. Arguably the most useful feature of this tool is the fact that you can edit each employee’s payroll information individually, so that you can alter the pay of one employee without it affecting the pay of any others.