by Mark Nemtsas | Jul 24, 2008 | News, Tips and Tricks
Did you know Time Clock MTS is 100% compatible with the new Microsoft operating system Windows Vista? Vista brings all sorts of new features to the Windows user and Time Clock MTS operates happily with all of them. The one and only difference with the Vista Time Clock MTS is where the software stores it’s configuration files and the default database location.
In Windows XP all of the program data was stored in this directory:
C:\Documents and Settings\All Users\Application Data\Time Clock MTS\
Windows Vista changes the location where program data is stored and when using Time Clock MTS on Windows Vista you’ll find all of your program information here:
c:\Program Data\Time Clock MTS\
That’s really all there is to know about Vista and Time Clock MTS, just download and install Time Clock MTS onto Vista as normal from our website and you’ll be up and running in no time.
by Mark Nemtsas | Jul 20, 2008 | News
The real benefit of time clock software lays in the productivity savings you gain from gathering and processing time and attendance information efficiently, and the costs savings you gain from removing employee fraud and calculation errors. Time Clock MTS gives you these benefits in one simple to use piece of software, given that you want to collect all of your information on the one network and using MS Windows based PC’s. However, if you have geographically separated locations or dont run MS Windows based PC’s then it’s a little more difficult to use Time Clock MTS. You can use it through the use of remote desktop tools (such as Windows Terminal Services) and Windows emulators (such as WiNe) but these add a layer of complexity that is not really desirable.
The best solution to these problems is by the use of an online time clock. I’m happy to announce that the online version of Time Clock MTS is under development and will be released within the next 12 weeks. Online Time Clock MTS is a completely hosted solution (we hold all your information and host the software) meaning you don’t need to install anything on your PC’s. All you’ll need to do is log into your Online Time Clock MTS account and clock in and out, run reports, and configure the software in the same way you do now with the desktop version. And this can be done from anywhere, using any computer that has a web browser!
Stay tuned, I’ll be posting screenshots here as they become available.
Update: Online Time Clock MTS is now available
by kathryn@timeclockmts.com | Jul 18, 2008 | Tips and Tricks, Using the Software

Employee Maintenance Dropdown
Time Clock MTS allows you to track attendance of employees that work for you. However, as employees leave your organization you may wish to either delete or deactivate an employee’s record in Time Clock MTS. You may want to do this to declutter the employee list or to prevent the employee from recording any more attendance information. When you Deactivate an employee you can Reactivate the employee while logged in as the administrator and using the Employee Maintenance->Re-Activate An Employee menu item. However, when you Delete an employee there’s no way of undeleting that employee from within Time Clock MTS.
However, the deletion is not permanent. The actual employee data and all of their employee attendance information is actually still present in the Time Clock MTS database. All you need to do is email us your Time Clock MTS database and let us know which employee you want undeleted. We’ll do it for you and email your database promptly and you’ll find that the employee record is now visible again.
by Mark Nemtsas | Jul 17, 2008 | How To, Tips and Tricks, Using the Software
In part 1 of customizing Time Clock MTS Reports I covered the basic structure of reports and how you could customize them. In this second part I’ll cover some of the Report Sections and the Data Fields that are available to each. If you don’t know what a Report Section or Data Field is then go back and take a look at Part 1 of this topic.
Report Header Section
- Report Name – the name of the report that is being run
- Period Start – the report start date
- Period End – the report end date
- Report Time – the date and time the report is run
- Shift Filter – the shift the report is filtered on (if applicable)
- Employee Filter – the employee(s) the report is filtered on (if applicable)
- Department Filter – the department the report is filtered on (if applicable)
- T – inserts a TAB space, used for alignment and formatting purposes
Company Header Section
- Company Name – the company name as set on the Display Settings page
- Company Address – the company address as set on the Display Settings page
- T – inserts a TAB space, used for alignment and formatting purposes
Employee Details Section
Employee Header Section
In Part 3 of this report customization series I’ll cover the remaining report sections.
by Mark Nemtsas | Jul 11, 2008 | How To, New Features, Tips and Tricks
Time Clock MTS Versions 2.0.1 and higher include a new setting to allow you to force a time pair to be paid as overtime. You can do this via the Tools->Edit Times menu. Just select the time pair you want to force as overtime and click the Edit Time button and you’ll be shown the Edit Time screen.
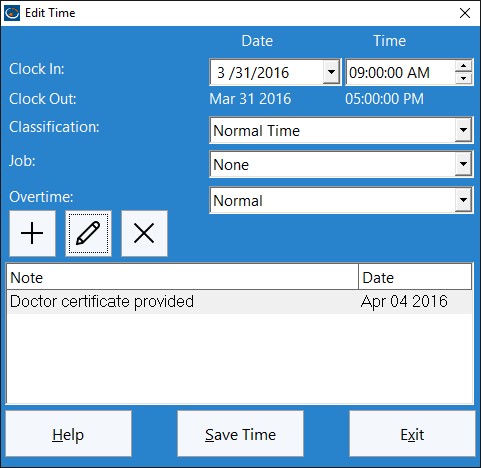
The Edit Time Screen
To force a time to be paid as overtime all you need to do is select the ‘Force Overtime’ option for the time, and click the Save Time button to save the change. For overtime purposes this time will now be forced to be paid as overtime regardless of other overtime settings. Let’s examine how this would work with some examples.
Example 1
No daily overtime, weekly overtime limit set at 40 hours. Employee works a 5 day week of 8 hrs, 8 hrs, 8hrs, 8 hrs, and 6 hrs for a total of 38 hrs. The last day of 6 hours happens to fall on a holiday for which the employee is entitled to overtime rates. The Time Clock MTS Administrator has flagged the time pair as ‘Force Overtime’. Time Clock MTS will report this week as 32 normal hours, and 6 hours of daily over time.
Example 2
No daily overtime, weekly overtime limit set at 40 hours. Employee works a 5 day week of 9hrs, 9 hrs, 8hrs, 8 hrs, and 8 hrs for a total of 42 hrs. The employee has agreed to fill in for someone else for 4 hours on the last day and the employer has agreed to pay them overtime rates for doing this. The Time Clock MTS Administrator has flagged the time pair as ‘Force Overtime’. Time Clock MTS will report this week as 36 normal hours, with 4 hours of daily over time on day 5, and 2 hours of weekly overtime on day 5. You can see in this case the employee still gets their weekly overtime entitlements as well as the time forced as overtime.
Why Use this Setting?
There are a few reasons why you’d want to make use of this setting:
- It’s a way of giving employees overtime rates on holidays. Many employers do not pay employees for holidays not worked, but if the employee does work on the holiday they are entitled to overtime rates. The holiday pay system in Time Clock MTS wont handle this sort of system by default, so this new setting is a way of achieving what is required.
- You may have some sort of overtime regime that is not handled properly by Time Clock MTS, this new setting pretty much allows you infinite flexibility to assign any amount of time to be paid as overtime.
- It allows for ad-hoc agreements between employers and employees. For example, you might not have an overtime policy but sometimes agree to pay employees at a higher rate for doing extra work, for performing unusual duties, or simply as a method of rewarding them.
Next time I’ll take a look at the other new overtime setting for individual times, the Ignore for Overtime setting.