« January 2011 | Main | March 2011 »
February 27, 2011
New Time Clock Software Testimonials Posted
Sometimes we get emails from users of Time Clock MTS telling me they are happy with the software and I like to post these emails up on the site for everyone to see. I've just posted up a few new comments over on the Time Clock Testimonials page, I especially like the one about reducing payroll once the user started using a finger scanner. A true indication that the right time clock system will actually SAVE you money rather than cost you money.
As always we welcome any comments you might have on Time Clock MTS and invite you to contact us with your thoughts.
Posted by at 8:33 AM | Comments (0)
February 23, 2011
The Manage Connections Screen

The Manage Connections Screen
Above you can see the Manage Connections screen. This screen is used to view and manage the connections to your Time Clock MTS database. Generally you wont need to use this screen for much, but every now and again you may need it to delete old, stale connections that are using up your Time Clock MTS Client Licenses. This can commonly happen two ways. Firstly, you've installed the Time Clock MTS Client software on too many computers and you're continually using up your client licenses (naught, naughty, you should only install the Time Clock MTS Client software on as many computers as you are licensed for). The second reason is that perhaps a computer with the client software on it has suddenly died or shutdown incorrectly and you're going to install the software on a new PC because the old one is kaput. In this case the connection record for the old computer can often not be deleted correctly and you'll need to remove it manually.
This blog describes the process to remove a connection record from Time Clock MTS.
1. Find the connection you want to remove in the list on the Manage Connections screen. You can identify the computer the connection is coming from by the name of the computer or the MAC address of the computer.
2. Ensure that the computer named is no longer running the Time Clock MTS Client software.
3. Click on the connection record you want to delete.
4. Click the Disconnect button to remove the connection record.
That's all there is to it, but as always if you have any problems please Contact Us and we'll do our best to help you out!
Posted by at 6:55 AM | Comments (0)
February 19, 2011
Starting up Time Clock MTS in Debug Mode
From time to time we need to users of Time Clock MTS to run the software in a special logging mode to allow us to find and fix up problems with the program or with the computer it is installed on. When this mode is activated Time Clock MTS creates a new Microsoft Excel worksheet and logs all manner of information to the worksheet which can then be emailed to us. This blog entry details how to start up the software in what we call "Excel Debug Mode".
1. Find the Start->Run box on your version of Windows. If you're using Windoxs XP it's just a matter of pressing the Windows Start button and selecting the Run option from the window that pops up. In Windows Vista the Run box is hidden by default and you may need bring back the Start->Run box. If you're running Windows 7 just click the Windows Pearl (the round button on the bottom left of your desktop) and select the run option from the window that pops up.

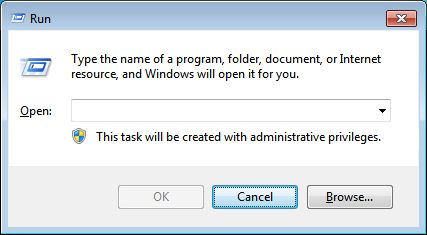
2. Generally the Start->Run box looks something like the screenshot shown above.

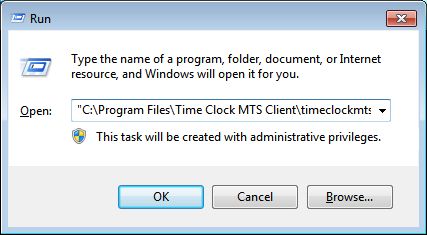
3. Enter the following command into the text field in the window. Make sure to enter the correct command depending on whether you're trying to get the Time Clock MTS Administrator program or the Client program started in Excel Debug Mode. Make sure to cut and paste the commands from this article rather than trying to type them in.
Administrator Program:
"C:\Program Files\Time Clock MTS\timeclockmts.exe" ExcelDebug
Client Program:
"C:\Program Files\Time Clock MTS Client\timeclockmtsclient.exe" ExcelDebug

4. Click the OK button and Time Clock MTS should start up as should a Microsoft Excel Worksheet. The worksheet should look something like it does above.
That's all you need to do to start Time Clock MTS in Excel Debug Mode. If we ask you to do this we'll ask you to do something once the software is running (like clock someone in and out or similar). Then all you'll need to do is shutdown Time Clock MTS, save the Excel worksheet and attach it to an email to send to us. As always if you have any problems or get stuck please Contact Us for more information.
Posted by at 9:48 AM | Comments (0)
Setting up a Second Administrator Computer - Updated
I wrote about setting up a second Time Clock MTS Administrator computer some time ago. Advances in the software means that the process is now a lot easier (actually its now just a matter of a couple of mouse clicks). The process of setting up a second administrator computer is shown below. Please note there are a couple of things to be aware of before you setup a second admin computer. Firstly, just one computer can actually be running the administrator version of Time Clock MTS at a time. Secondly, you need to purchase a license for each computer you want to install the Time Clock MTS administrator software on.
1. Make sure you know the network path to your existing Time Clock MTS database.
2. Install the administrator version of Time Clock MTS onto the computer you want to use as the second administrator computer.

3. Run the software, you'll be asked to enter a new administrator password (note that this password can be different to that used on your current Time Clock MTS system). Once you've entered the initial administrator password log into the software as the admin and you should see Time Clock MTS looking like it does in the image above.

4. Check what version of Time Clock MTS you have. You can do this on the Help->About menu (see the image above). If you're using a version of Time Clock MTS before V3.0.1 then you'll need to use the old method of setting up a second administrator computer. If you're using Version 3.0.1 or later then please proceed to step 2.

5. Log into Time Clock MTS as the administrator and go to the Tools->Options->System Options screen (shown above).
6. Click the Change button which can be found next to the Database Location text field.

7. Click the Yes button on the warning that pops up (see above).

8. In the Explorer window that appears navigate to the Time Clock MTS database that you want to use.

9. You'll now be shown the screen above confirming that you've connected to a different Time Clock MTS database.

10. Click the Save button and you'll be taken back to the main Time Clock MTS login screen. Note in the screenshot above that we're seeing some employees now that have been pulled from the existing database you connected to.
That process is a lot easier than the older method, but as always if you have any problems please Contact Us and we'll do our best to help you out!
Posted by at 9:46 AM | Comments (0)
Show Hidden Files and Folders in Windows - Updated
This is an updated version of the Old Showing Hidden Files and Folders blog article with a new section added for Windows 7.
The default location that Time Clock MTS stores it's settings files and database is a folder that is usually hidden by Microsoft Windows. So, when we need to help you with software problems or perhaps you need to email us your database to reset your administrator password that you may not be able to find the files you need. This updated blog post aims to show you how to show hidden files and folders on your computer regardless of what version of Microsoft Windows you happen to be running.
Show Hidden Files and Folders in Windows 7
• Click on the Windows Start button, this is the round button on the lower left of your Windows 7 desktop.
• Select the Control Panel menu option.
• When the Control Panel opens click on the Folder Options link under the "Appearance and Personalization" link.
• Go the to View Tab of the Folder Options Window.
• In the "Advanced Settings" scroll box check the "Show hidden files, folders, and drives" radio button.
• Uncheck the box that says "Hide extensions for known file types".
• Uncheck the box that says "Hide protected operating system files (Recommended)".
• Now click the Apply button and then the OK button.
Show Hidden Files and Folders in Windows Vista
• Click the Start button
• Then click on Computer
• Press the ALT key
• Select the Tools->Folder Options menu
• Click the View tab
• In the Hidden files and folders frame select Show hidden files and folders
• Uncheck the Hide protected operating system files (recommended) option
• Click Yes to confirm
• Click OK
Show Hidden Files and Folders in Windows XP
• Click Start
• Open My Computer
• Select the Tools ->Folder Options menu
• Click the View tab
• In the Hidden files and folders frame select Show hidden files and folders
• Uncheck the Hide protected operating system files (recommended) option
• Click Yes to confirm
• Click OK
Show Hidden Files and Folders in Windows 2000
• Open My Computer
• Select the Tools -> Folder Options menu
• Click the View tab
• In the Hidden files and folders frame select Show hidden files and folders
• Uncheck the Hide protected operating system files (recommended) option
• Click Yes to confirm
• Click OK
Posted by at 9:45 AM | Comments (0)
