As the administrator you will often need to manage employee times in Time Clock MTS directly. Reasons that you may need to do this could be:
- To enter vacation time for employees
- To enter sick time for employees
- To punch an employee out who forgets to punch out
- To punch an employee in who forgot to punch in
- Insert a missing time punch pair
- Edit or remove incorrect punch in / out information
- View captured punch in or punch out images
- View recorded time edit log history
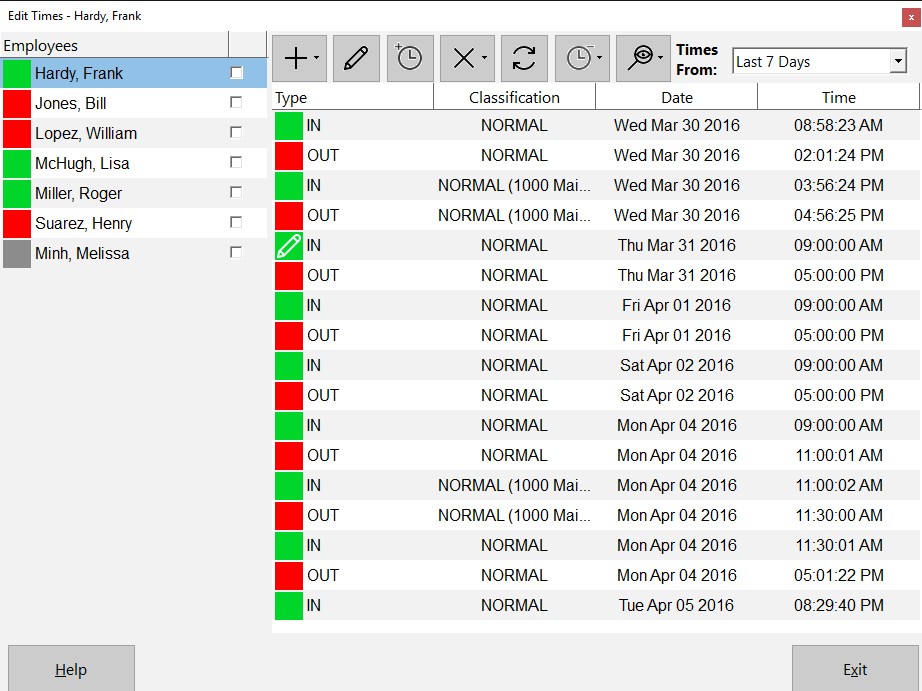
The Edit Times screen is available when logged in as the administrator from the Tools->Edit Times menu.
The Edit Times screen is split into two main areas. The employee list on the left, and the employee times list on the right. Note that if deactivated employees are not being shown on the main employee list then they will not be shown on this employee list.
To edit a particular employees time punches click on their name and their time punches will be displayed on the right. Each employee time punch is displayed with an icon (green for a punch in and red for a punch out). If the icon is shown with a pen through it then that time has been edited by the Time Clock Administrator. Note also that the classification of the time punches (normal, other, sick, or vacation time) is displayed as is the job name and number if the time punches are assigned to a job.
View Times from a Date Range
You can select what date range you wish to see employee times from. Just select a date range from the drop down box above the times list.
Adding an Employee Time Punch
You can add a single employee time or multiple employee times by clicking the  button. Depending on your selection you will then be taken to the Add Time or the Add Multiple Times screen. Note that you can only add times in pairs (that is a punch in and a punch out time). If an employee is punched in while you're trying to add times, those times must be at least 24 hours after the employees current punch in time.
Editing Employee Time Punches
If you need to edit an employee time, click on that time on the employee time list and then click the  button. You will then be taken to the Edit Time screen. Note that editing times is also how you can add notes to times as the administrator.
Insert a Missing Punch
If you need to insert a missing punch into the middle of an existing punch then click on the time in the employee time list and then click the  button. You will then be taken to the Insert Missing Punch screen.
Deleting Time Punches
If you need to delete an employee time, click on that time on the employee time list and then click the  button. Time Clock MTS allows you to delete either a Punch In/Out pair or a single time. In the vast majority of cases you should only delete time pairs. Deleting single times should be used with caution because if it is not used properly it can render your time clock data invalid. If you choose to delete a time pair you will be taken to the Delete Time screen. The delete single time functionality should be used with extreme caution. When using it make sure your time data stays in the form of In/Out pairs.
Changing Time Punch State
For whatever reason you may find it necessary to change the state of a single time (that is changing a punch in to an out or a punch out to an in). Clicking the  button will allow you to do this. Changing the state of single times should be used with caution because if it is not used properly it can render your time clock data invalid. The change time state functionality should be used with extreme caution. When using it make sure your time data stays in the form of In/Out pairs.
Punching Employees In or Out
From time to time you may find it necessary to use the Edit Times screen to punch employees in or out who have forgotten to do so themselves. You can do this by clicking the Punch In/Out  button. Time Clock MTS will then ask you if you want to just punch in/out the selected employee, checked employees or all employees. Confirm the action and you'll be asked to enter a punch time (see image below).
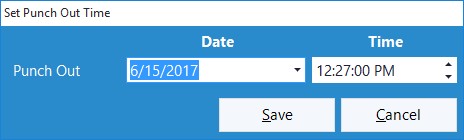
The time will default to the current time but you can change it as required. This could be useful if you need to punch out employees who forgot to do so the day before. Note that only those employees for whom the punch time is valid will be punched in or out. For example, if you try to set a punch out time BEFORE the last punch in then no action will take place.
Viewing Captured Images
If your Time Clock MTS computer has an attached camera then Time Clock MTS can capture images from the camera on clock in or out. You can set this up via the Camera Settings page. Selecting a time and then clicking the  button will allow you to View Captured images. If there is no image captured for the selected time you will be told so when you try to view the image.
Viewing Audit Logging Information
You can optionally record audit log information for Time Clock MTS clock in and out times. You can set this up via the Security Settings page. You can view the audit log information associated with a time by selecting the time and then clicking the button. All audit log information associated with a time will be displayed on the Time Audit Log screen.
Audit Trail
Note that any time created or edited by the administrator is flagged as such. Also any employee clocked in or out while logged in as the administrator will also have the associated times flagged as edited by the administrator. These times are noted in the Time Clock MTS reports.