Time Clock MTS can export time clock data to QuickBooks using the standard QuickBooks IIF file format. This help topic explains how to configure Time Clock MTS to export data to QuickBooks and then explains the actual process of exporting the data. If want to learn how to export data to other payroll systems you should read the Data Export Help topic.
Configure Time Clock MTS for QuickBooks Export
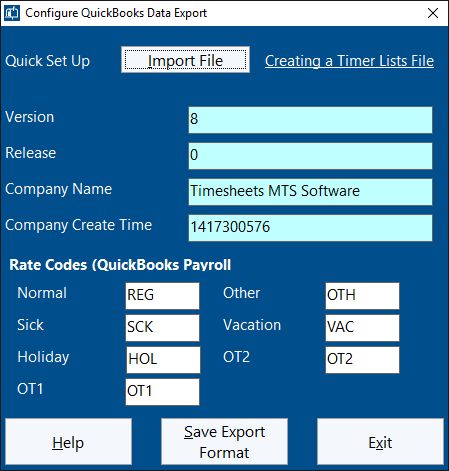
The software can be configured to export data to QuickBooks from the Reporting->Data Export->Configure QuickBooks Export menu. You can see the screen used above. The Version, Release, Company Name, and Company Create Time fields are created by QuickBooks for your company database and are required by Time Clock MTS to create a valid export file. The Rate Codes fields allow you to map Time Clock MTS rate codes (normal time, other, sick time etc) to QuickBooks payroll items.
| Import File | This button is used to import a QuickBooks Timer Lists (created by QuickBooks) into Time Clock MTS to automatically fill some of the configuration fields on this screen. You can learn how to create a QuickBooks Timer Lists file here. When you have a file to use just click this button and you'll be asked to locate the file (it must have an .iif extension). Once located, the software will read the file and if it is valid will automatically fill in the Version, Release, Company Name, and Company Create Time field on this screen. |
| Version | This is the QuickBooks version and can be found on the second line of the timer lists file under the VER header. |
| Release | This is the QuickBooks release number and can be found on the second line of the timer lists file under the REL header. |
| Company Name | This is the QuickBooks company name and can be found on the second line of the timer lists file under the COMPANYNAME header. |
| Company Create Time | This is the QuickBooks company database create time and can be found on the second line of the timer lists file under the COMPANYCREATETIME header. |
| Rate Codes | If you want your employee time clock activity to map to QuickBooks Payroll Items then you can use the Rate Codes fields to match the Payroll Item names in QuickBooks. So, if for example your normal pay rate in QuickBooks is called "Straight Time" then set the Normal rate code to "Straight Time". Similarly if your QuickBooks payroll item for overtime rate one is "OT - Time and a Half" then you'd set the OT1 rate code to "OT - Time and a Half". |
Once you have entered the required settings click the Save Export Format button to save the changes or the Exit button to close the screen and discard any changes.
The Export Data Screen
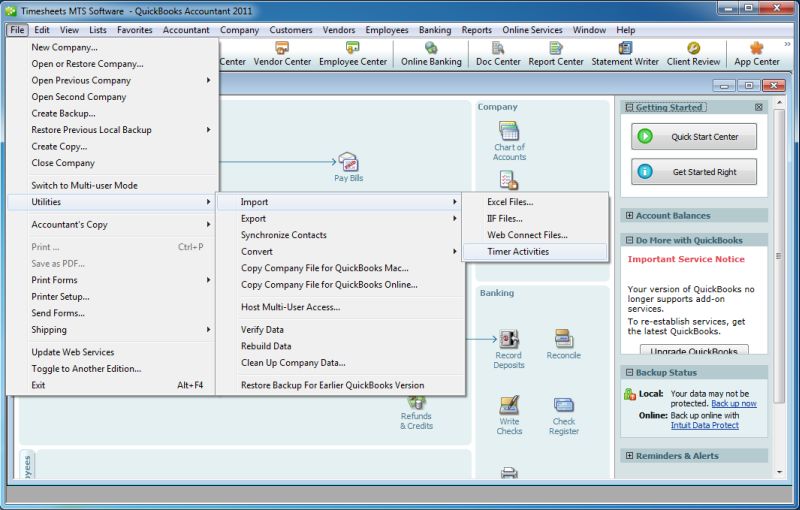
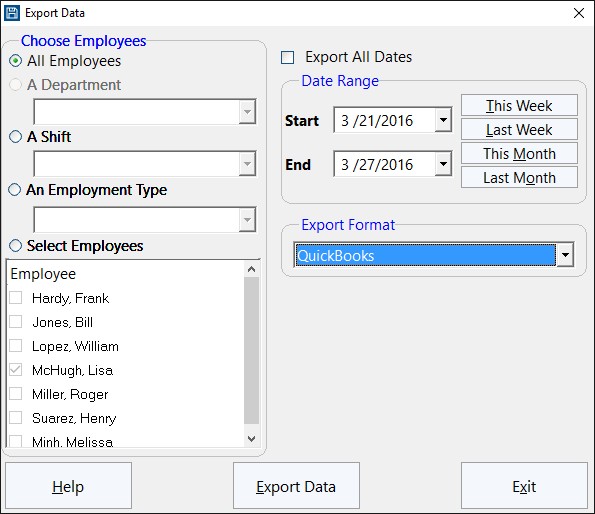
The Export Data screen (see above) is used to create QuickBooks export files. Make sure to choose "QuickBooks" from the Export Format dropdown on the right of the screen. A more detailed explanation of how to use this screen can be found in the Exporting Data from Time Clock MTS help topic. Note that when your data has been exported to the QuickBooks format a Windows Notepad window will appear containing your data. The file will be named export.iif. That file can be imported into QuickBooks using the File->Utilities->Import->Timer Activities menu (see image below).