Time Clock MTS allows you to export data from it in any text format you require. You can define any number of export formats (useful for transferring to other databases or payroll programs) and then export data for one or many employees across any date range. If want to learn how to export data to QuickBooks you should read the QuickBooks Integration Help topic.
Managing Export Formats
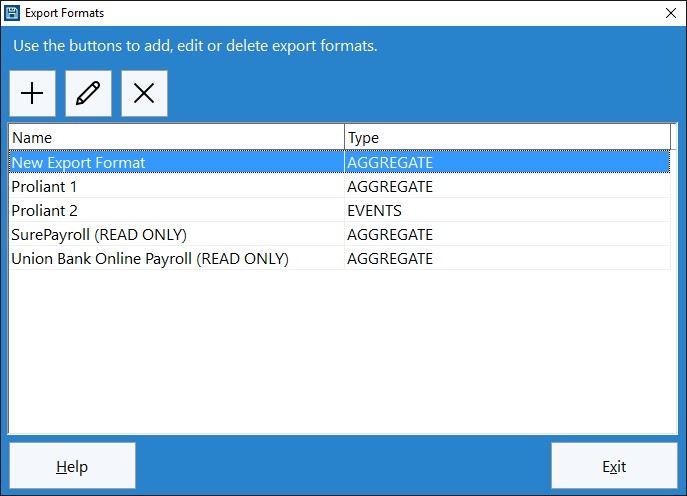
Data export formats are defined on the Tools->Reporting->Data Export->Export Formats screen. To Add an Export Format click the  button. To Edit an Export Format click on it in the Export Format list and click the
  button. To Delete an Export Format click on it in the Export Format list and click the
  button. Time Clock MTS includes some pre-defined data export formats to suit specific employee payroll systems. These pre-defined export formats cannot be modified.
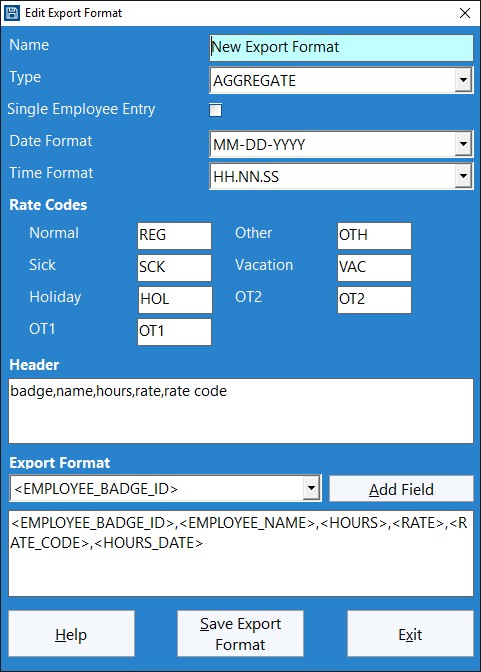
The Edit Export Format Screen
The Edit Export Format screen is used to define a new Export Format or edit an existing one.
| Name | The name of the Export Format. |
| Type | The type of Export Format. Aggregate Export Formats produce a summary of information for each day in the export period while Event Based export formats produce a line item for every clock in/out pair during the export period. |
| Single Employee Entry | Check this box with an Aggregate Export Format and only one entry per rate type will be produced for each employee across the export period. When left un-checked an entry for each rate code and day will be produced. |
| Date Format | Choose a format for dates from this drop down. |
| Time Format | Choose a format for times from this drop down. |
| Rate Codes | Enter a code for the different rates in this series of text boxes. |
| Header | Any text entered here will appear in the header of your exported data file. |
| Field Drop Down | Select a pre-defined export field using this drop down and then click the Add Field button to have it added automatically to the Export Format text box. The pre-defined fields available depend on the Export Format type (Aggregate or Event Based). |
| Add Field Button | Click this button to add the selected field to the Export Format text box. |
| Export Format Text Box | This defines the line export format produced by the Export Format. If you require a comma separated format then enter commas in between your export fields, if you require a TAB delimited format then use the <TAB> field. Note that if you have commas in your data fields (like the employee name) then you should enclose that field in double quotes (") to escape the comma character for a CSV file. |
Once you have defined the Export Format to your liking click the Save Export Format button to save the changes or the Exit button to close the screen and discard any changes.
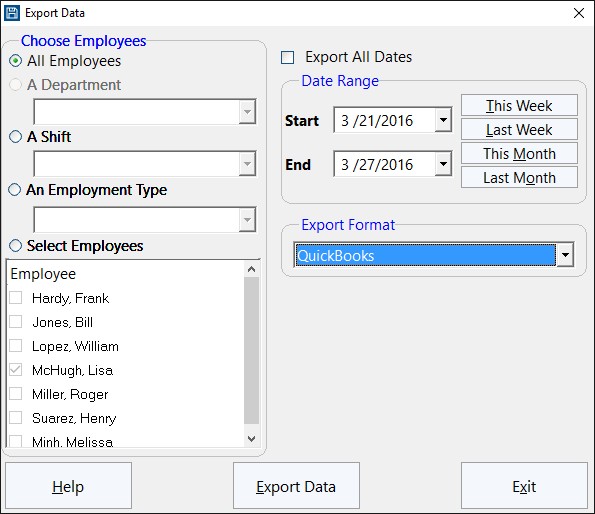
The Export Data Screen
The screen above can be found at Tools->Reporting->Data Export. The Export Data screen is used to select export criteria (the employees and date range) and then export the data to a text file. You may choose to export data for all employees, a shift, a department, or select employees to export from a list. To choose what employee data to export click the All Employees, A Department, A Shift, Employment Type, or the Select Employees options on the left side of the screen. You can manually select a date range to export using the Start date dropdown and the End date dropdown. Alternatively you can use the This Week, Last Week, This Month, or Last Month buttons to automatically choose a date range. Please note that the this week/last week dates are determined based on your choice of the first day of your pay week. You can read more about this in the Payroll Settings Help Topic. If required you can export data for all dates by checking the Export All Dates checkbox.
Once you have selected your export criteria you can choose your required export format from the Export Data dropdown and then click the Export Data button. Your export data will then popup in a Windows Notepad window.