by Mark Nemtsas | Oct 31, 2011 | Tips and Tricks, Using the Software
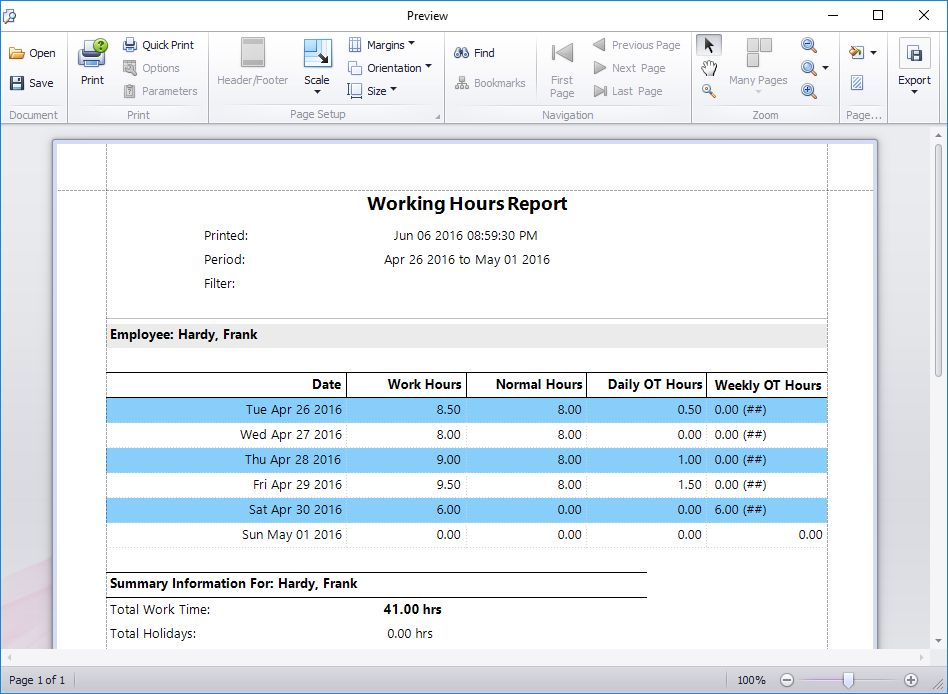
Report Run Tuesday to Sunday
Above you can see a working hours report run for a period from Tuesday 11 October through to Sunday 16 October. In this case our multi-user time clock software is setup with the first day of the week being Monday and to adhere to California Overtime Rules, with overtime paid after 8 hours in a day and after 40 normal hours in a week.
Close examination of the Weekly OT Hours column shows what appears to be, at first glance, what appears to be a mistake. On Saturday April 30 the software has calculated that the 6 work hours are all to be paid at Weekly OT rates. However, if we add up the hours in the Normal Hours column it appears that this employee has only worked 32 normal rate hours to that point, which clearly doesn’t exceed the 40 hour limit stated above. So what is going on here?
What is going on is that even though the report isn’t showing the times for Monday 25 April Time Clock MTS is still taking those hours into account to calculate the weekly overtime. Let’s look at the report including Monday’s data.
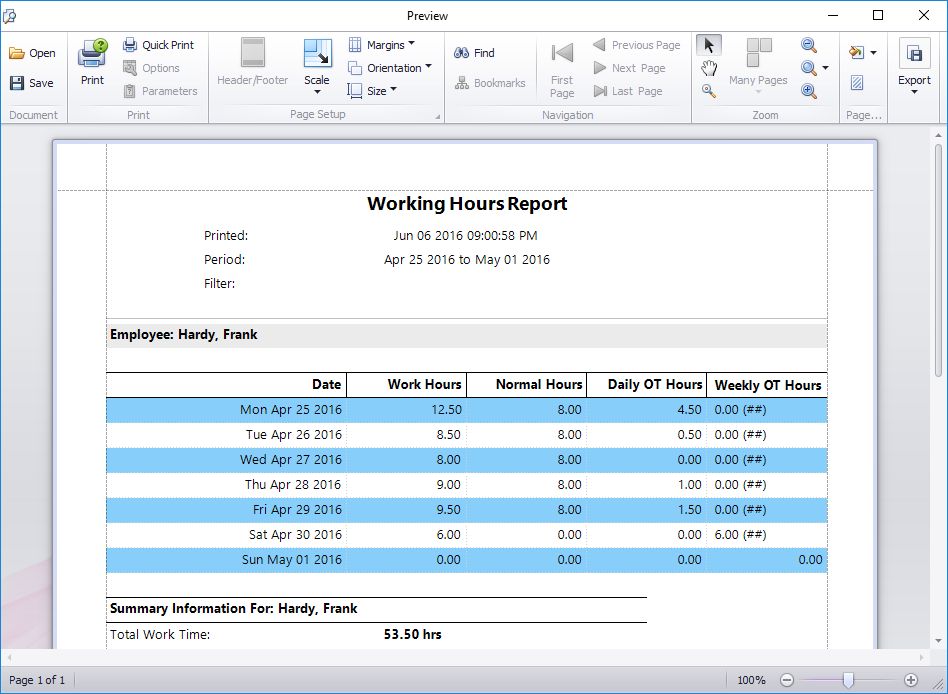
Report Run Monday to Sunday
We can see that the employee has worked 12.5 hours on Monday. This takes the normal hours tally for Saturday 30 April up to 40 hours and Time Clock MTS is indeed correct in calculating those 6 hours as weekly overtime.
I’ve written about this example to highlight that Time Clock MTS calculates weekly overtime using ALL of the data from a given week regardless of the report period you’ve chosen to display. This is of particular importance to employers who use irregular pay periods like bi-monthly or monthly. Employers with pay periods like these that do not always start on the same weekday could easily end up with cases where hours from the previous pay period impact on overtime calculations for the current pay period.
by kathryn@timeclockmts.com | Oct 25, 2011 | New Releases, News
Another minor release of Time Clock MTS today. This one fixes up a problem with the main application window disappearing when a report that takes a long time to generate was run. The other fixes are to some report section template fields that were not displaying correctly or not aligning properly when printed on reports. If you’re not sure what the report section template fields are then you should take a look at the blog entry on Customizing Time Clock MTS Reports.
by kathryn@timeclockmts.com | Oct 25, 2011 | New Releases
Another minor release of Time Clock MTS today. This one fixes up a problem with the main application window disappearing when a report that takes a long time to generate was run. The other fixes are to some report section template fields that were not displaying correctly or not aligning properly when printed on reports. If you’re not sure what the report section template fields are then you should take a look at the blog entry on Customizing Time Clock MTS Reports.
by Mark Nemtsas | Oct 25, 2011 | How To, Tips and Tricks
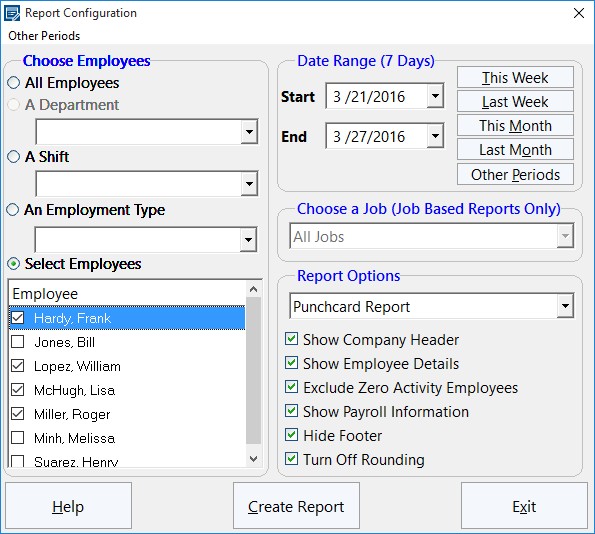
The Generate Payroll Reports Screen
One of the features that businesses look for when choosing an employee attendance tool is the ability to export data to other software programs. Many people that use a time clock system will often need to export data to spreadsheets, word processors and other such database packages. If this can be done easily, quickly and effectively, it will save time and hassle for the business. This Time Clock MTS How To Article covers the steps to follow if you want to create a payroll report and export it to another software program.
- Open Time Clock MTS and log into your administrator account. Once you are logged in, go to Reporting -> Payroll Reports. This is the part of the time clock tool that allows you to control which reports are created. This is where you should go whenever you need to create any sort of report. You can create reports on employees, departments, shifts and many other things. If you don’t want reports generated on all of the employees (or departments etc.), you can choose the ones you want to see reports about from a list.
- Once you have opened the Report Configuration screen, you can choose what report you want to create (here is a Full List of Time Clock MTS Reports). You can select different employees, departments, shifts and employment types. Additionally, you can choose a specific date range and the type of report that you would like. You can choose the type of report by using the drop-down menu on the right-hand side of the screen. There are various other options on the screen that you can choose, for example, you can choose whether you want the company header to be displayed on the report, the employee details and any other information.
- Now that you have chosen exactly what you want the reports to be about, you can go ahead and create it. To create the reports, simply click Create Report at the bottom of the screen. The report will appear almost instantly and will contain information such as the total hours worked, total vacation time and total earnings.
- Once the screen containing the report has appeared, you can now export the data by clicking any of the buttons at the bottom of the screen, e.g. Export CSV.
You can choose either Export CSV, Export Tab or Export Excel. Exporting the data takes a few seconds and exports the report(s) onto the software of your choice. You may also choose to print the report, which can be done by clicking Print.
Time Clock MTS has many features like this that make it an ideal time and attendance tool for both large and small businesses. By following the above steps, you can create reports for whatever you want and export it in a matter of a few seconds.
by kathryn@timeclockmts.com | Oct 13, 2011 | New Releases, News
I’ve posted up a very minor update to Time Clock MTS with what should be the final fix to the pesky least quantity rounding that I seem to be completely unable to get working correctly. I’m confident it’s working ok now though! (fingers crossed).