by kathryn@timeclockmts.com | Dec 30, 2012 | New Releases, News
Yesterday I released version 4.0.4 of Time Clock MTS. This released included a fix to the job totals for the new Daily Job Time Report and fixed up a couple of minor typos on the Vacation / Sick Time accrual screens. I also added a new button to the first run screen to allow new users to view our time clock video demonstration and added a link to the same video on the Help menu.
by kathryn@timeclockmts.com | Dec 24, 2012 | New Releases, News
Our computerized employee time clock software, Time Clock MTS has just had a new version released. This new version adds a new report, some new report section template fields, and includes some debugging code for a crash one user is seeing on one computer. Here’s the changes in more detail.
- The Daily Job Time Report has been added. This report breaks down time spent day by day, job by job, and clock in by clock in for each employee. Interestingly it also classifies the pay rate (normal, overtime 1, and overtime 2) for each clock in and clock out during the report period. This is the first Time Clock MTS report to do this.
- Rates of pay have been (<NORMAL_RATE>,<OT_RATE>, and <OT2_RATE>) have been added to the Employee Header and Employee Details report section templates.
- One user has been experiencing a hard crash on Windows 7 somewhere around a Windows repaint API call. I’ve added some debugging code in this region to try to get to the bottom of what’s going on.
The new report was added at the suggestion of one of our time clock users. I’m always looking for suggestions from our users, especially for new reports. Please, if you’ve got any suggestions contact me with your ideas.
by Mark Nemtsas | Dec 23, 2012 | Tips and Tricks, Using the Software
Time Clock MTS includes two distinct methods for employees to clock in and clock out. The first uses the Employee List Interface and the second uses the Keypad Interface. Let’s have a closer look at each method of clocking in and clocking out using Time Clock MTS or you could watch the clock in video tutorial.
Clocking In and Clocking Out with the Employee List Interface
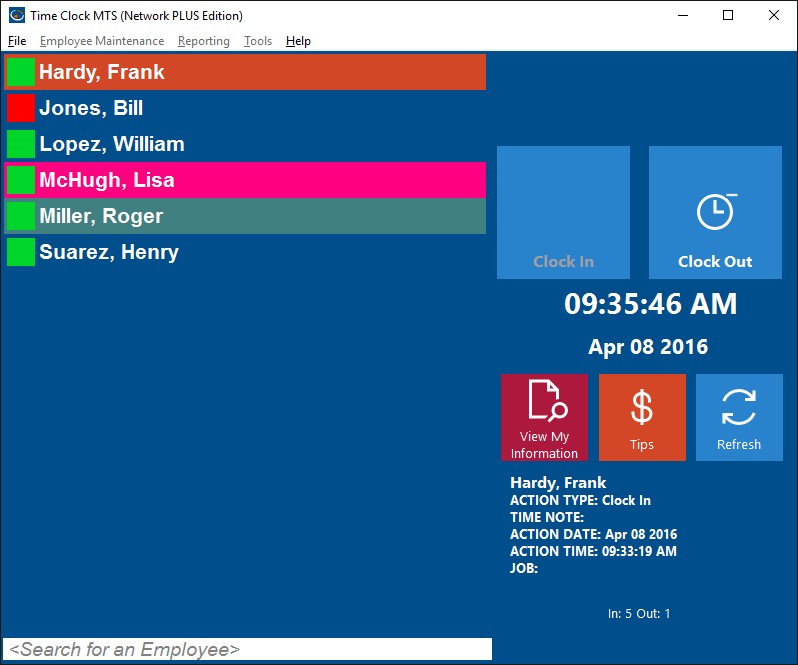
The Employee List Interface
Above you can see the employee list interface of Time Clock MTS. On the left is a list of employees. Next to each employee is a status icon showing the current status of that employee. For example, a green icon indicates an employee is clocked in and a red icon indicates they are clocked out. On the right hand side of the screen are the clock in / out buttons, below that the View My Information button and the status information area. You can use a bar code reader, a magnetic card reader, or even RFID reader with this screen to automatically punch employees in or out without the need to touch a mouse or keyboard. Using the employee list interface to clock in and out is very simple. Just follow these steps:
- Click on the employee’s name in the list who needs to clock in or clock out. Alternatively they can use one of the data input devices (like a bar code scanner) to read an appropriately encoded barcode, magnetic card, or RFID badge and the employee will be punched in or out immediately.
- Depending on their current status either the Clock In or Clock Out button will become active.
- Click on the Clock In or Clock Out button to clock the employee in or out. The employee may have to enter their PIN to complete the action.
- If the clock in or clock out action is successful the status icon for that employee will change and the status information area will show the details of the clock in or clock out.
Clocking In and Clocking Out with the Keypad Interface
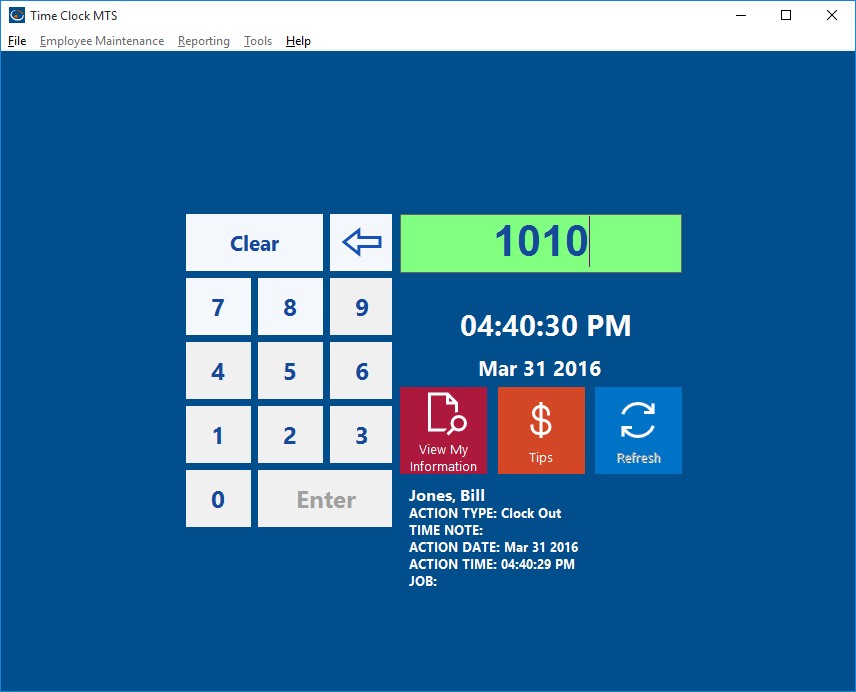
The Keypad Interface
Above you can see the keypad interface of Time Clock MTS. On the left is a virtual numeric keypad and on the right is the employee badge number field (at top) and below that is the status information area. The keypad interface is designed to be used with a touchscreen. Like the employee list interface it can also be used with a barcode reader, a magnetic swipe card reader, or even a prox card. Using the keypad interface to clock in and out couldn’t be any easier.
- An employee needs to know their Time Clock MTS badge number to be able to use the keypad interface. All they need to do is enter their badge number using the virtual timeclock keypad (or via a regular keyboard or one of the other data devices I described above). Then they need to click the Enter button. The employee may then have to enter their PIN to complete the action.
- Time Clock MTS will then check the status of employee with the entered badge number and clock them in or clock them out as appropriate. The status information area will show the details of the employee clock in or clock out.
So, there you have it. Two different methods for employees to clock in and clock out of Time Clock MTS. Both are simple to do and quick for your employees to learn and one of them will, no doubt, be suitable for your company.
by kathryn@timeclockmts.com | Dec 19, 2012 | News, User Testimonials, Using the Software
A user of our free timeclock software sent through a nice email this morning explaining how she is using our software.
The freeware version of Time Clock MTS really is free if you’re using it on one computer and have less than four employees. Unlike many other “free” programs we don’t want to know your email, we don’t need a credit card number, and you don’t even need to tell us you’re using it. Just download it and install it and start tracking your employee timeclock data. Even better we’ll give you technical support just as if you were a paying customer. What’s not to like about that?!
by kathryn@timeclockmts.com | Dec 17, 2012 | New Releases, News
A new version of our Time and Attendance Software has just been released. Time Clock MTS Version 4.0.2 contains the following (fairly minor) changes:
- A fix for an error that fired when an employee entered a job number when no jobs had been created.
- The Edit Times screen now will display a clock out as the first time in period. Previously if a clock out was the first time it wouldn’t be displayed which meant that it was possible to create an invalid time set for an employee.
- The software version number is now displayed on the Registration Details screen.
- A minor re-layout done to the Add/Edit Shift screen to correct some display issues on 125/150% DPI displays.
- Fixed up some minor typos and grammatical errors in the help file.