by Mark Nemtsas | Apr 23, 2012 | How To, Tips and Tricks
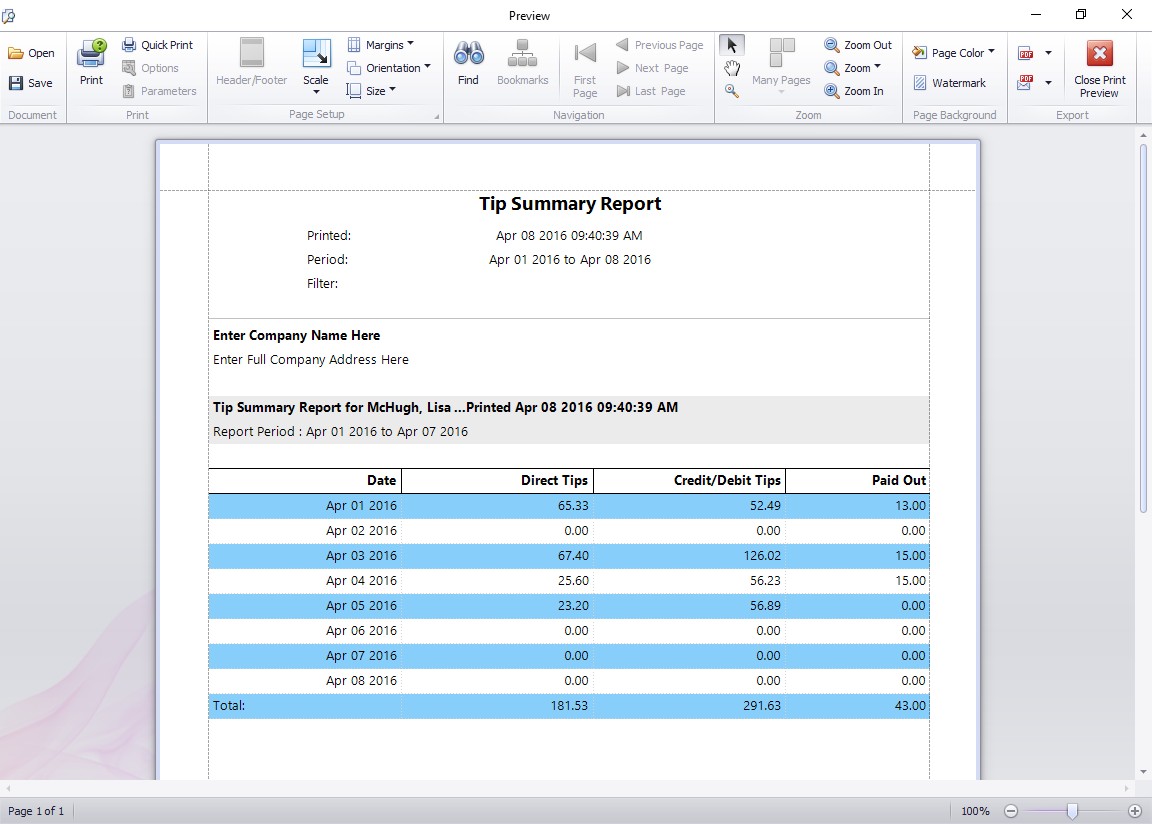
The Tip Summary Report
This Time Clock MTS How To Article covers how you can run reports on employee tips. There are three main employee tip reports in our tip tracking software and this how to article describes each in detail. Employee Tip reports can be run from the Reporting->Payroll Reports screen and you must be logged in as the Time Clock MTS administrator to access the reports. As is normal with most other Time Clock MTS reports you can run any of the tip based reports for a date range, one or many employees, or by department.
The Tip Summary Report
The Tip summary report (shown above) gives a day to day breakdown of tips for each employee. This includes a daily report on tips received directly, credit/debit card tips received, and tips paid out to others.
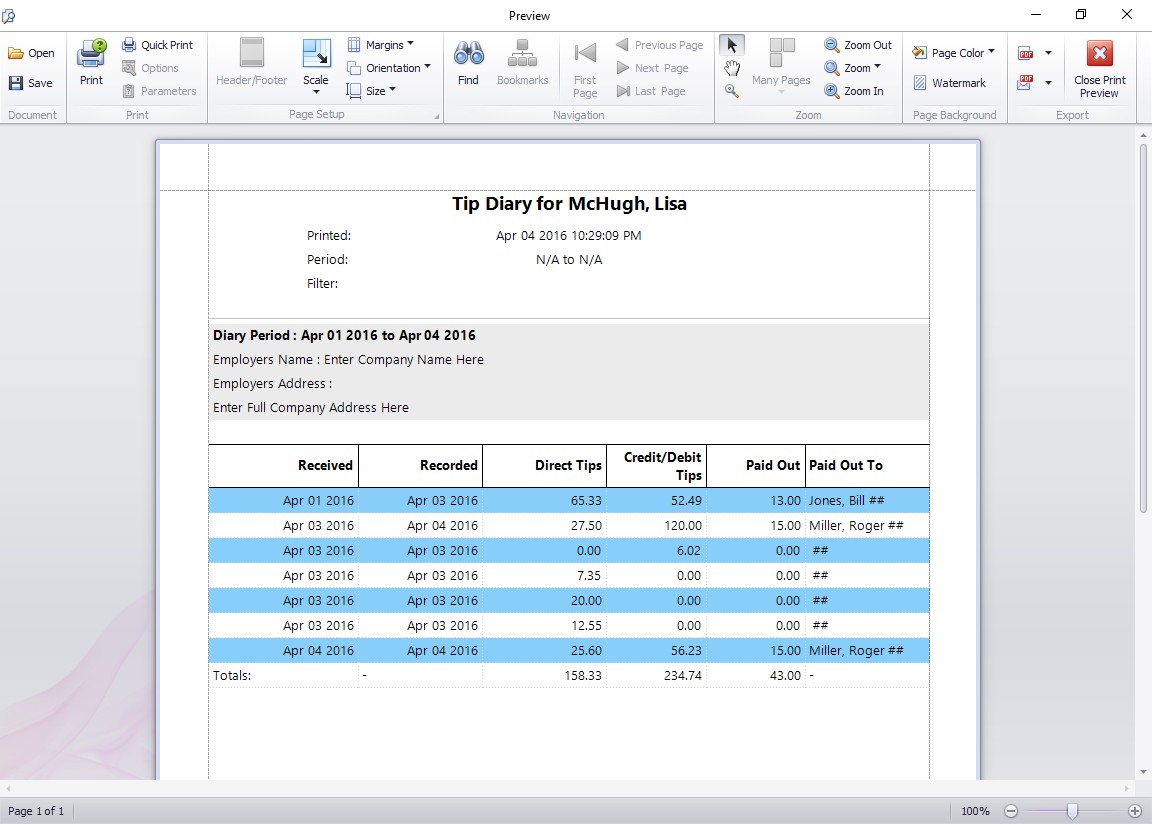
The Employee Tip Diary Report
The Employee Tip Diary Report
The employee tip diary report gives full details of each entry made by the employee into their tip diary across the reporting date range. Totals are then displayed for each type of tip over the reporting period. This report is very similar to Form 4070A Employee’s Daily Record of Tips which is available from the IRS.
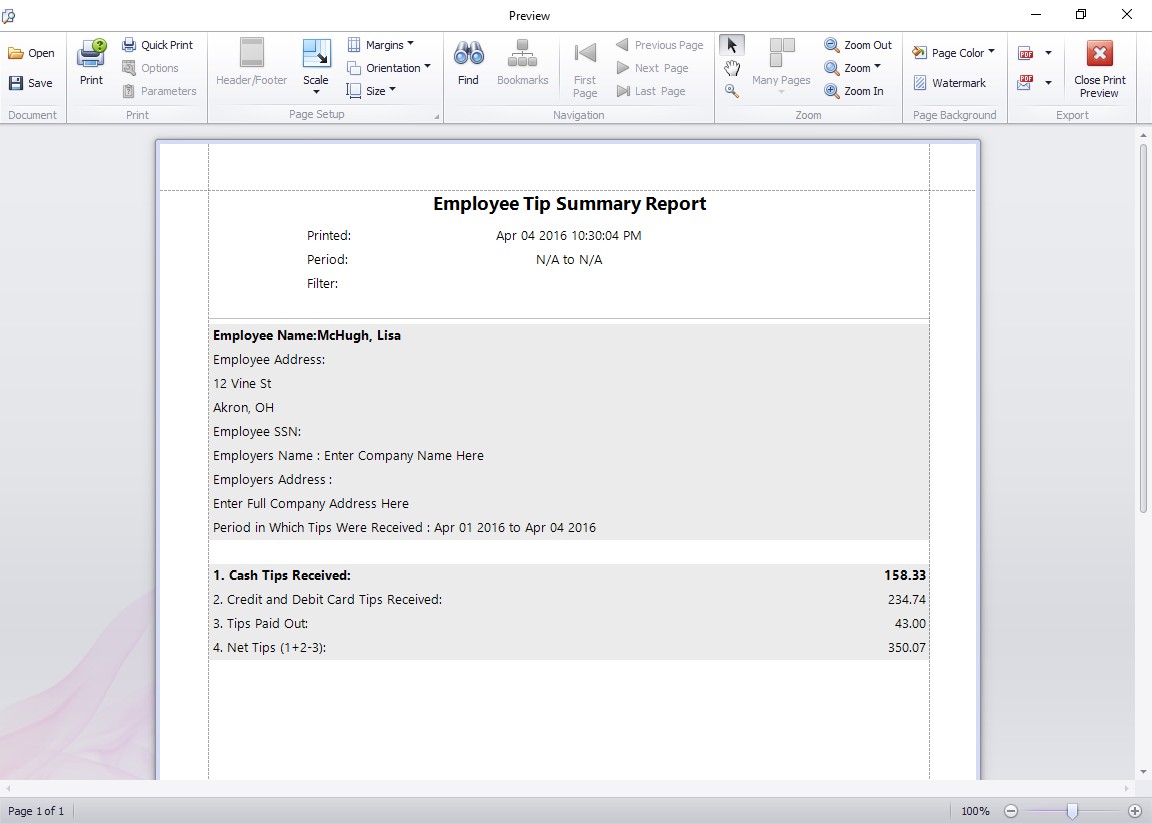
The Employee Tip Diary Summary Report
The Employee Tip Diary Summary Report
The employee tip diary summary report produces a very easy to read summary of the employee tip activity over the selected reporting range. Totals are displayed for each type of tip over the reporting period. This report is very similar to Form 4070 Employee’s Report of Tips to Employer which is available from the IRS.
by Mark Nemtsas | Apr 18, 2012 | How To
This Time Clock MTS How To Article covers how employees can record a tip using the Time Clock MTS employee tip tracking system.
- The first step is to log in as the Time Clock MTS administrator and enable tip tracking. This was covered in the how to article How to Setup Employee Tip Tracking.
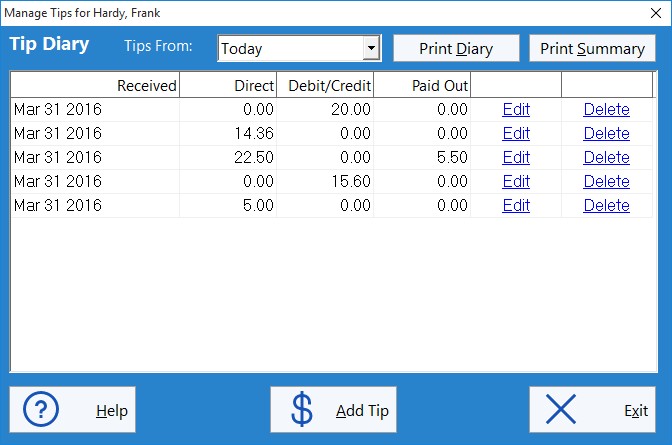
- Employees will now be able to see the Employee Tip Tracking button on the time clock. To enter a tip they should click this button and they’ll be shown the Employee Tip Diary which can be seen in the image at the top of this article.
- The Employee Tip Diary is used by employees to add, edit or delete employee tips. To add a new tip employees must click the Add Tip button.
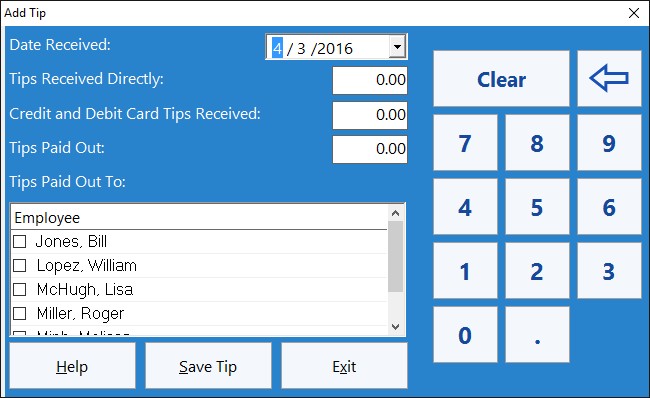
The Add Tip Screen
- The Add Employee Tip screen (shown above) allows employees to enter details of a tip or gratuity that they’ve received. The details of the tip (date received and cash or credit amount) are entered into the fields on the left side of the form. Data can be entered via a keyboard or via the numeric keypad on the right.
- If the employee has paid out the tip to other employees they should enter an amount into the Tips Paid Out field and then select the employee(s) paid out to from the employee list box.
- When the employee is happy with the details of the tip to be added they must click the Save Tip button and the tip will be added the employee’s tip diary.
by Mark Nemtsas | Apr 17, 2012 | How To, Tips and Tricks
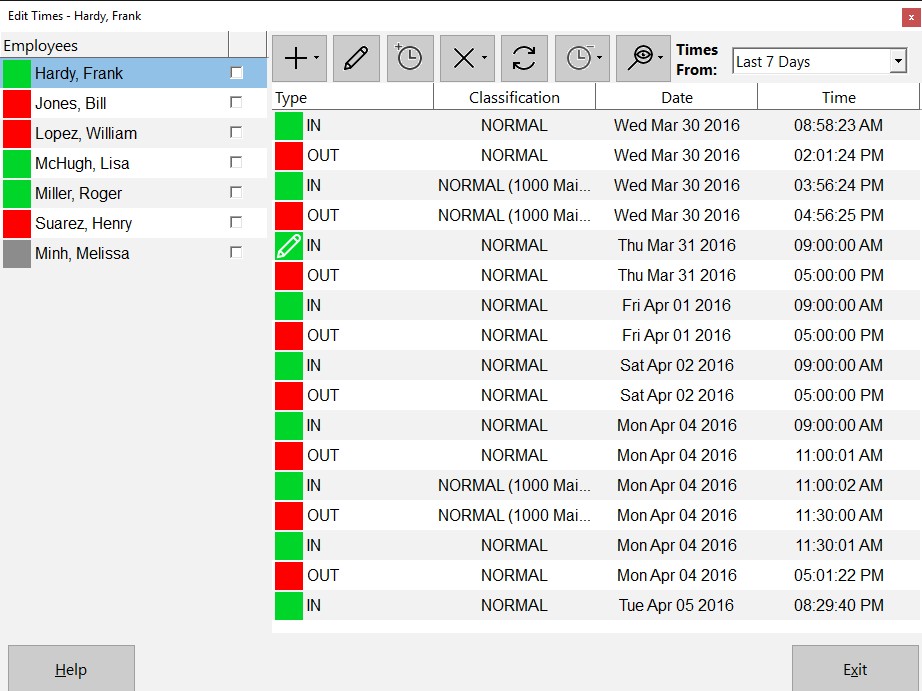
The Edit Times Screen
This Time Clock MTS How To Article covers how the Time Clock Administrator can punch out all employees that are currently punched in quickly and easily. This can be especially useful at the end of the work day to punch out any employees that may have forgotten to punch out when they left work for the day.
To punch out all employees that are currently punched in just follow the steps below..
- Log into Time Clock MTS as the administrator. How you log in as the administrator was covered in this How To Article.
- Go to the Tools->Edit Times screen and you’ll be shown the screen at the top of this article.
- Click the Punch In / Out
 button and choose the Punch Out All Employees option from the menu that pops up.
- A popup screen will give you the chance to set the punch out time for the group of employees. See the screen below. In this example we’ve set the time to 5:00:00PM.
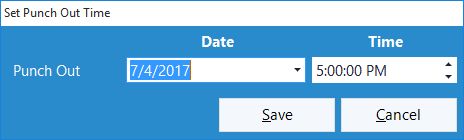
Setting the Punch Out time
- Confirm that you want to punch out all employees in the confirmation window that is then shown.
- All employees that are punched in will be punched out of Time Clock MTS
If this article isn’t what you were looking for you might find the How to Punch In All Employees article or how to Punch a Group of Employees In or Out article useful.
by Mark Nemtsas | Apr 16, 2012 | How To, Using the Software
SurePayroll is a very popular online employee payroll system that will calculate wages, pay your employees and help you stay compliant with payroll taxes & regulations. We’re happy to say that our pc time clock software, Time Clock MTS will now integrate with SurePayroll allowing you to quickly and easily export your employee time and attendance data to your payroll system. Here’s the steps that need to be taken to produce a data file suitable for exporting to SurePayroll.
1. Map Employee Names and ID’s Correctly
Time Clock MTS uses only one field for employee’s names while the SurePayroll system requires a first and last name. To get around this you must name your Time Clock MTS employees using the form LastName, FirstName. It is vital that you get the comma in between the last and first name. You can see in the image above that the employee is named Jones, Bill.
The second thing to ensure is that the Time Clock MTS employee Badge ID matches your SurePayroll employee numbers exactly. If this is not done then the time clock data for that employee will not be able to be imported to your payroll system. Above you can see that the employee Badge ID is 1010, this must be the same as the SurePayroll employee number.
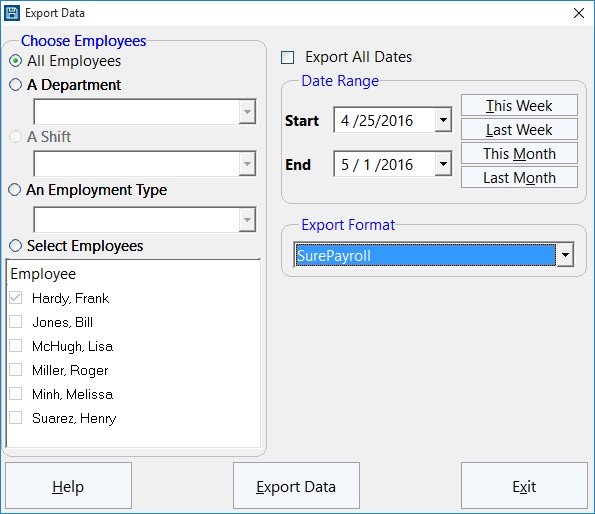
2. Export Data Using the Pre-Defined SurePayroll Export Format
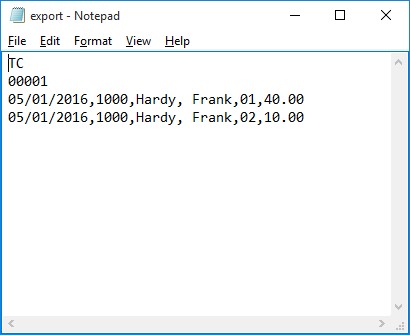
The next step is to actually export the data. This is done from within Time Clock MTS on the Reporting->Data Export->Export Data screen (shown above). Use the selection boxes on the left to choose what employee data you want to export. The date selection buttons on the top right allow you to select the date range that you want to export time clock data for. When you are happy with both the employee selection and the date range click the Export Data button to start the data export process. When the export is complete a Notepad window will pop up and you’ll see your exported data (see the image below). You can now save this file with the correct name and file extension required by SurePayroll and import it into your payroll system.
by kathryn@timeclockmts.com | Apr 16, 2012 | New Releases, News
While I am writing this entry Version 3.3.5 of Time Clock MTS is being uploaded. The changes made to this version of are detailed below.
- The software incorrectly displaying employees as clocked out after switching jobs has prompted a re-write of the code run when employees are selected on the employee list interface. The result is that the incorrect display is fixed, the number of database accesses has been reduced considerably and response times have improved.
- Added some new fields to the Export Data system. This includes the <HOURS_DECIMAL> field which displays times in decimal format regardless of your global time display format setting. The other two fields added are <EXPORT_START_DATE> and <EXPORT_END_DATE>.
- Added capability for pre-defined (and read only) data export formats.
- Added pre-defined data export formats to suit Sure Payroll and Union Bank Online Payroll.
- Exporting data will now group Normal and Holiday time if they have the same rate code.
- Exporting data will now group OT1 and OT2 if they have the same rate code.
Note that for the Sure Payroll and Union Bank Online Payroll export formats to work correct you must set the Time Clock MTS employee badge number to the corresponding payroll system employee ID. Also, because Time Clock MTS does not track first and last names separately employees in Time Clock MTS must be named using the form Last Name, First Name. For more detailed information see the Sure Payroll integration or the Union Bank Online Payroll Integration How-To articles.