by Mark Nemtsas | Jan 26, 2012 | Using the Software
I got an email today from a user interested in the job tracking features of Time Clock MTS who wanted to know what job based reports were available within the software. Right now there’s a few reports that are job specific.
1. The Job Punchcard Report – this report is basically a copy of the Punchcard Report with a couple of extra columns showing the job name and number that each clock in/out pair is associated with. If a time wasn’t associated with a job then no job code is shown. This report is useful to examine the activity of employees on jobs on an employee by employee basis.
2. The Job Time Report – this report totals time employees worked on each job across the report time period. This report is useful to examine the time spent on each job on a job by job basis.
3. The Active Job Report – this report prints out a list of all active jobs along with their job codes. This report would be useful to print out and pin up next to your time clock stations so that your employees know what job codes to enter into Time Clock MTS when they need to track a job.
It’s worth noting that Job Punchcard Report and the Job Time Report can be run for just a single job by selecting a job name/code from the Choose a Job dropdown on the Report Configuration screen. This enables you to see the activity on a single job over the report period very quickly and easily.
by kathryn@timeclockmts.com | Jan 23, 2012 | New Releases, News
There’s been some usability enhancements made to version 3.3.1 of our time card software as well as some small tweaks and a change to sick and vacation time accruals. The details of the changes made to this new version are shown below.
- The job selection screen now remembers the last window size when it is re-loaded.
- You can now sort the columns on the job selection screen by clicking on the column headers.
- Fixed up some minor layout issues on the vacation and sick time accrual screens.
- Added the “Apply Starting Balance Annually” setting to both sick time and vacation accruals. When checked this will start each years available sick or vacation time with the “Starts With” balance for the accrual schema. Note that this setting will only take effect if the “Carry Balance Forward Yearly” setting is not checked. Note also that the date the balance is applied depends on your “Use Hire Date Not Fiscal Year” setting.
by kathryn@timeclockmts.com | Jan 17, 2012 | New Releases, News
Time Clock MTS version 3.2.13 has just been released. Detailed changes for this new version can be found below.
- Fixed the Add Employee Tip screen that could leave the bottom employee in the list scrolled off of the bottom of the screen.
- A scroll bar is now displayed on employee bulletins that are more than 5 lines long.
- A fix has been put in place to stop the main application window disappearing when a very long report is generated. The same problem seems to be happening when using the Edit Times screen but I’m trying to get to the bottom of that.
- Stopped the double expiry warning message when in the last 10 days of the trial period.
by Mark Nemtsas | Jan 9, 2012 | Tips and Tricks
This website contains a number of free tools that can make the task of tracking your employee’s time and attendance data much simpler. The first tool is Time Clock MTS itself. If you’ve got three or fewer employees and want to use the software on one computer then Time Clock MTS is the perfect free time and attendance tool.
If you’re looking for something a bit simpler then we’re happy to provide you with our free time clock calculator. This 100% online tool allows you to enter your attendance data for a week and it will total up your number of work and break hours. You can then print your time card for later reference.
Finally, if you’re just after a some basic tools to record your attendance data you might like to take a look at our free timesheet templates. These well laid out timesheets are available 100% free to download in several popular file formats including Microsoft Word, Microsoft Excel and Adobe PDF. Once downloaded they can easily be printed out and supplied to your staff to record their timesheets.
Of course if you’re wanting a more advanced (but not free) time and attendance tool you should take a look at our time clock software, Time Clock MTS. It’s suitable for most businesses, small and large and is currently being used by many thousands of companies around the world. If an online time and attendance system is more suitable to your requirements then try signing up for a free 30 day account of Online Time Clock MTS.
by Mark Nemtsas | Jan 8, 2012 | How To, Tips and Tricks
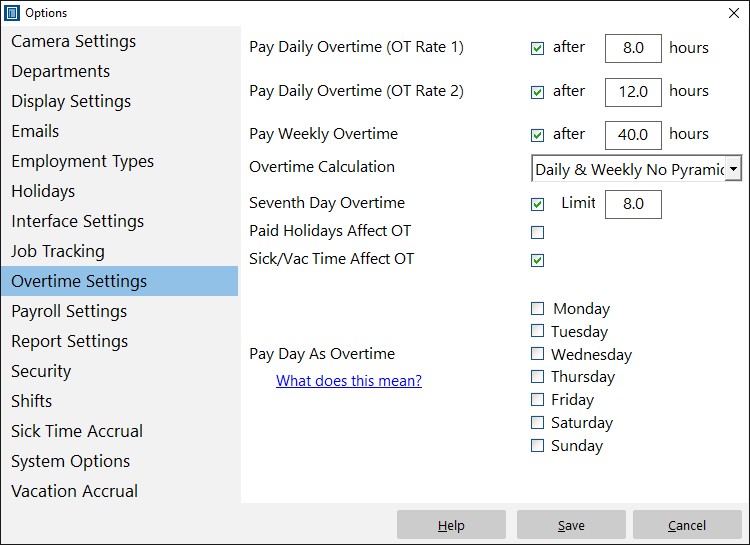
The Overtime Settings Screen
If you’ve got several employees in your business who are receiving different amounts of hourly pay, it can be difficult to keep track of it all manually. Time Clock MTS is a simple and easy time clock system that helps you manage the information of all your individual employees.
Overtime is one of those things that’s well-known for getting slightly confusing. However, with a effective and easy-to-use time and attendance tool, you can set the hourly overtime rate for each employee (even if it varies from one employee to another) and let the computer work out the rest!
This Time Clock MTS How To Article is a step-by-step guide for setting up daily overtime for your employees using Time Clock MTS.
- Log in as the Administrator. You can do this buy choosing File > Log In As Administrator. Tap in your password and you’re ready to go.
- Once you’re logged in, select Tools > Options. A new window will open and you’ll see a list on the left-hand side. Choose Overtime Settings from the list.
- Set the amount of hours the employees must work before receiving overtime pay. You can do this by checking the box next to “Pay Daily Overtime (OT Rate 1)” and then typing in the number of hours. For example, if you type “8” in the box, this means that the employee has to work eight hours before starting to receive overtime pay. Click the Save button to save the changes and close the Options window.
- The final thing to do is to actually set the hourly overtime rate. To do this, start by highlighting the employee on the “Employees” list. Select Employee Maintenance > Edit Selected Employee. A new window will open and you should see a list of four different categories on the left-hand side. From this list, choose “Payroll Information”. Look for “Hourly Payments” half way down the page on the right-hand side of the window.
Type the hourly overtime rate in the box labeled “OT 1 Rate / hr” and click “Save Employee”.