by kathryn@timeclockmts.com | Jul 26, 2011 | Using the Software
I’ve just had an interesting question from a user who is looking to upgrade from the free version of Time Clock MTS to a one client commercial version. The user currently has the admin version of Time Clock MTS installed on a PC where his employees clock in and out and is also where he runs reports and configures the software. In his new setup he wants to use this computer as a client (for clock-in and clock-outs only) and use his own computer to administer the software. So there’s a little bit of work required to set this up and still keep the data from the free version. Let’s take at what needs to be done to share his data file and setup Time Clock MTS in the configuration he wants.
1. Prepare a location on your file server where your database will reside. Make sure that all computers that are going to connect to that database have full read/write permissions on the folder where the database is going to be stored.
2. Log into the admin software on the computer that will become the client and go to the Tools->Options->System Options page and move the database to your server by clicking the Move button.
3. Uninstall the admin software on the computer that will become the client
4. Install the Time Clock MTS client software (which can be downloaded from here) on the computer, you’ll find that it will connect automatically to your database you moved to your server. If it doesn’t just go through the first run wizard and you can connect to it that way.
5. Download and install the admin software on the computer that you want to become the administrator. Go through the process of entering a password and so on. Don’t worry too much, you’re not going to use the database created when you install the admin software on this computer.
6. Log into the newly installed admin software as the administrator and go to the Tools->Options->System Options page and connect to the database on your server using the Change button.
That’s all there is too it, a useful process to know if you’re looking to move your administrator software to a new computer!
by kathryn@timeclockmts.com | Jul 25, 2011 | New Releases, News
I’ve just uploaded Version 3.2.1 of Time Clock MTS. This version contains a couple of new reports, some (hopefully) helpful new features, and some minor cosmetic fix ups to several screens. Details of the changes can be found below.
- Added several tips focussed fields to the payroll information report section template.
- Added some “OTHER” time classification fields to the accruals report section template.
- Fixed up the TAB order on the bulk time entry screen, fixed some minor layout issues on the same screen too.
- The time period on the Edit Times screen is now remembered.
- Added the “Insert Missing Punch” button to the Edit Times screen. Allows you to insert a clock out and in into the middle of an existing clock in/out. That sentence is confusing enough to warrant a dedicated blog post on the topic. Stay tuned.
- Changed the status message delay on the Keypad Interface to 10 seconds.
- Fixed up some dodgy tooltip text on the Edit Employee screen.
- Added the Time Off Report and the Simple Wages – Departmental Report.
by Mark Nemtsas | Jul 25, 2011 | How To, Tips and Tricks, Using the Software
The recent release of Version 3.2.1 of Time Clock MTS saw the addition of a new feature to the Edit Times Screen that allows the insertion of a missing punch into the middle of an existing clock in/out pair. The typical situation where this might be useful is if an employee forgets to clock out for a break. This blog entry takes you through the process of inserting a missing punch using the Edit Times screen.
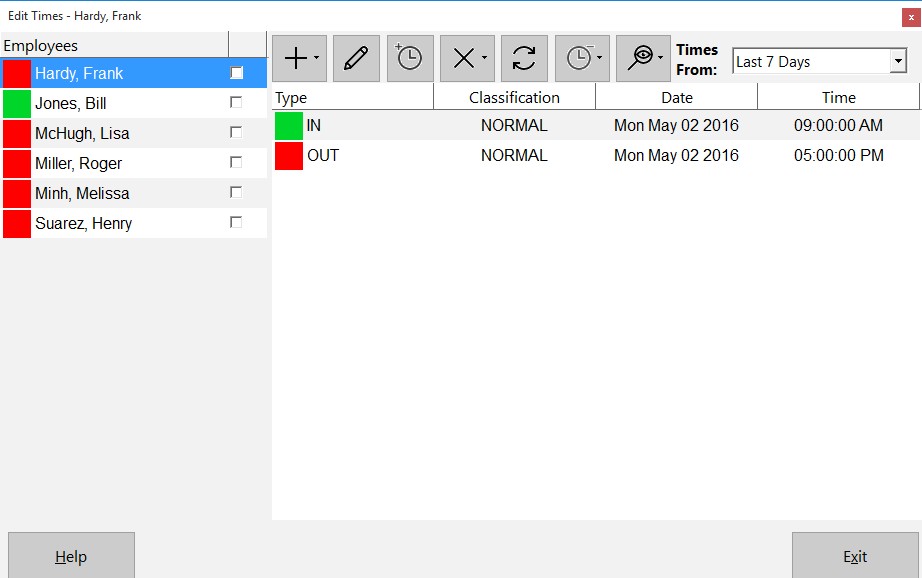
Figure 1 – Missing Punch on Edit Times Screen
Above you can see the Edit Times screen for an employee who has clocked in just before 9:00AM and clocked out just after 5:00PM. The employee has forgotten to clock out for lunch so the administrator must insert punch to represent the break. To do this you must click on either the clock in or out where you want to insert the missing punch and then click the Insert Missing Punch  button.

Figure 2 – The Insert Missing Punch Screen
Above you can see the Insert Missing Punch screen. Note that the Clock Out time is first and the Clock In comes next. This is because when you insert a missing punch you are representing a missed clock out and back in, which in our example is a missed 30 minute lunch break. It’s worth noting that you can also add a time note, assign a job to the missing punch, and change the overtime calculation method. It is important to realize that these settings only affect the newly created Clock In.
Let’s go ahead and adjust the Clock Out and Clock In times to the lunch break times of 12:00:00PM and 12:30:00PM.
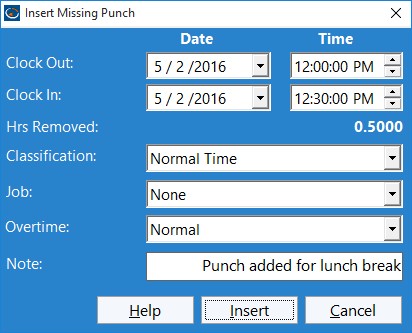
Figure 3 – The Insert Missing Punch Screen
Above you can see we’ve edited the screen to give the times wanted and have also added a note to record why this punch was inserted. We’ll go ahead now and click the Insert Punch button to add the clock out and in. This will take us back to the Edit Times screen.
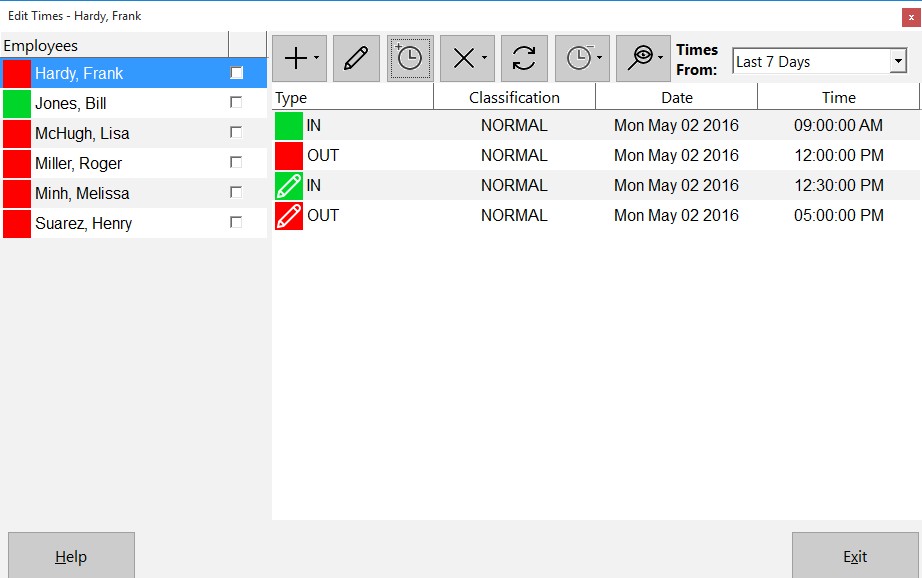
Figure 4 – The Edit Times Screen with Missing Punch Inserted
You can see in the image above that the missing punch has been added to represent the lunch break that the employee forgot to clock out and in for. Previously you could insert a missing punch into Time Clock MTS by using the Edit Time screen and by adding a new time but this new button greatly streamlines the process and helps to eliminate any potential for error.
As always if you have any questions please feel free to ask me!
by Mark Nemtsas | Jul 18, 2011 | New Features, News
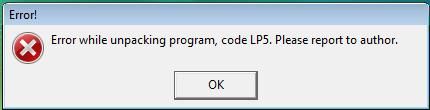
Code LP5 Error
Above you can see an error message a group of Time Clock MTS users were reporting last week when they tried to run the program. This not only included new users of the software but also some people using versions nearly 2 years old! Thanks to a top rate IT department at one company we were informed of what was causing the problem before we even really knew there was a problem! Thanks go out to them.
Anyway, the issue was due to a recent update to Windows Vista and Windows 7 conflicting with a third party component that we use in our software. We’ve contacted the authors of this component who have supplied us with a version that Windows appears to like a lot more and have now uploaded version 3.1.9 of Time Clock MTS. There are no other changes to the software in this release.