by Mark Nemtsas | Oct 22, 2010 | Tips and Tricks
Prior to the release of Time Clock MTS Version 3 all the Time Clock MTS job based reports were run for all jobs. A common request we had was to allow reports to be run for a single job to allow for simple cost tracking on a job by job basis. This has now been accomplished simply by placing a job selection drop down on the Report Configuration screen which you can see above. It’s a simple matter now to select a job from this drop down and then choose a job based report to run (like the Job Punchcard Report or the Job Time Report). The data on the report will then be restricted to the job you selected from the drop down.
If you’re not sure what job tracking in Time Clock MTS is or you just want to know how to make it work then you should try watching the Time Clock Job Tracking Demo.
by Mark Nemtsas | Oct 22, 2010 | Tips and Tricks, Using the Software
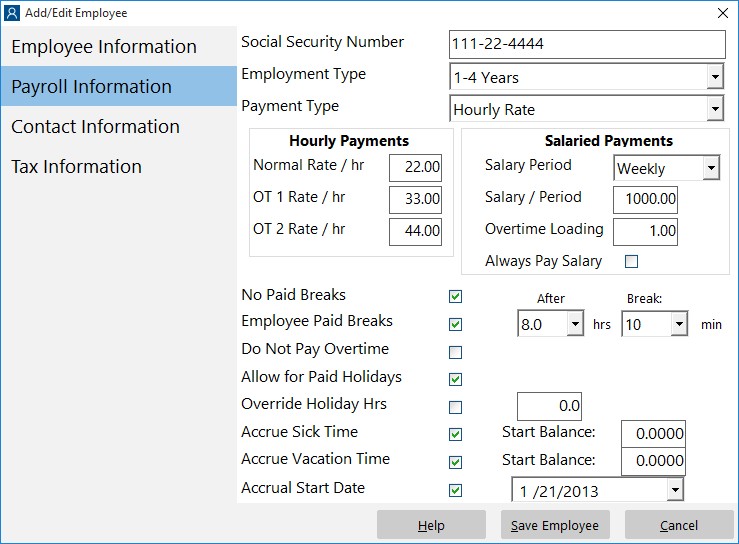
The Payroll Information Screen
A common issue that the new user to Time Clock MTS has is dealing with bringing employees into Time Clock MTS that have existing sick and vacation accrual balances. Prior to the release of Time Clock MTS Version 3 the only real solution was to set the hire date of the employee to the day they were entered into Time Clock MTS. Then their accrual starting balance (either the employment type starting balance or the employee starting balance) could be set to their actual balance. This worked fine but not having the hire date set correctly could affect on going accrual calculations or lead to confusion when manually setting those employees to different accrual schemes as their years of service increased.
This has all changed, though, as of version 3 of Time Clock MTS. A couple of innocuous little settings (seen in the screenshot above) allow you to set an accrual start date for employees with existing accrual balances. When the Accrual Start Date checkbox is checked and a date set that date is used as a starting date for that employees accruals and the employees starting balance used as a starting balance. This ensures that the accrual calculations are accurate and that no confusion arises because of an incorrect employee hire date.
So, here’s how to setup an existing accrual balance for an employee being entered into the Time Clock MTS software for the first time.
- Setup the Vacation Accrual Scheme and Sick Time Accrual Scheme and assign them to the employee as required.
- Transfer the sick time and vacation accrual balances from your existing attendance system into the Starting Balances text boxes on the Time Clock MTS Employee Payroll Information screen.
- Check the Accrual Start Date checkbox on the Employee Payroll Information screen and select the accrual start date.
That’s all there is to it. The Accrual Start date will now be used as the start date for all accruals for that employee all accruals from that point forward will use the starting balance as the starting point for all calculations.
by kathryn@timeclockmts.com | Oct 21, 2010 | New Releases, News
I’m happy to announce that Version 3 of Time Clock MTS has been released today. There’s a lot of new features in the software, a number of bug fixes, and some new logging code to make any new errors easier to track down. You can find details of the changes below.
New Features
- The Tools->Interface Settings screen now allows you to select either small or large fonts for the Employee List Interface.
- The Edit Times screen now remembers column widths if you adjust them.
- The number of hours credited to an employee on a Public Holiday can now be set on an employee by employee basis. So, for example, you could set holidays to credit 8 hours and then go through and modify your part time employees to credit them with less hours. This is adjusted on the Employee Maintenance->Payroll Settings screen.
- The Daily Time Report has been added. This shows all clock in and out events in time order split up by days.
- A new Report Section Template field has been added. This allows you to display the actual hours worked for a salaried employee who is set to always be paid their salary regardless of hours worked.
- A new Report Section Template field has been added. This shows the time worked less any accruals during the report period.
- The Bulk Add Time screen has been modified to allow you to add up to 7 different times at once.
- The Export Data functionality has been completely changed. You can now define any report format you like and export it to any text format you like. This will be the subject of a later blog post.
- The Report Configuration screen now includes a Job Number selection, this allows you to run any of the job based payroll reports for all jobs or for one particular job.
- The Actual versus Rounded Time report has been added. This new report displays the actual time versus the rounded times across a report period. Obviously this report is only useful if you have report rounding turned on.
- The Time Clock MTS Client can now be set to only display the employees from one department. This is set on the Tools->Options->System Settings screen of the client software.
- Employees on Sick or Vacation time are now shown with a purple icon on the Employee List Interface.
- Employees that are out on sick time or vacation time are shown as such in the Last Action area on the employee list interface.
- The Employee Status report now shows if employees are out on sick or vacation time.
- If you want to bring employees in the Time Clock MTS system with existing accrual balances you can now set initial balances and dates.
- Comments for times are now shown on the Job Punchcard report.
- Employee contact details now include the employee email address.
- The Time Clock MTS administrator software can now be connected directly to an existing database without needing to move it. Useful if you’re moving the computer your admin software is installed on or if you’ve installed a second admin computer.
- The job number is shown along with the job name on the sub totals area of the Job Punchcard Report.
Bug Fixes
- The Departmental Wages report is now fixed up for employees with very long badge numbers.
- Enabling the web camera on the client software no longer triggers a 401 error.
- The Force Overtime setting now works correctly if Daily Overtime is not set.
- The main screen of the software no longer disappears occasionally when running long payroll reports.
- The Job Punchcard report is now working correctly, formerly the job numbers were not changing correctly.
Other Changes
- A reminder is shown to new users of the software when they first clock someone in or out that it is possible to have employee passwords or PIN’s.
- The password reset screen provides a much clearer indication that it is only to be used when you’ve forgotten your password.
- The client software now includes a reminder that users are running the client version and that you need to run the admin version to see all the menus and run reports an so on.
- Fingerprint support for Windows 7 has been added.
- The Windows version is now sent with all error message emails.
- Some new data logging has been added to the Add Single Time screen to try to track down an error that some people are seeing.
- Time Clock MTS will no longer allow you to move the Time Clock MTS database into a folder that already contains a database. Designed to stop people accidentally over-writing their data.
Phew! That’s a lot of changes, I’ve been working hard on this for a while and I hope you find that it was worth all the effort. Thanks to those users who suggested a lot of these changes, I think they’ve really improved the useability and flexibility of the software. There’s still a few things to be added in the next month or so that will round out the Version 3 upgrades. Stay tuned to the blog too because I’ll be expanding on a number of these changes to explain in more detail how to use them and how they can be useful to your business.