by Mark Nemtsas | Apr 28, 2009 | Tips and Tricks, Using the Software
I am beginning to think that there’s some confusion about what the File->Reset Administrator Password menu item does so it’s worth a little bit of clarification. A few months back I described how you could use this menu item to Reset Your Administrator Password.
When you Should Use the Reset Administrator Password Menu
You should only use the File->Reset Administrator Password menu when you’ve forgotten your administrator password and you need to reset it. To reset your administrator password successfully you’ll need to know the answers to the reminder questions. If you answer the questions correctly then Time Clock MTS will contact our web server to get a new password and reset the password. If you’re a registered user of Time Clock MTS then the email address you used to purchase the software will be emailed the new password. If you’re using the trial version or the free version then you’ll be told what the new password is via a popup message.
You shouldn’t use the File -> Reset Administrator Password Menu if you know your Administrator password and just want to change it.
Manually Resetting Your Administrator Password
If you know your administrator password and just want to reset it to something different then you should not use the above method. Log in as the administrator and go to the Tools->Options->System Settings page and reset the password there. You can read more about this in the System Settings Help Topic.
What to do When You’ve Forgotten Your Admin Password AND Reminder Question Answers?
In this case you’ll need to get us to reset your admin password for you. You’ll need to email us your Time Clock MTS database. We’ll reset the password for you and then email your database back, once you’ve got it back you’ll need to read the instructions here to learn what to do.
I hope that this helps to clear up any confusion!
by kathryn@timeclockmts.com | Apr 21, 2009 | New Releases, News
A new minor release of Time Clock MTS today fixing up a few problems. Details of the fixes are below:
- Some fixes to the way resizing of the application window works. In some cases the bottom employee on the employee list wouldn’t be visible, I think this is because of the scroll bars appearing on the list of employees. This should be fixed up now, along with the maximize window button being disabled when you’re using the keypad interface.
- A fix to the mySQL database creation script, for some reason LONGTEXT fields were being set to VARCHAR(255). Now all fixed.
- Fix to all payroll reports where the monthly pay amount was more than $9,999.99. Wages now display and print correctly.
- Employees using the ‘View My Information’ button can no longer view the time location report and the departmental wages report.
Additionally, Time Clock MTS Version 2.3.1 (released about a month ago) included a fix for the shift restriction feature which was working for a long time and then stopped working.
by Mark Nemtsas | Apr 16, 2009 | Tips and Tricks, Using the Software
A fairly common question that we get asked about our software is what is the difference between a “client” and an “employee”? It get’s asked enough that we thought it was worth writing a blog entry about it.
What’s the difference between clients and employees in Time Clock MTS?
Put simply an employee is a record in the Time Clock MTS database corresponding to a person in your organization for whom you wish to track time and attendance data. That’s someone for which you want to track time for.
On the other hand, a client is a computer on which you have installed the Time Clock MTS Client software so you can record time and attendance information using that computer for any employees in your Time Clock MTS database. You might have multiple computers in your workplace with the Time Clock MTS Client installed on it so employees can clock in and out anywhere around the office or factory. Administrators can’t use these computers to add employees, or edit times, or change their time clock settings.
The cost of Time Clock MTS is basically dependent on both the number of time clock computers that you need. If you need just one time clock computer and you’re happy to manage your software from that same computer then our most popular product is the Time Clock MTS Stand Alone Edition. It’s exactly as it sounds and uses one computer for both tracking employee time and administrative purposes. One computer will track up to 500 employees for $99 (US).
However, if you’re wanting to manage your software from a different computer than the one your employees punch in and out from then the Network Edition allows you 20 time clock (or client) computers and one administrator computer. As well as the 20 client computers you can track up to 500 employees for $199 (US).
If your business is very small and you just want to track 3 or fewer employees on a single computer then you can use Time Clock MTS for free.
As you can see there’s an edition of Time Clock MTS to suit almost any business. You should take advantage of our completely unrestricted free 30 day trial to see if it suits your business. It really is time clock software for ANY business.
by Mark Nemtsas | Apr 15, 2009 | How To, Tips and Tricks, Using the Software
If you’re using Time Clock MTS to track your employee attendance then you can allow employees to view their own time cards. This blog entry will cover how you can setup the software to do this and how your employees can then view their own information.
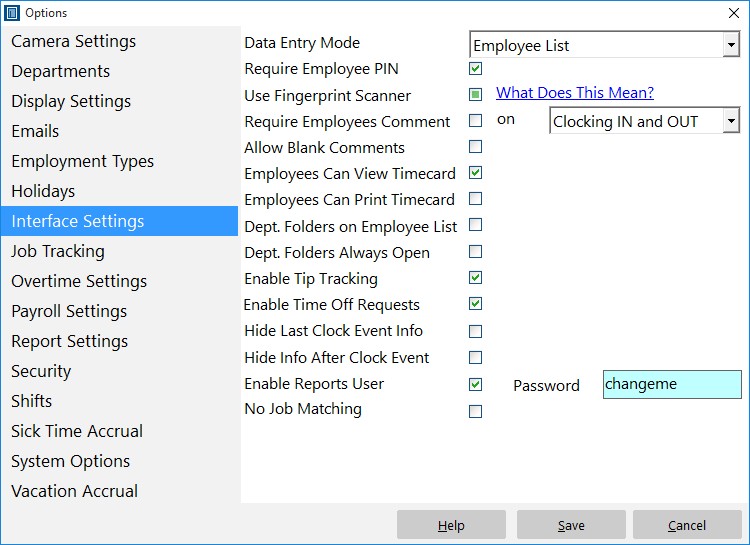
The Interface Settings Screen
Setting Up the Software
Setting up the software to allow employees to view their time card information is very simple. Just log into the administrator software as the administrator and then go to the Tools->Options->Interface Settings page. All you need to do then is check the ‘Employees Can View Timecard’ checkbox. You can also allow them to print their timecard by checking the ‘Employees Can Print Timecard’ checkbox. Click Save to save the changes. Note that employees can only print and view their own timecards when you’re using the Employee List Interface.
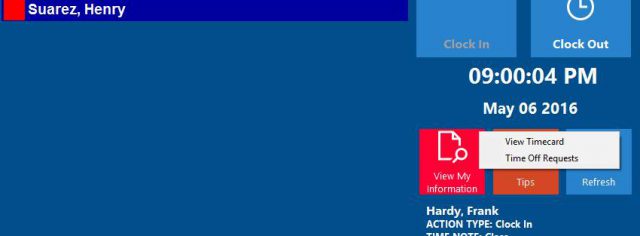
Employees can view their own timecards.
Employees Viewing their Timecard
If you’ve setup Time Clock MTS to allow employees to view their time card then they can do so very simply. Here’s how employees can view their time card information if you are using the Employee List interface of the software:
- Have them select their name from the employee list.
- Click the View Information Button and then the View Timecard option.
- If you’ve got employee PIN’s or employee fingerprint security turned on then the employee will need to enter their PIN or scan their fingerprint to view their time card.
- The report configuration screen will be displayed. The employee can pick the date range from the top right, and the report they want to view from the report list. Note that the employee cannot pick any other employee from the list of employees.
- When they’re ready to view their timecard they just need to click the Create Report button.
- Employees will then be shown their timecard for the period they selected. If you’ve allowed them to print their timecard then they’ll be able to print their time card too.
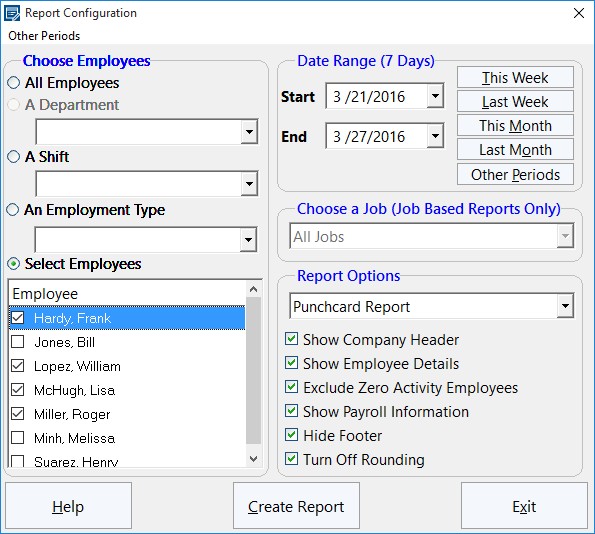
Report Configuration Screen
If your employees are using the keypad interface and they want to view their time card information then they need to follow this process:
- Enter their employee badge number into to the badge number field of the keypad interface.
- Click the View Timecard button which is immediately to the right of the badge number field.
- If you’ve got employee PIN’s or employee fingerprint security turned on then the employee will need to enter their PIN or scan their fingerprint to view their time card.
- The report configuration screen will be displayed. The employee can pick the date range from the top right, and the report they want to view from the report list. Note that the employee cannot pick any other employee from the list of employees.
- When they’re ready to view their timecard they just need to click the Create Report button.
- Employees will then be shown their timecard for the period they selected. If you’ve allowed them to print their timecard then they’ll be able to print their time card too.
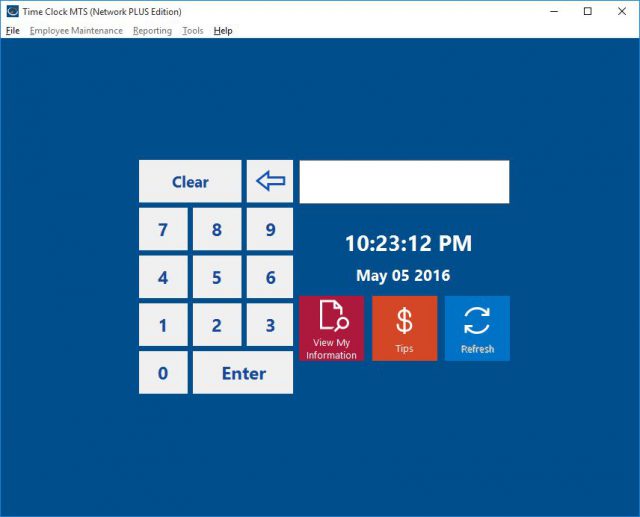
Keypad Interface with View Time Card Button
That’s all there is to it. A lot of companies like to make this information available to their employees because it saves a lot of questions for the payroll staff. If you didn’t know Time Clock MTS could do this and your company would find it useful why not turn on this useful feature today!
by kathryn@timeclockmts.com | Apr 14, 2009 | New Releases, News
A couple of minor releases in the last few days fixing up some small problems and putting in some new logging code to try to track down some errors that have started surfacing for some reason.
Version 2.2.9
Fingerprint support was re-enabled and the method used to check for correct fingerprint driver installation was changed. This is the resolution to the hard crash that was fixed up in the last release. There were also a couple of minor feature changes including adding last 14 days selection to the edit times screen and allowing administrators to setup web camera image capture on a client by client basis.
Version 2.2.10
A fix to the type 13 mismatch error that was caused by the release of Version 2.2.10. I’ve also added a bunch of new logging code to try to track down why people are suddenly (and mysteriously) getting Element Not found Errors. This is particularly baffling because this area of the software has not been touched in well over a year.

