Some users have reported some problems upgrading to Time Clock MTS Version 5 when they are using SQL Server as a backend database. I suspect this only occurs for users who have imported an Access database using SQL Server Management Studio. It appears that this process creates some indexes and constraints that prevent the upgrade process from occurring. Unfortunately there’s no automated fix because the names of the constraints and keys are randomly generated during the import process and will be different in each case.
The fix for this issue is complex and should only be attempted by users who are familiar with SQL Server and SQL Server Management Studio. If you’re not sure what either of these are or you think I’ve suddenly started talking another language then you’re not the right person to be implementing this fix. Talk to your IT staff or your database administrator before continuing.
You can be sure you’ve got this problem when you see an error like this the first time you run Time Clock MTS Version 5 after upgrading:
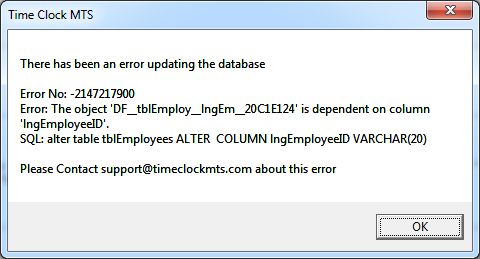
Note down the name of the object (of the form DF_tblEmploy_lngEm_XXXXXX) because we’re going to need that later. Close down Time Clock MTS and open up SQL Server Management Studio.
1. Backup your Database
Before we start this process you should backup your database. In SQL Server Management Studio (SSMS) you can do this by right clicking on your time clock database in the object explorer and choosing the Tasks->Backup menu option.
2. Determine Name of Constraints/Indexes to Delete
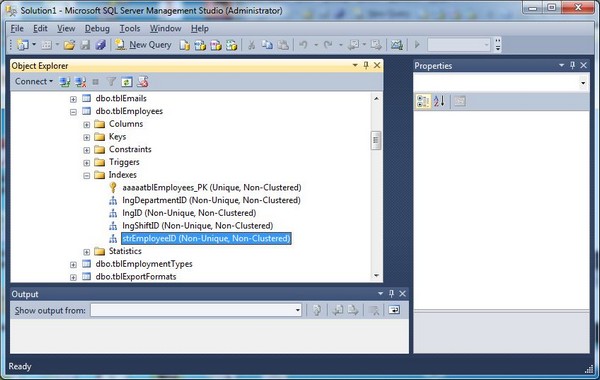
In SSMS we’re going to determine the names of the constraints and indexes to delete. The first is the one shown in the image above (but of course yours will most likely have a different name). Open up the table tblEmployees in the SSMS object explorer and click on the “Indexes” folder icon. It should look something like the image below. You may see an index called “strEmployeeID” there. If so, note down the name.
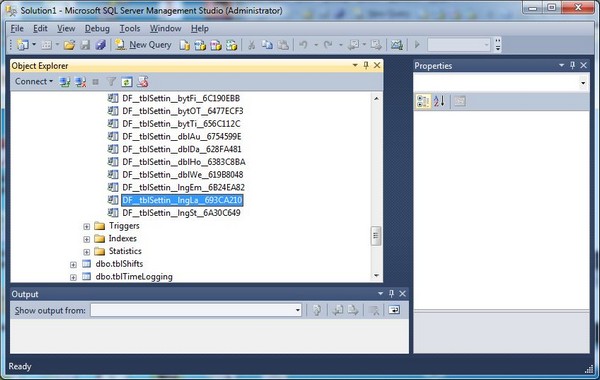
Now scroll down to tblSettings in the SSMS Object Explorer and open the Constraints folder. Scroll through the list of constraints looking for a constraint of the form “DF__tblSettin_lngLa_XXXXXX”. It might look something like the image below. If you find the constraint note down the name.
Click on the Indexes folder icon for tblSettings and you may see an index named “lngLastEmployeeID”. If you do note down that name.
3. Build and Run a Query to Delete Indexes/Constraints
Now we’re going to build a query to delete the offending indexes and constraints. Click on the New Query toolbar button in SSMS and cut and paste the code below into your new query window.
USE [YourDatabaseName]
GO
/** if you have a lngLastEmployeeID index in tblSettings include this line**/
DROP INDEX [lngLastEmployeeID] ON [dbo].[tblSettings]
/** if you have a strEmployeeID index in tblEmployees include this line**/
DROP INDEX [strEmployeeID] ON [dbo].[tblEmployees]
/** if you have a constraint of the form DF__tblSettin__lngLa__XXXXX tblSettings include this line**/
ALTER TABLE [dbo].[tblSettings] DROP CONSTRAINT [DF__tblSettin__lngLa__XXXXXX]
/** if you have a constraint of the form [DF__tblEmploy__lngEm__XXXXXXX] tblSettings include this line**/
ALTER TABLE [dbo].[tblEmployees] DROP CONSTRAINT [DF__tblEmploy__lngEm__XXXXXXXXX]
GO
Make sure to change YourDatabaseName to the name of your database. Delete the lines from the code that you do not need. For example, if you didn’t find a “lngLastEmployeeIndex” in step 2 then you can delete that line from the code. Also, make sure to change the names of the constraints to match those you found in Step 2. For example, if your tblEmployees constraint was named DF__tblEmploy__lngEm_20C1E124 then you’ll have to change DF__tblEmploy__lngEm__XXXXXXXXX to match that name.
When you’re happy that your query is correct we can run it by clicking the Execute toolbar button in SSMS and the offending indexes and constraints will be deleted.
4. Change Time Clock MTS Startup Settings File
Now you’re going to need to open up the Time Clock MTS Startup Settings file in Windows Notepad. The file can be found here:
c:\Program Data\Time Clock MTS\timeclock.ini
Look for a setting at the bottom of the file called “Version5DatabaseUpdates” and set the value back to 0 (it should be set 1) so that the entry looks something like this:
Version5DatabaseUpdates=0
Save the changes to the file and startup Time Clock MTS and everything should now work just fine.
