The information in this old article is now superseded. If you want to learn how to setup the Time Clock MTS Network PLUS Edition with SQL Server you should read these instructions.
Introduction
Time Clock MTS is now ready to be tested using MS SQL Server as a database rather than the standard MS Access database. This will result in a program that is more responsive, more reliable, and able to cater for more client computers than ever before. If you are interested in taking part in this beta then all the usual disclaimers apply. The software *is* beta and the setup is reasonably complex at the moment. The setup will improve a lot when we get to the final release.
Download and Install the BETA Verions of Time Clock MTS
If you are a current user of Time Clock MTS then you will only need to download and install the update versions of the client and admin programs. If you’re new to Time Clock MTS or want to try a fresh install then you’ll need to download the full installation packages. Go to our Time Clock Downloads Page to download Time Clock MTS.
Create Your SQL Server Database
The first setup is to create your SQL Server database using the Time Clock MTS Access database as a template. You must have installed the admin version of Time Clock MTS first, and can use your existing populated timeclock.mdb file as a template.
- The best method of creating the SQL Server database is to use the built in database upsizing wizard within MS Access. You’ll need to do this in Access 2000 or better and the wizard can usually be found on the Tools->Database Utilities->Upsizing Wizard menu within MS Access.
- Before upsizing make sure to install Time Clock MTS on one computer and run it at least once on the default database that ships with the software. This will update the database with all the latest fields and tables. If you have any existing data in your MS Access database this will be exported to the SQL Server database during this process.
- When you’re ready to upsize open the timeclock.mdb database (found in C:\Documents and Settings\All Users\Application Data\Time Clock MTS\Database unless you’ve moved it) in MS Access and run the database upsizing wizard. Choose to Create a New Database and click Next.
- On the next screen enter your SQL Server details here such as your server name, UID, password and the name of the database you want to store your information in. Note this information down and when you’re happy click next.
- On the next screen you want to choose to export ALL tables to SQL Server. Click Next when you’re done.
- On the next screen you’ll be given the option to export table attributes to SQL Server. Leave all the default options here and just click Next.
- On the next screen you’ll be given the opportunity to make application changes, just leave all the default options and click next.
- On the next screen you’ll be told the the wizard is now ready to do the upsize, just click Finish and let it do its work.
Connecting the Time Clock MTS Admin Program to the SQL Server Database
You’ll need to have installed the Time Clock Admin program with the normal MS Access database before connecting to the SQL Server database.
- Find your timeclock.ini file. This should be in C:\Documents and Settings\All Users\Application Data\Time Clock MTS\. Note that you may have to show hidden files and folders in Windows Explorer to seet his file.
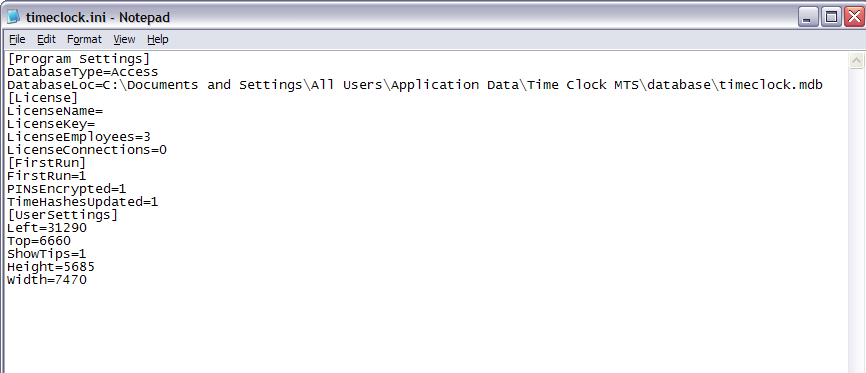
- Open the timeclock.ini file in Windows Notepad and look for the [Program Settings] section. There should be a setting or two in here already, containing the location of your MS Access database and one called ‘DatabaseType’ that says ‘Access’. It should look something like this:
- Now we’re going to edit the file to look like:
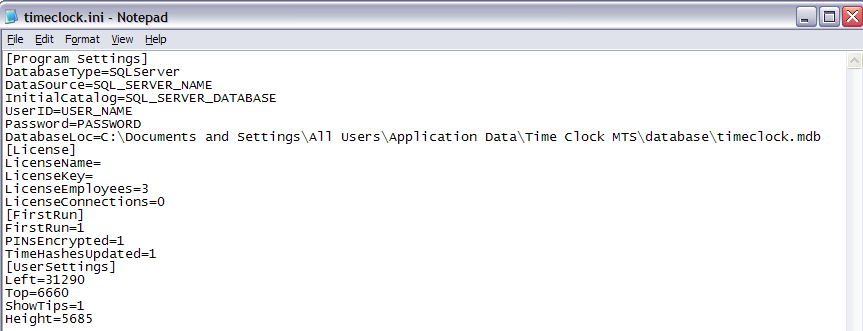 Explanation of Settings
Note that the DatabaseType setting has changed to SQLServer, make sure you get the spelling and case of this correct
SQL_SERVER_NAME = your SQL Server
SQL_SERVER_DATABASE = the database you created above (by default Access will have called this timeclockSQL)
USER_NAME = the SQL Server user name you have setup for Time Clock MTS
PASSWORD = the password for the SQL Server USER_NAME
- When you’re happy with the timesheets.ini file save it. Try running the Time Clock MTS admin program, if you’ve entered all the details above properly then it will connect to your SQL Server database.
Connecting the Time Clock MTS Client Program to the SQL Server Database
You’ll need to have installed the Time Clock Client program and connected it to an MS Access database first.Once this is done you’ll then need to make the changes required to connect it to the SQL Server database. The changes are EXACTLY THE SAME as those described above for the Admin program. Just open and edit the timeclock.ini file as described above.
