by Mark Nemtsas | Jul 11, 2008 | How To, New Features, Tips and Tricks
Time Clock MTS Versions 2.0.1 and higher include a new setting to allow you to force a time pair to be paid as overtime. You can do this via the Tools->Edit Times menu. Just select the time pair you want to force as overtime and click the Edit Time button and you’ll be shown the Edit Time screen.
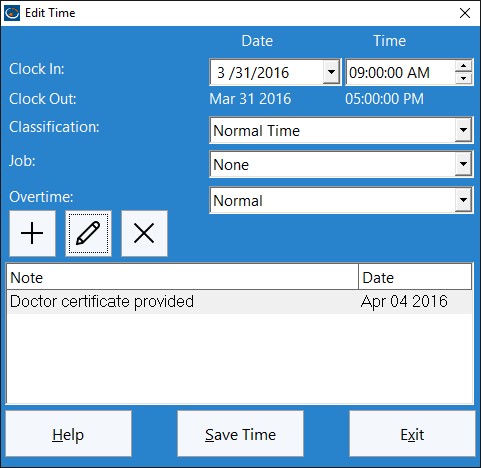
The Edit Time Screen
To force a time to be paid as overtime all you need to do is select the ‘Force Overtime’ option for the time, and click the Save Time button to save the change. For overtime purposes this time will now be forced to be paid as overtime regardless of other overtime settings. Let’s examine how this would work with some examples.
Example 1
No daily overtime, weekly overtime limit set at 40 hours. Employee works a 5 day week of 8 hrs, 8 hrs, 8hrs, 8 hrs, and 6 hrs for a total of 38 hrs. The last day of 6 hours happens to fall on a holiday for which the employee is entitled to overtime rates. The Time Clock MTS Administrator has flagged the time pair as ‘Force Overtime’. Time Clock MTS will report this week as 32 normal hours, and 6 hours of daily over time.
Example 2
No daily overtime, weekly overtime limit set at 40 hours. Employee works a 5 day week of 9hrs, 9 hrs, 8hrs, 8 hrs, and 8 hrs for a total of 42 hrs. The employee has agreed to fill in for someone else for 4 hours on the last day and the employer has agreed to pay them overtime rates for doing this. The Time Clock MTS Administrator has flagged the time pair as ‘Force Overtime’. Time Clock MTS will report this week as 36 normal hours, with 4 hours of daily over time on day 5, and 2 hours of weekly overtime on day 5. You can see in this case the employee still gets their weekly overtime entitlements as well as the time forced as overtime.
Why Use this Setting?
There are a few reasons why you’d want to make use of this setting:
- It’s a way of giving employees overtime rates on holidays. Many employers do not pay employees for holidays not worked, but if the employee does work on the holiday they are entitled to overtime rates. The holiday pay system in Time Clock MTS wont handle this sort of system by default, so this new setting is a way of achieving what is required.
- You may have some sort of overtime regime that is not handled properly by Time Clock MTS, this new setting pretty much allows you infinite flexibility to assign any amount of time to be paid as overtime.
- It allows for ad-hoc agreements between employers and employees. For example, you might not have an overtime policy but sometimes agree to pay employees at a higher rate for doing extra work, for performing unusual duties, or simply as a method of rewarding them.
Next time I’ll take a look at the other new overtime setting for individual times, the Ignore for Overtime setting.
by Mark Nemtsas | Jul 9, 2008 | How To, Tips and Tricks, Using the Software
Version 2 of Time Clock MTS included a complete re-work of the way reports functioned, and allowed you do configure the appearance of reports to suit your requirements. In this weblog entry I’ll cover the basic elements of customizing reports, in subsequent entries I’ll take a look in detail each aspect of doing so.
Report Structure
Each Time Clock MTS report has the same basic structure, this is best illustrated by the following simple diagram.
<Report Header>
<Company Header>
<Employee Header>
<Employee Details>
<Report Data>
<Employee Summary>
<Employee Accruals>
<Payroll Information>
The first 2 report sections are displayed once per report, the last 6 sections are displayed for each employee you choose to run the report on. All of these report sections except the <Report Data> section can be customized to your requirements. The report data section contains the data for the report that you are currently running.
How Are Report Sections Customized?
Reports are customized by configuring each report section using the Tools->Options->Report Settings page.
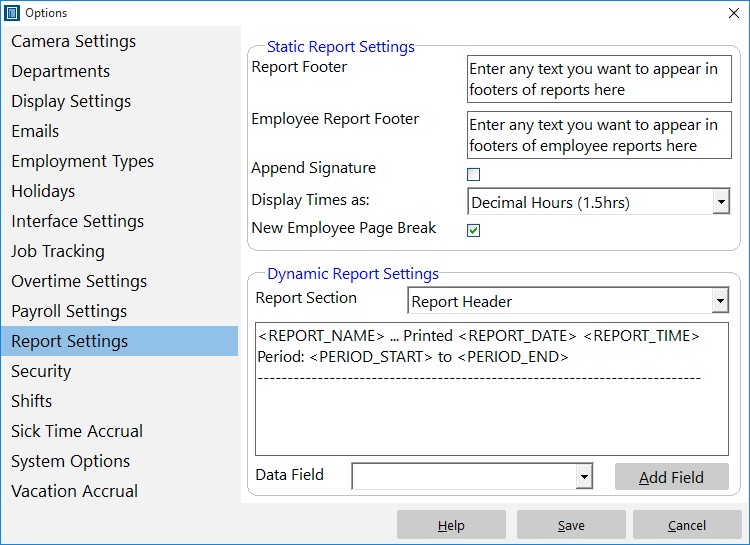
Control how reports are formatted to suit your requirements.
You can read more about this page in the Report Settings help topic. In basic terms you use this screen to customize report sections by selecting a report section, and configuring the section template using either free text or by inserting data fields using the Add Field button and drop down.
What is a Section Template?
A section template is simply the text that defines the format of a Report Section. A section template can contain any text you like and can contain Data Fields. Each section template has a number of Data Fields that can be added to it.
What is a Data Field?
A Data Field is text that can be included in a section template that is automatically replaced by Time Clock MTS when reports are generated. For example, if you include the Data Field in your section template it will be replaced by the name of the report when your report is run.
Next time, in part 2 of report customization I’ll cover some of the report sections and the data fields that are available to each.
by Mark Nemtsas | Jul 2, 2008 | Tips and Tricks, Using the Software
A common question I get is how exactly does payroll time rounding work? So I thought it would be worthwhile to cover it in some more detail to help Time Clock MTS users.
How is Report Rounding Turned On?
You can turn on report rounding on the Tools->Options->Payroll Settings page. For more information take a look at the Time Clock MTS Payroll Settings help topic.
How Does Rounding Work?
Rounding is applied to time information at report time only. The rounding used is just normal arithmetic rounding. Here’s an example, let’s say we have the time rounding set to 15 minutes and the normal clock in time for your employees is 7:30 AM. In this example, anything on or before 7:37:29 AM is rounded down to 7:30 AM, and anything on or after 7:37:30 is rounded up to 7:45 AM.
What Does the Least Quantity Checkbox Do?
Checking this box over-rides the rounding scheme as shown above. The most basic way of explaining it is that all clock ins are ROUNDED UP and all clock outs are ROUNDED DOWN. So, in our example above any employee clocking in after 7:30:00 AM will have their time rounded up to 7:45:00 AM. Let’s say the normal clock out time for the above example is 4:30:00 PM. When the Least Quantity check box is marked, any employee clocking out between 4:30:01 PM and 4:44:59 PM will have their clock out time rounded down to 4:30:00 PM. The practical effect of the Least Quantity check box is that the hours worked are minimized.
What Effect Does Rounding Have on Stored Time Information?
None, clock in and clock out data is still stored to the nearest second, the rounding takes effect when you run a report. In fact, you can now generate reports and suppress the rounding so you can view your raw time information. To do this all you need to do is check the Turn Off Rounding checkbox on the Report Configuration screen.
Why Would you use Time Rounding?
To comply with either your workplace payroll rules or government payroll regulations. A lot of workplaces have a minimum amount of payable overtime, so rounding can be easily used to prevent employees accumulating small amounts of overtime by clocking in slightly early, or clocking out slightly late. Another reason could be to allow for some leeway in clocking in or out, clearly not everyone can clock in exactly on time so time rounding allows for this. For example, Californian labor law allows for some leeway in rounding of time, allowing employers to not pay overtime for employees who clock in slightly early or out slightly late (provided they are not actually working of course).
That about sums it all up, if you have any questions, as always post a comment or email us.
by Mark Nemtsas | Jun 19, 2008 | How To, Tips and Tricks, Using the Software
One change to Time Clock MTS is simply a new item added to the Employee Maintenance menu. This deceptively simple menu item Copy Selected Employee fixes up one of the most common complaints I had about Time Clock MTS. Usually the complaint went something like this:
“How can I add employees to Time Clock MTS without having to type in all the details for every single one?”
Well, prior to Version 2, the answer to this question was you just can’t add a number of employees quickly and easily. Right though, with the addition of the menu item above the job of adding many employees to Time Clock MTS has suddenly become a lot easier.
Here’s how to quickly add an employee using another employee record as a template:
- Add the employee you want to use as a template, give them all the settings you require including payroll, assigning to a department, a shift, and whatever else you need. For the sake of this example we’ll call this employee ‘John Smith’.
- Select the employee ‘John Smith’ in the employee list and then select the Employee Maintenance->Copy Selected Employee menu item.
- The employee maintenance screen will now been displayed with all the details already filled in, the name of the employee will be set to ‘Copy of John Smith’. All you need to do now is edit the details you want to change for this employee (such as the name, address, and PIN) and in just a few seconds you’ve created a new fully configured employee.
That’s it, there’s nothing else to it. Remember, when you do need to add an employee, and you want the employees record to be based on some existing employee you’ve already set up, then make use of the new Copy Selected Employee menu item!
by Mark Nemtsas | Jun 14, 2008 | How To, New Features, Tips and Tricks
Time Clock MTS Versions 2.0.1 and higher feature a new setting to allow you to exclude a time pair from any overtime calculations. You can do this via the Tools->Edit Times menu. Just select the time pair you want to exclude from overtime calculations and click the Edit Time button and you’ll be shown the Edit Time screen.
The Edit Time Screen
To exclude a time from overtime calculations all you need to do is select the ‘Ignore for Overtime’ option for the time, and click the Save Time button to save the change. For overtime purposes this time will now be ignored for all overtime calculations regardless of other overtime settings. Let’s examine how this would work with some examples.
Example 1
Daily overtime set at 8 hours, weekly overtime limit set at 40 hours. Employee works a 5 day week of 10 hrs, 8 hrs, 8hrs, 8 hrs, and 8 hrs for a total of 42 hrs. The Time Clock MTS Administrator has flagged two hours of day one as ‘Ignore for Overtime’ because the employee was underpaid by two hours last week. Time Clock MTS will report this week as 42 normal hours only.
Example 2
Daily overtime set at 8 hours, weekly overtime limit set at 40 hours. Employee works a 5 day week of 8 hrs, 9 hrs, 9hrs, 8 hrs, and 8 hrs for a total of 42 hrs. The Time Clock MTS Administrator has flagged four hours of day 5 as ‘Ignore for Overtime’ because the employee went home sick during the day, the administrator wants the employee to be paid for these hours but not impact on overtime calculations. Time Clock MTS will report this week as 40 normal hours, and 2 daily overtime hours.
Why Use this Setting?
There are a few reasons why you’d want to make use of this setting:
1. It’s a way of helping administrators fix up underpayments from previous pay periods. You may want to just add a few hours to the current payroll period to make up for hours not paid previously, but you don’t want these added hours to impact on overtime for the current pay period.
2. You don’t want sick time or vacation time to impact on overtime calculations. Example 2 above covers this case.
3. It’s a way of employers paying employees for time they are making up. For example, an arrangement may be reached with an employee to have 4 hours off work one week on the understanding that they will make it up the next week. Of course you don’t want the make up hours to impact on overtime calculations for the second week.
by kathryn@timeclockmts.com | May 7, 2008 | Tips and Tricks, Using the Software
Time Clock MTS has three levels of user access. That of the normal user or employee who just needs to clock in or out, the reports user, and that of the Administrator who needs to configure Time Clock MTS and run reports. To use Time Clock MTS as the adminstrator you need to log in as the Administrator using a password.
How Is the Administrator Password Set?
The administrator password is set by you when you first install and run the Time Clock MTS Administration program . The screenshot below shows where you enter the administrator password.

Set Administrator Password
How do I log in as the Administrator?
By simply using the File->Log in as Administrator menu.
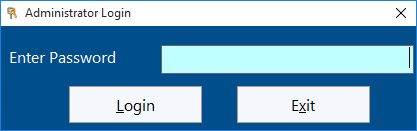
Administrator Login Screen
Can I Change the Administrator Password?
Yes you can change the administrator password any time you like. All you need to do is run the Time Clock MTS Administration program and log in as the administrator. Then go to the Tools->Options->System Options screen. For more help on this try taking a look at the System Options Help Topic.
I’ve Forgotten the Administrator Password What Do I Do?
If you know your password reminder question answers then you can simply reset the administrator password. If you have forgotten everything then you’ll need to send us your Time Clock MTS database so we can reset it for you.
Page 22 of 23« First«...10...1920212223»