by Mark Nemtsas | Mar 14, 2013 | Tips and Tricks
At the time that this blog entry was written Time Clock MTS was being used by more than 100 hotels, inns, villas, and motels to track their staff attendance, generate payroll reports, and monitor staff leave and accruals. I’ve had a lot of emails over the last few years from these types of users about how best to configure the software to suit their requirements so I thought it would be worthwhile listing off some of what I’ve learned in this time.
Split Hotel Staff by Departments
If you’re using Time Clock MTS as hotel time attendance software you’re going to want to split your employees into departments to mirror the functional areas found in a typical hotel. Obvious departments to setup and assign to Time Clock MTS employees are housekeeping, front office, reservations, uniformed services, bar and wait staff, and administrative staff. Clearly it’s going to be worthwhile splitting up your hotel time attendance tracking by department so that payroll expenses for different cost centers can be tracked more easily. Also, Time Clock MTS can be much easier to use if departments are setup and the Departmental Folder View on the Interface Settings screen is used. Also don’t forget that most Time Clock MTS reports can be run for a single department and that there’s some reports built into the software specifically aimed at tracking departmental costs such as the Departmental Wages Report.
Use Job Tracking for Detailed Cost Tracking
Time Clock MTS is designed to be useful for companies with a single employee right up to companies with hundreds of employees. In the case of bigger hotels departmental time and attendance tracking may be sufficient, but in smaller operations where employees are expected to perform multiple roles the more detailed cost tracking offered by job tracking can be more useful. Job tracking will allow you to track your time attendance and easily see what hours are being spent on revenue generating activities and what hours are being spent on indirect costs. All this while still being able to track the time and attendance of hotel staff. Obvious jobs to setup would be similar to those discussed above in the discussion of hotel departments.
Built In Tip Tracking Makes Things Easy for Bar and Wait Staff
Most hotels or motels have staff who rely on tips and gratuities as a significant part of their income. Time Clock MTS provides an all-in-one solution to allow you to track their time attendance data and tips. You can read more about our tip tracking features here. Time Clock MTS also includes powerful tip tracking reports that fulfill the IRS reporting requirements of the hotel/motel as an employer and other reports useful for the employee directly.
Conclusions
Time Clock MTS is used across a number of industries and is both flexible and powerful enough to be truly useful in most employee time attendance tracking situations. It has certainly proven to be useful in the hotel / motel industry with a number of features that are directly applicable. If you’re currently using Time Clock MTS in a hotel, motel, villa complex, or inn and there’s a feature missing that you’d love to see added to the software please contact me and let me know.
by Mark Nemtsas | Mar 14, 2013 | Tips and Tricks, Using the Software
Sometimes it surprises me how Time Clock MTS is used out there in the “wild”. For example, it’s used in a lot of locations to track student attendance. At one trade and technical school in Miami, for example, it’s now being used to track the attendance of all students in the classroom in an effort to replicate real attendance tracking in the work place. This is happening in more than 20 classrooms to track over 600 students attendance at that one location.
Fortunately, Time Clock MTS provides enough flexibility to allow it to be configured to track student attendance while still being simple enough to not burden down users with having to track payroll information too. I thought it might be worth looking at how it could be setup to track student attendance and what reports would be useful in a classroom or school environment.

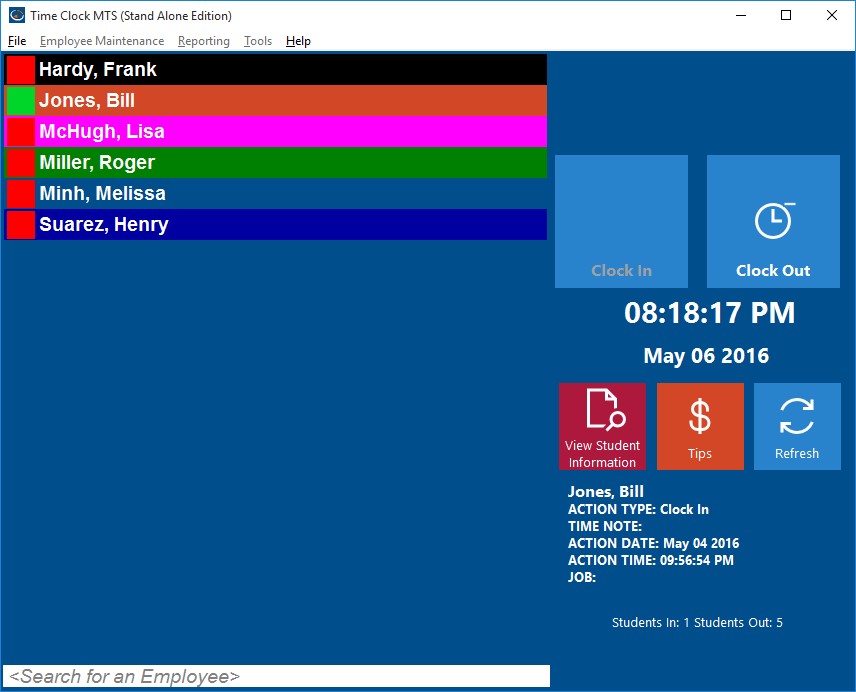
Time Clock MTS configured as school attendance software
Customizing the Interface to Suit Students
The screens that students would see when logging their attendance in Time Clock MTS can be changed somewhat to suit the classroom environment. The Display Settings screen is where most of the labels on the main screen of Time Clock MTS can be changed. Labels such as the “Employees In”, “Employees Out”, “Search for Employees” and so on could be changed to reference students rather than employees. The main time clock screen of Time Clock MTS setup as student attendance software might look something like that shown above.
Student Attendance Reports
Almost any of the reports in Time Clock MTS would be fine for monitoring student attendance but clearly most of the payroll data could be safely removed or ignored. Probably the best report to use would be the Punchcard Report but I’d suggest editing various report section templates to remove extraneous information. Report section templates can be changed on the Report Settings Screen. Report section templates that could be edited for clarity would be the employee accruals section (which could really be deleted for tracking student attendance), and the employee payroll details section (where you could remove references to actual money earned).
Time Clock MTS in Schools and Universities
I thought it would be worthwhile concluding with some brief figures on how many schools and universities Time Clock MTS is being used in. At last count, this was something more than 200 different schools or universities. It’s safe to assume that some of these are using the software to track staff attendance rather than student attendance. However, I do know that many of them are using it to track student attendance. With the tips I’ve given above I hope this will make the software even more useful for this purpose.
by Mark Nemtsas | Feb 9, 2013 | Tips and Tricks, Using the Software
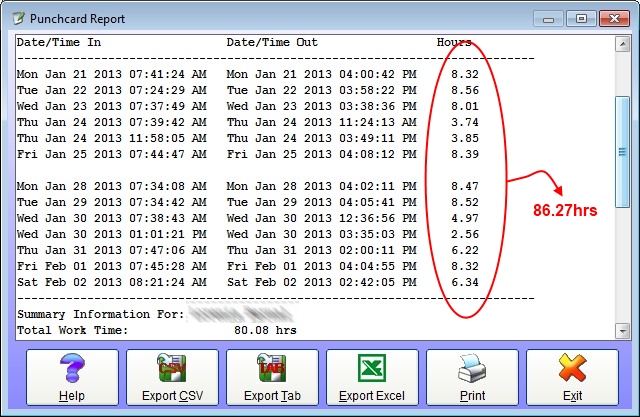
Salaried Employee Time Card Report
I’ve written about this a few times before but it’s worth mentioning again. From time to time I get an email from a user of our employee time attendance software who has noticed that the total time for punches on a report do not add up to the work time in the summary section of the report. Above you can see just such a report. It’s an employee punchcard report. You can see that the time punches on the report tally up to 86.27 hours but the total work time reported is 80.08 hours. What’s the reason for the discrepancy?
Well it turns out that this employee is set to be paid a salary rather than paid hourly (this is configured on the employee payroll information screen). What’s more they are setup for monthly salary. Thus, when Time Clock MTS generated this report it calculated how much of a month the report period was (about 46.2% it turns out). It took this fraction and multiplied it by the standard hours worked per month (173.3 hours per month) and arrived at the figure reported of 80.08 hours as opposed to the time the punches added up to.
If you do have salaried employees and you do want to report on their actual hours worked (as opposed to their calculated pro-rata hours as shown above) then there’s a report section template field you can include in the payroll information and employee summary report templates. The <ACTUAL_SALARY_WORK_TIME> field will show the actual time recorded by a salaried employee during a report period. Report section templates and fields can be configured on the Time Clock Report Settings screen.
by Mark Nemtsas | Dec 23, 2012 | Tips and Tricks, Using the Software
Time Clock MTS includes two distinct methods for employees to clock in and clock out. The first uses the Employee List Interface and the second uses the Keypad Interface. Let’s have a closer look at each method of clocking in and clocking out using Time Clock MTS or you could watch the clock in video tutorial.
Clocking In and Clocking Out with the Employee List Interface
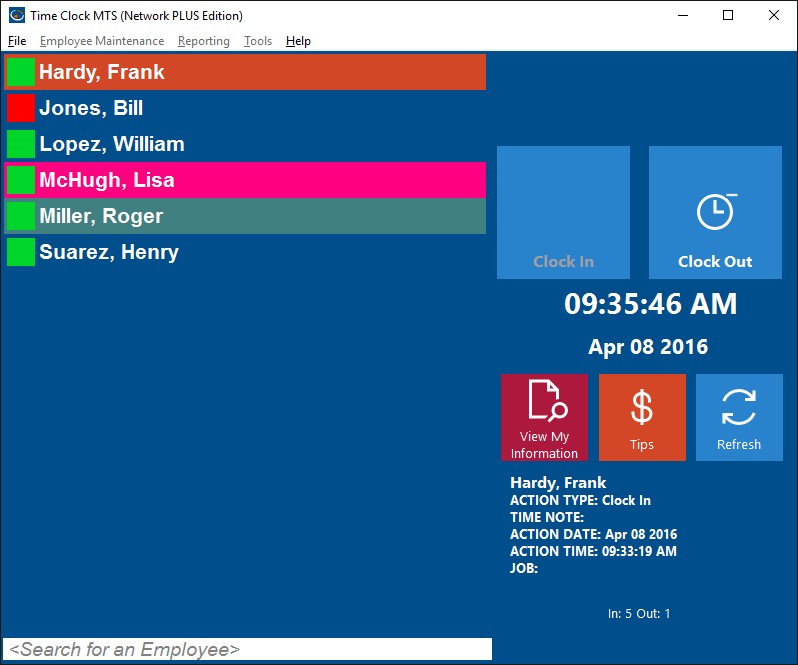
The Employee List Interface
Above you can see the employee list interface of Time Clock MTS. On the left is a list of employees. Next to each employee is a status icon showing the current status of that employee. For example, a green icon indicates an employee is clocked in and a red icon indicates they are clocked out. On the right hand side of the screen are the clock in / out buttons, below that the View My Information button and the status information area. You can use a bar code reader, a magnetic card reader, or even RFID reader with this screen to automatically punch employees in or out without the need to touch a mouse or keyboard. Using the employee list interface to clock in and out is very simple. Just follow these steps:
- Click on the employee’s name in the list who needs to clock in or clock out. Alternatively they can use one of the data input devices (like a bar code scanner) to read an appropriately encoded barcode, magnetic card, or RFID badge and the employee will be punched in or out immediately.
- Depending on their current status either the Clock In or Clock Out button will become active.
- Click on the Clock In or Clock Out button to clock the employee in or out. The employee may have to enter their PIN to complete the action.
- If the clock in or clock out action is successful the status icon for that employee will change and the status information area will show the details of the clock in or clock out.
Clocking In and Clocking Out with the Keypad Interface
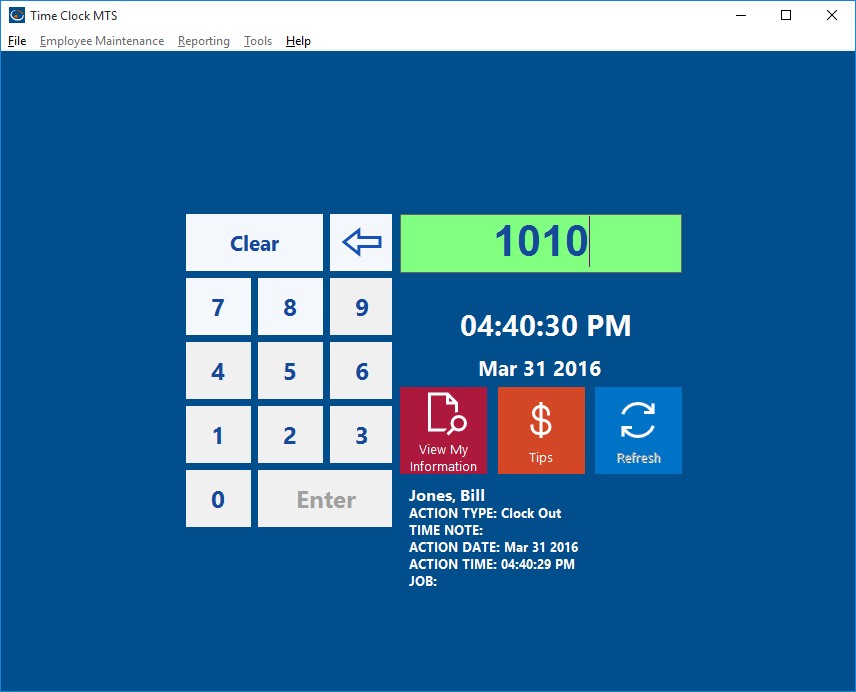
The Keypad Interface
Above you can see the keypad interface of Time Clock MTS. On the left is a virtual numeric keypad and on the right is the employee badge number field (at top) and below that is the status information area. The keypad interface is designed to be used with a touchscreen. Like the employee list interface it can also be used with a barcode reader, a magnetic swipe card reader, or even a prox card. Using the keypad interface to clock in and out couldn’t be any easier.
- An employee needs to know their Time Clock MTS badge number to be able to use the keypad interface. All they need to do is enter their badge number using the virtual timeclock keypad (or via a regular keyboard or one of the other data devices I described above). Then they need to click the Enter button. The employee may then have to enter their PIN to complete the action.
- Time Clock MTS will then check the status of employee with the entered badge number and clock them in or clock them out as appropriate. The status information area will show the details of the employee clock in or clock out.
So, there you have it. Two different methods for employees to clock in and clock out of Time Clock MTS. Both are simple to do and quick for your employees to learn and one of them will, no doubt, be suitable for your company.
by kathryn@timeclockmts.com | Dec 14, 2012 | Tips and Tricks, Using the Software
Protect your business against employee fraud by using Time Clock MTS security features you may not have been aware of.
Time clock fraud by employees is a real problem. It might be happening right now within your business and you are yet to find out. Today we received an email from a company who has had to get the police involved because an employee had been systematically defrauding the company through manipulation of their time clock system. Don’t let this happen to you!
Time Clock MTS has many different security features some of which are turned on by default and some of which need to be turned on by you, the user. An important security feature of Time Clock MTS that you as the administrator can use is audit logging. This feature records the entire editing history of each clock in and clock out event tracking every change and which computer those changes were made from. If the company that has contacted us about their employee time clock fraud had audit logging turned on within their time clock software they could have provided the police with documentation to support any criminal case.
To turn the audit logging system on to monitor your employee activities go to the Tools->Options->Security Options screen and check the box for Enable Audit Logging.
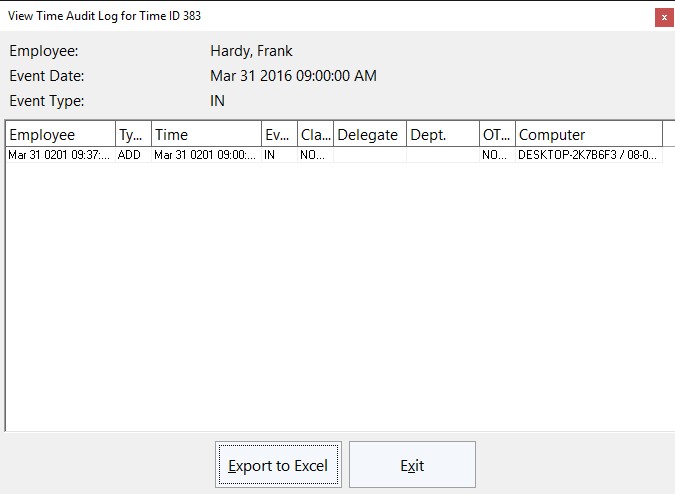
Enable Audit Logging to View the Time Audit Log
Time Clock MTS includes other security features to help you prevent time clock fraud. Some of these include:
by Mark Nemtsas | Dec 8, 2012 | Tips and Tricks, Using the Software
You might think that setting up a barcode time clock is expensive and complicated. If you did think that, you’d be wrong. By my estimation you could setup an old Windows computer with Time Clock MTS, a simple USB barcode scanner, and some “home made” barcode employee badges for under $275. Here’s how I’d do it.
1. Designate a Computer to be your Time Clock Computer
Almost every business has computers these days, and in my experience it’s not unusual for one of these computers to either be highly under-utilized or retired and switched off all of the time. It’s one of these computers that you should use as your time clock station. Cost? In most cases $0.
Total Cost to Date: $0
2. Purchase and Install Time Clock MTS
Time Clock MTS can be purchased for $99 (US). This can track up to 500 employees on a single computer. Once you’ve installed Time Clock MTS, create an employee for each employee you want to track. You could also create many employees at once very easily using the method I describe here. Once you’ve created all of your required employees, print out a Badge Number Report from within Time Clock MTS.
Total Cost to Date: $99 (US)

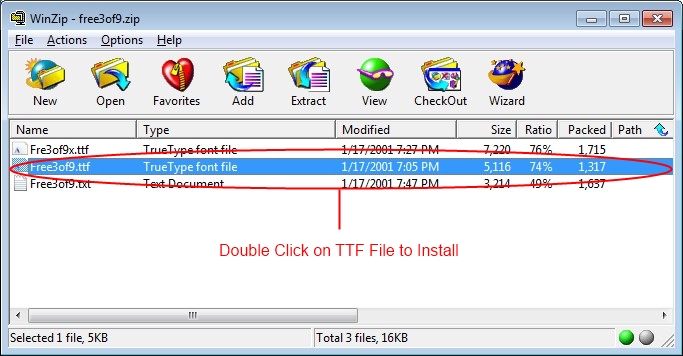
Figure 1 -Installing a Barcode Font
3. Create Your Employee Badges
Creating barcodes is easy. And free. You can do it from within pretty much any word processor or spreadsheet these days. All you need is a barcode font. Yes, a font, just like Arial, or Times New Roman, or Trebuchet. If you do a Google search for “free barcode font” you’ll get a ton of results, and to save you the trouble I did a search and found that this barcode font is free, and works just fine. To install the font just download the ZIP file, unzip it and double click on one of the files with the ttf extension (see the image above). Windows will then auto-magically install the font.
Once the font is installed you can select it from a font selector in your word processor or spreadsheet of choice. You can see below that I created some simple barcodes in Microsoft Word. Note that the barcode font I selected is “Free 3 of 9”. Here’s the tricky bit. You need to decide whether you’re going to use Time Clock MTS in Employee List Mode or Keypad Interface Mode. The barcodes required for each mode are slightly different. If, for example you have an employee with the ID 1000 then the barcodes need to be encoded as follows:
Employee Interface Mode: +1000=
Keypad Interface Mode: 1000
As you can see the only difference is + and = characters around the employee ID on the Employee Interface barcodes. As a further example, if we have an employee with the ID 9999 then the two different barcode formats would be:
Employee Interface Mode: +9999=
Keypad Interface Mode: 9999
When you know the format you need as you create your bar codes you’ll want each barcode to correspond to a Time Clock MTS badge number, the same badge numbers we got from the Badge Number Report we printed out in Step 2 above. In the image below I’ve created badges for the numbers 1010 and 1020 (these badges are for the keypad interface because there’s no + or = characters in them).
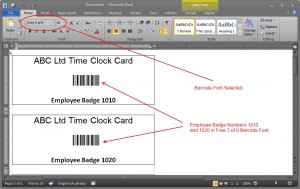
Figure 2 -Simple Employee Badge Design
Now the design of the badge is entirely up to you, in the image above I’ve done a very simple design in Microsoft Word. Given that you’re doing this in a word processor or spreadsheet the sky is the limit really. Once the design is complete print out the cards. I’d suggest a heavy card stock of some type and using a laser printer. I’d also suggest laminating the cards if possible. In any event the cost of the cards is going to be minimal. Less that $0.50 each. For arguments sake let’s say we’re creating 75 badges for 75 employees, giving a cost of $37.50 for the badges.
Total Cost to Date: $136.50
4. Buy a USB Barcode Scanner
Barcode scanners are not expensive items these days. It’s a well known and mature technology and the bugs have well and truly been ironed out. All you need to do is ensure that the scanner comes with the right sort of interface (most likely USB) to plug into your PC and that it can read the barcode that you’re using. Barcodes come in many different types, with names like Code 39 (or type 3 of 9), Code 128, and EAN 2. The free barcode font we downloaded in step 3 is Code 39. While I do need to warn you to check that the reader will be able to understand your barcode type, in the VAST majority of cases readers support pretty much every type of barcode these days.
The actual type of scanner you buy is entirely up to you but I’d stick with better known brands simply for reasons of after sales support and reliability. I’ve used Symbol (made by Motorola) and Gryphon (made by Datalogic) USB Barcode scanners many times in the past and never, ever, had a problem with them. When I wrote this article these could be purchased from Amazon for $120 per unit with $10 shipping.
Total Cost to Date: $266.50
5. Install the Barcode Scanner and Configure Time Clock MTS
When your barcode scanner arrives all you should need to do is plug it into a USB port on your computer. Windows will most likely take care of the rest. You may need to install some drivers though, consult the documentation that ships with your scanner. Once installed the computer should view any data read by your barcode scanner as exactly the same as that entered by a keyboard. Don’t believe me? Try opening up a word processor or Windows Notepad on the computer and scan a barcode, you should see the characters the barcode represents appear in the word processor.

Figure 3 -The Time Clock MTS Keypad Interface
The final step in the process is to configure Time Clock MTS to work with the scanner. If you’ve decided to use the default Employee List mode of Time Clock MTS then you won’t need to configure the software at all. However, if you’ve decided to use the Keypad Interface then I’ve described in some detail how to set that up in the setting up the keypad interface mode article. This shouldn’t take you more than a few minutes.
Total Cost to Date: $266.50
6. Start Employees Clocking in and Out
Once Time Clock is working in your chose mode and you’ve printed out your barcode badges in the correct format then clocking an employee in or out is as easy as scanning one of the badges you made in step 3 above. When you scan the badge Time Clock MTS will read the badge number and then clock the employee with the corresponding badge number in or out as appropriate. Is really couldn’t be any simpler.
Grand Total: $266.50
There you have it, a barcode time clock system for under $275. In my experience a company will likely recoup up to $5 per employee per week when they start using a system like this. This recovery includes indirect costs such as no longer having to waste time using inefficient paper based systems and the associated time spent processing the data created by those systems. The recovery also includes direct costs by largely eliminating employee time clock fraud. $5 per employee per week? If you’ve got 10 employee’s you’ll get your $275 back in just over a month. 20 employees and you’ll get it back in a fortnight. Any more than 20 employees and you should be asking yourself why you’re still reading this and you haven’t started setting up such a system already.