by Mark Nemtsas | May 3, 2009 | How To, New Features, Using the Software
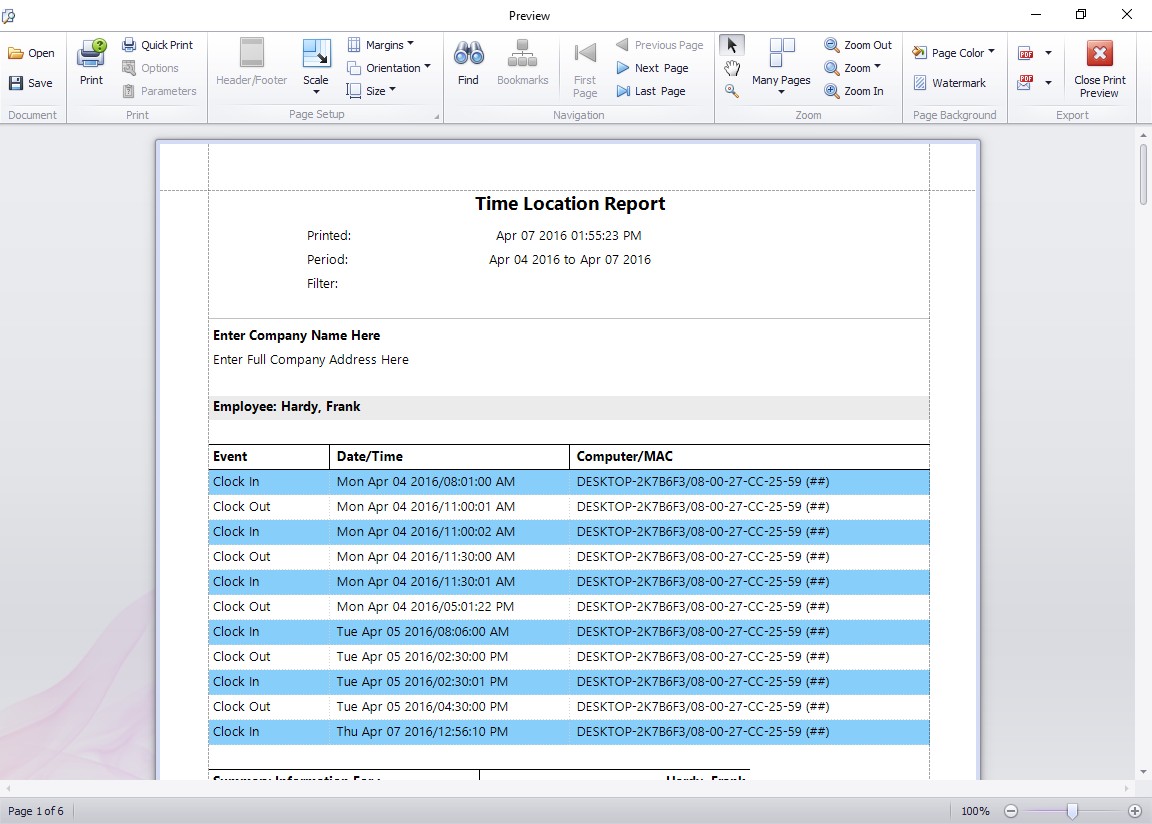
This report shows you what computer your employee has clocked in or out from.
One of the most common forms of employee time clock fraud is buddy punching. This is simply when one employee clocks in or out for another one. Time Clock MTS has a number of methods built into it to help you reduce or eliminate this practice including fingerprint security, image capturing, and employee PINs. Version 2.2.12 saw a new feature added to the software to help further eliminate buddy punching.
When an employee clocks in or out Time Clock MTS now records the Computer Name and Network MAC address along with the time record. Each computer on your network will have a unique computer name and the network cards in these computers all have a unique MAC address. Armed with these two pieces of information you or your network admins can determine exactly which PC an employee clocked in or out from. To give you this information in an easy to read format there’s a new report, the Time Location Report. You can run this report in the same way as you run all the other Time Clock MTS reports, from the Report Configuration Screen. An example of this new report is shown above. Each time recorded for the employee has it’s own line and each time shows the computer name and MAC address of the computer the employee clocked in or out from.
So, if each of your employees is supposed to clock in and out from their own PC, and you suspect someone is clocking in or out for someone else, then this new feature can help you detect this practise. Just run the Time Location Report and you can see quickly and easily where an employee is clocking in or out from!
by Mark Nemtsas | Mar 7, 2009 | New Features
Did you know that Time Clock MTS has recently integrated biometric technology into it’s software? With the use of a U.are.U fingerprint scanner by Digital Persona you can now feel more secure in the knowledge that your employee time and attendance data is more accurate than ever.

A Digital Personal USB Finger Scanner
You can see one of these scanners above. They can be obtained from Californiapc.com and it’s as simple as plugging in the scanner to your usb port. It’s simple to setup employees and enroll their fingerprints into the software for clocking in and out, just look at our flash tutorial. Each employee can store two different fingerprints. Verifying their fingerprint will can be required if the employee needs to punch in or out, when they want to view their own time card, and when they want to record tips or manage their time off requests. Optionally an employee can be excluded from the fingerprint security and be required to enter their PIN instead. This is to allow for employees whose fingers refuse to scan reliably.
If you make use of the fingerprint technology in our software you will eliminate buddy punching or misuse by your staff. If you’re wondering what buddy punching is and how fingerprint security can help reduce it then you should read this article. Right now Time Clock MTS is one of the most affordable time clock systems on the market that includes fingerprint security. In fact, it can be had on a single PC with a finger scanner for under $200. You can try out our fingerprint time clock software free of charge and see how it works for you for 30 days without obligation.
by Mark Nemtsas | Feb 4, 2009 | New Features, New Releases
Within the next few hours version 2.2 of Time Clock MTS will be released. The key feature in this new version is integration with Digital Persona fingerprint scanners that you can purchase from California PC. By using a fingerprint scanner with Time Clock MTS you’ll pretty much eliminate payroll fraud and buddy punching. I bet that most companies will recoup the cost of the software and scanners in just a few weeks, with the ROI over a year likely to be in the hundreds of percent.
If you want to read more about Time Clock MTS will work with a fingerprint scanner then there’s that page on the main site. Stay tuned, new release due out shortly!
by Mark Nemtsas | Jan 20, 2009 | How To, New Features, Tips and Tricks, Using the Software
In part 1 of configuring Time Clock MTS to comply with Californian Overtime Regulations I covered how to setup the software to calculate this sort of overtime automatically. In this second part I’ll cover how it is displayed in reports.
Report Template Changes to Show Overtime Rate 2
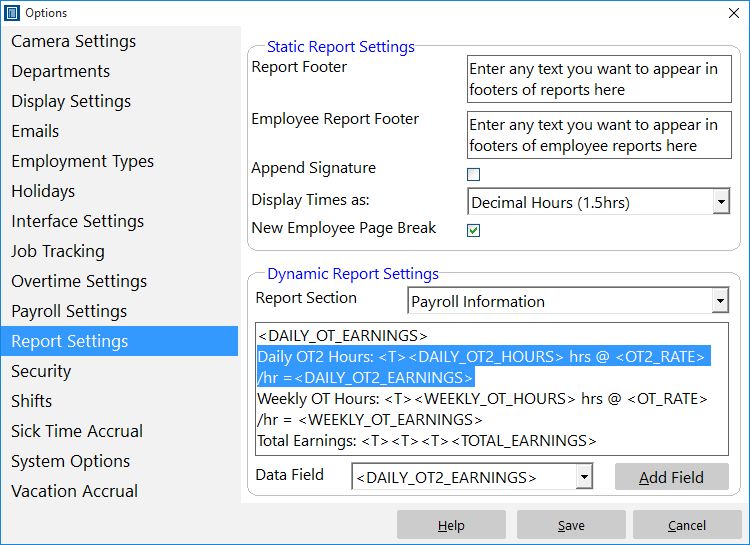
Modifying Report Templates
If you have only just started using Time Clock MTS then you will not need to modify your reports to display overtime rate 2 as the software will have set it up by default. You can therefore ignore this part of this article. However, if you are an existing user of Time Clock MTS upgrading an old version of the software to a newer version that supports the Californian Overtime Regulations then you will need to modify the Payroll Information report section template. In the image above you can see the relevant section that I have added to the report section template. I have added this immediately under the line that was already there that displayed the overtime rate 1 information. The line I have added is:
Daily OT2 Hours: <T><DAILY_OT2_HOURS> hrs @ <OT2_RATE> /hr = <DAILY_OT2_EARNINGS>
Basically this displays the heading ‘Daily OT2 Hours:’ along with the actual hours worked at overtime rate 2, the rate of pay for overtime rate 2 (which should be set to double time) and the earnings at overtime rate 2. If you don’t understand what the report section templates are then you should take a look at my posts on customizing Time Clock MTS reports in part 1, part 2, and part 3.
Overtime Rate 2 Report Date in Payroll Summary Section
Viewing Overtime 2 Payment Amounts in Reports
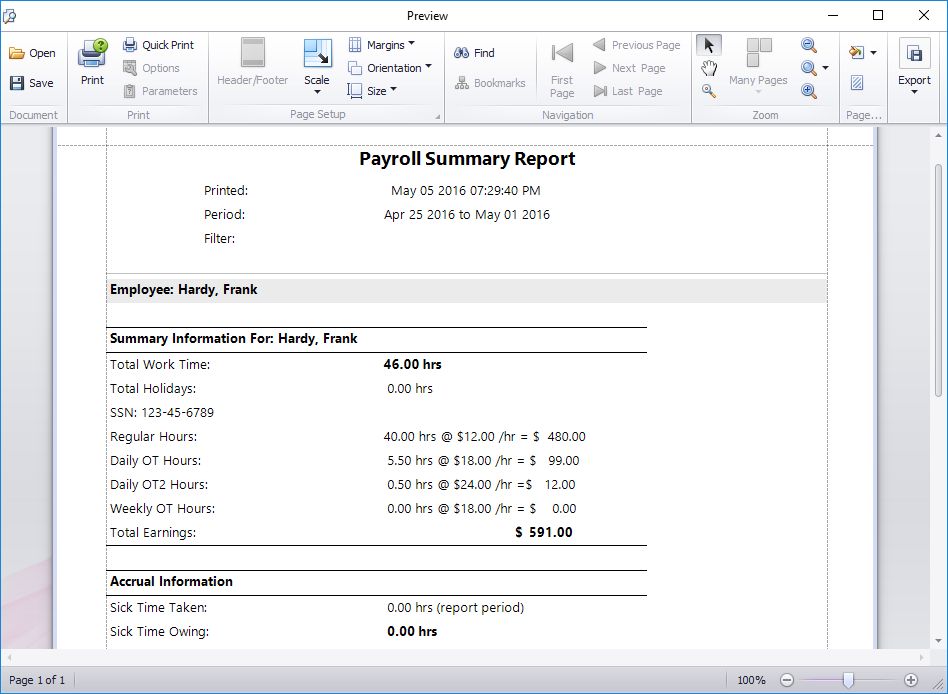
If you choose to display the payroll summary section in a report (or run the payroll summary report) then you will be shown the new overtime rate 2 payment information as per the image above. You can see in this example that the employee is entitled to 1 hour of overtime at overtime rate 2 which is set to double the normal rate.
So, that’s all there is to it. It is very simple to configure Time Clock MTS to comply with the Californian overtime regulations. Doing so will give you significant productivity improvements come payroll calculation time, and will help to you do reduce and eliminate payroll errors. As always please email me if you have any questions.
by Mark Nemtsas | Jan 20, 2009 | How To, New Features, Tips and Tricks, Using the Software
Employee Settings to Suit California Overtime Regulations
California has it’s own set of peculiar regulations for payment of overtime to employees. They are reasonably complex and are tedious when you have to apply and calculate them manually. As of Version 2.1.11 Time Clock MTS is now fully compliant with these regulations saving you a lot of time calculating your payroll and overtime pay. You can read about these regulations in detail on the Californian Department of Industrial Relations website. The relevant section of the page that applies (given that an employee is not subject to an exemption or exception) is:
1. One and one-half times the employee’s regular rate or pay for all hours worked in excess of eight hours up to and including 12 hours in any workday, and for the first eight hours worked on the seventh consecutive day of work in a workweek; and
2. Double the employee’s regular rate or pay for all hours worked in excess of 12 hours in any workday and for all hours worked in excess of eight on the seventh consecutive day of work in a workweek.
Thus overtime can be split into two parts:
- Daily Overtime: hours worked between 8 and 12 in a single day are subject to 1.5 times the normal rate of pay. Hours worked in excess of 12 hours in a single day are subject to 2.0 times the normal rate of pay.
- Seventh day overtime: If an employee works for the first 6 days of a work week then they are eligible for overtime if they work on the seventh day of the work week. The first 8 hours of work on the seventh day are subject to 1.5 times the normal rate of pay. Hours worked in excess of 8 hours are subject to double the normal rate of pay.
Overtime Settings to Suit California Overtime Regulations
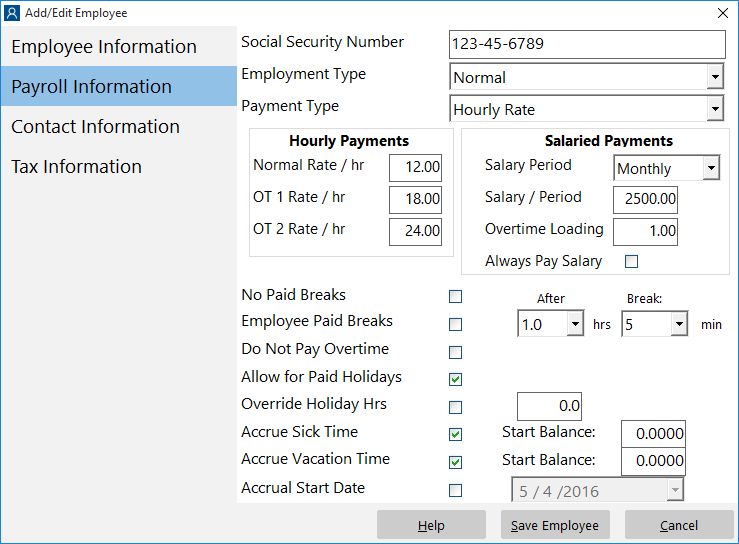
Setting up Time Clock MTS to comply with these regulations is simple. Firstly, you must edit the employee payroll information for each employee that is to receive overtime. In the first image in this post you can see an employee configured with overtime rate 1 set to 1.5 times the base rate of pay, and overtime rate 2 to double the base rate of pay. Once this is done for each employee you can then move on to the global overtime settings.
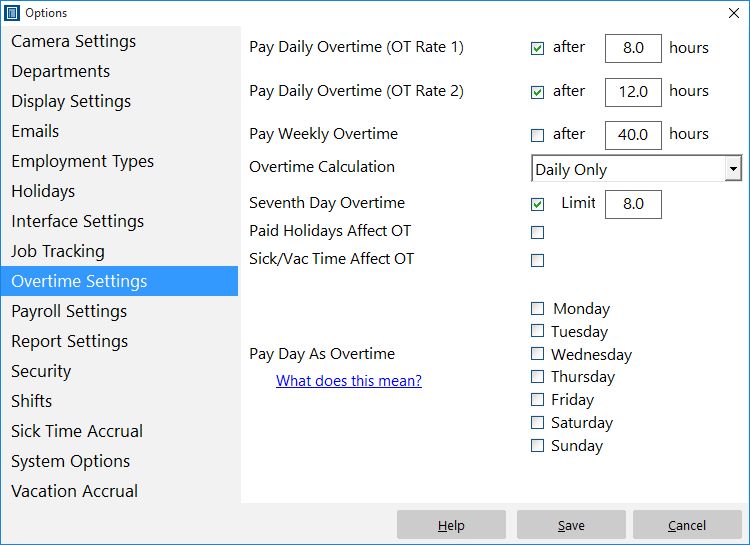
The second screenshot in this post shows Time Clock MTS configured to calculate overtime as per the Californian stipulations. Daily over time rate 1 is set to trigger at 8 hours and over time rate 2 is set to trigger at 12 hours. Weekly overtime is turned off and the calculation of overtime is set to daily overtime only. Lastly, the seventh day overtime setting is checked and the limit set to 8 hours.
In part 2 of our California overtime regulations compliance I’ll cover modifying the Time Clock MTS report section templates to display the new payment amounts covered by overtime rate 2.
by Mark Nemtsas | Jul 11, 2008 | How To, New Features, Tips and Tricks
Time Clock MTS Versions 2.0.1 and higher include a new setting to allow you to force a time pair to be paid as overtime. You can do this via the Tools->Edit Times menu. Just select the time pair you want to force as overtime and click the Edit Time button and you’ll be shown the Edit Time screen.
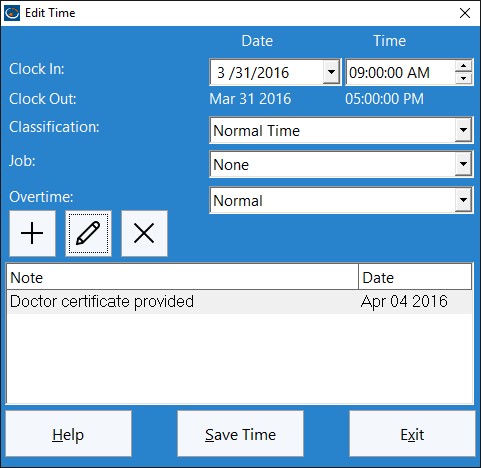
The Edit Time Screen
To force a time to be paid as overtime all you need to do is select the ‘Force Overtime’ option for the time, and click the Save Time button to save the change. For overtime purposes this time will now be forced to be paid as overtime regardless of other overtime settings. Let’s examine how this would work with some examples.
Example 1
No daily overtime, weekly overtime limit set at 40 hours. Employee works a 5 day week of 8 hrs, 8 hrs, 8hrs, 8 hrs, and 6 hrs for a total of 38 hrs. The last day of 6 hours happens to fall on a holiday for which the employee is entitled to overtime rates. The Time Clock MTS Administrator has flagged the time pair as ‘Force Overtime’. Time Clock MTS will report this week as 32 normal hours, and 6 hours of daily over time.
Example 2
No daily overtime, weekly overtime limit set at 40 hours. Employee works a 5 day week of 9hrs, 9 hrs, 8hrs, 8 hrs, and 8 hrs for a total of 42 hrs. The employee has agreed to fill in for someone else for 4 hours on the last day and the employer has agreed to pay them overtime rates for doing this. The Time Clock MTS Administrator has flagged the time pair as ‘Force Overtime’. Time Clock MTS will report this week as 36 normal hours, with 4 hours of daily over time on day 5, and 2 hours of weekly overtime on day 5. You can see in this case the employee still gets their weekly overtime entitlements as well as the time forced as overtime.
Why Use this Setting?
There are a few reasons why you’d want to make use of this setting:
- It’s a way of giving employees overtime rates on holidays. Many employers do not pay employees for holidays not worked, but if the employee does work on the holiday they are entitled to overtime rates. The holiday pay system in Time Clock MTS wont handle this sort of system by default, so this new setting is a way of achieving what is required.
- You may have some sort of overtime regime that is not handled properly by Time Clock MTS, this new setting pretty much allows you infinite flexibility to assign any amount of time to be paid as overtime.
- It allows for ad-hoc agreements between employers and employees. For example, you might not have an overtime policy but sometimes agree to pay employees at a higher rate for doing extra work, for performing unusual duties, or simply as a method of rewarding them.
Next time I’ll take a look at the other new overtime setting for individual times, the Ignore for Overtime setting.