by Mark Nemtsas | Apr 12, 2014 | How To, Tips and Tricks
Recently we’ve had a large number of people asking us about moving Time Clock MTS away from Windows XP to a newer version of Windows (such as Windows 10 or Windows 8.1). This how-to guide gives users a step by step process to doing so.
Step 1: Gather Information
Before starting this process you’re going to need to gather some information.
- Is the computer running the Time Clock MTS Client or the Time Clock MTS Administrator program? You can work this out by going to the Help->About Time Clock MTS menu and looking at the title of the window. It’ll be “About Time Clock MTS” for the Time Clock MTS Administrator program and “About Time Clock MTS Client” for the client program.
- While on the Help->About Time Clock MTS screen note down the version of the software. That’s going to look something like “Version 4.1.2” and is in the top middle of the window.
- Log into Time Clock MTS as the administrator and go to the Help->Registration screen and copy down all of the registration details including the Registration Name, Number of Employees, Client Connections, and the Registration Key.
- While still logged in as the administrator go to the Tools->Options->System Options screen. Look at the middle right of the screen and you’ll see a text box called “Database Location”. That’s the path to your Time Clock MTS database and you need to note that down.
- Locate your Time Clock MTS installation files. Ideally you’ll have kept a copy of the installers you used to install Time Clock MTS originally. These will be called timeclock_install.exe (the administrator program installer) and timeclock_client_install.exe (the client program installer).
Step 2: Do You Have the Time Clock MTS Installers?
If you have your original Time Clock MTS Installers and you don’t want to upgrade to the latest version of the software skip to Interlude : Go Take a Walk or Get a Cup of Coffee and ignore the rest of this step.
Of course we have installers available for the latest version of Time Clock MTS on our website. While we recommend that you use the latest version of the software we do also have downgrade installers that will downgrade Time Clock MTS from the latest version to either Version 4.1.7 or Version 3.3.9. Note that you MUST downgrade the latest version of Time Clock MTS to Version 4.1.7 BEFORE downgrading it to Version 3.3.9.
If you wanted to install a version of Time Clock MTS other than these then you’re out of luck, these are the ONLY installers we provide.
Step 3: I Want to Upgrade to the Latest Version of Time Clock MTS
If you cannot find your current installers or you want to upgrade to the latest version of Time Clock MTS then you can do so easily. Sometimes our users are entitled to a free upgrade and if you’re not we offer discounted upgrade pricing. To check if you’re eligible for a free upgrade or to get access to discounted upgrade prices please contact us with your Time Clock MTS registration name that you noted down in Step 1 asking about upgrading and we’ll get back to you. If you’re entitled to a free upgrade or decide to purchase an upgrade we’ll supply you with some new Registration Keys that will work in the latest version of Time Clock MTS.
Interlude : Go Take a Walk or Get a Cup of Coffee
*phew* this process is rather long and complicated and this is a good point to stand up and move away from your computer and take a walk around the office or grab a quick coffee. When we come back we’ll actually be installing and moving software and datafiles!
When you’re ready to proceed move onto Step 4: Are you moving the Client or Administrator Program?.
Step 4: Are you moving the Client or Administrator Program?
If you are moving the Client program go to Step 5: Moving the Client Program. If you are moving the Administrator program go to Step 6: Moving the Administrator Program.
Step 5: Moving the Client Program
Use your Time Clock MTS Client installer to install the client program on the new computer. When you run the software for the first time it will prompt you to navigate to where your time clock database is. Remember that you noted this location down in Step 1. When connected to your database you should see the normal Time Clock MTS screen. Log in as the time clock administrator using the File->Log in as Administrator menu and go to the Help->Registration screen and enter your registration details to register the software. If you need help registering the the software you should view this video tutorial.
That’s it, you’re done. You can ignore the rest of this guide..
Step 6: Moving the Administrator Program
Before moving the Administrator program you need to determine if your Time Clock MTS datafile is stored locally on the old Windows XP computer or somewhere on your network. Remember that we noted down the Database Location in Step 1 of these instructions. Take a look at that location and if it looks something like this:
C:\Documents and Settings\All Users\Application Data\Time Clock MTS\Database\timeclock.mdb
then your database is stored locally. If the location doesn’t look exactly the same as that but starts with the letters c:\ then it’s stored locally too. If your Database Location doesn’t look like this then it’s most likely that your database is stored on your network. If your database is stored locally then go to Step 7: My Database is Stored Locally. If your database is stored on your network skip to Step 8: My Database is Stored on My Network
Step 7: My Database is Stored Locally
If your Time Clock MTS database is stored locally on your Windows XP computer then your going to have to move your datafile to your new computer AND install the software on the new computer. We’ve written about moving the software and datafile to a new computer and you can read those instructions here: moving Time Clock MTS to a new computer. Once you’ve followed those instructions log in as the time clock administrator using the File->Log in as Administrator menu and go to the Help->Registration screen and enter your registration details to register the software. If you need help registering the the software you should view this video tutorial.
That’s it, you’re done. You can ignore the rest of this guide..
Step 8: My Database is Stored on My Network
If your database is stored on your network then moving your Time Clock MTS Administrator program is actually the same process of setting up a second administrator computer. To learn how to do that you should follow the instructions we’ve written here. Once you’ve followed those instructions log in as the time clock administrator using the File->Log in as Administrator menu and go to the Help->Registration screen and enter your registration details to register the software. If you need help registering the the software you should view this video tutorial.
That’s it, you’re done.
by kathryn@timeclockmts.com | Feb 23, 2014 | How To, Tips and Tricks, Using the Software
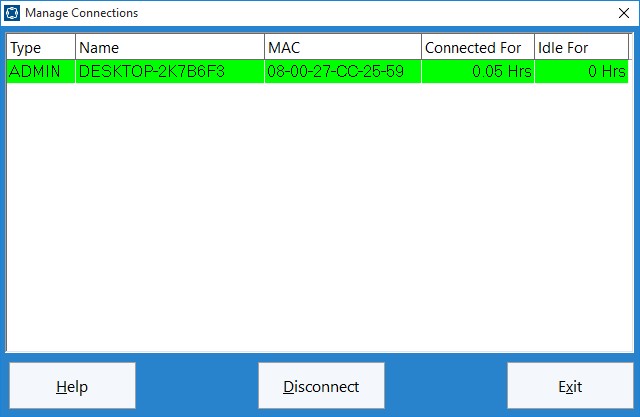
The Manage Connections Screen
Above you can see the Manage Connections screen. This screen is used to view and manage the connections to your Time Clock MTS database. Generally you won’t need to use this screen for much, but every now and again you may need it to delete old, stale connections that are using up your Time Clock MTS Client Licenses. This can commonly happen two ways. Firstly, you’ve installed the Time Clock MTS Client software on too many computers and you’re continually using up your client licenses (you should only install the Time Clock MTS Client software on as many computers as you are licensed for). The second reason is that perhaps a computer with the client software on it has suddenly died or shutdown incorrectly and you’re going to install the software on a new PC because the old one is kaput. In this case the connection record for the old computer can often not be deleted correctly and you’ll need to remove it manually.
This blog describes the process to remove a connection record from Time Clock MTS.
1. Find the connection you want to remove in the list on the Manage Connections screen. You can identify the computer the connection is coming from by the name of the computer or the MAC address of the computer.
2. Ensure that the computer named is no longer running the Time Clock MTS Client software.
3. Click on the connection record you want to delete.
4. Click the Disconnect button to remove the connection record.
That’s all there is to it, but as always if you have any problems please Contact Us and we’ll do our best to help you out!
by Mark Nemtsas | Feb 5, 2014 | How To, Tips and Tricks
Based on certain events occurring in Time Clock MTS the software can automatically send out emails to one or more recipients. This could be useful for a number of reasons. For example notifying a payroll supervisor or department supervisor that an employee has requested time off. Or perhaps notifying the employee themselves when their time off request has been approved or denied.
This how-to guide takes the Time Clock MTS user through the steps required to create an email alert.
1. Log in as the Administrator
The first step is to log into the Time Clock MTS Administrator program as the administrator and go to the Tools->Emails Alerts screen (see the image below).
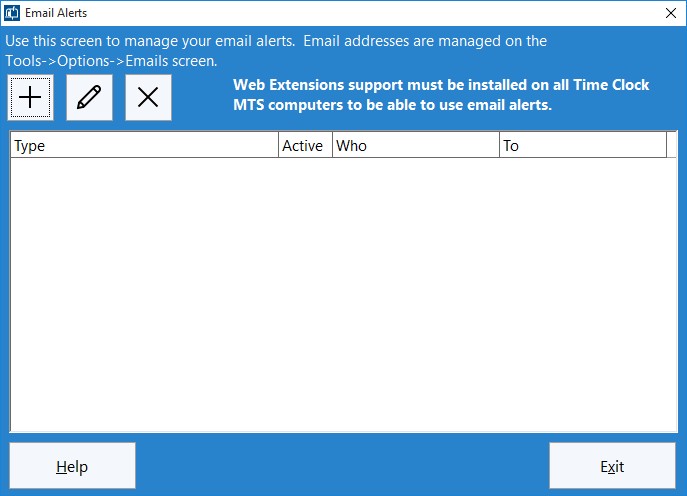
Figure 1 – The Manage Emails Alerts Screen
2. Add an Alert
To add an email alert click the  button and you’ll be shown the Add Email Alert screen (see below).
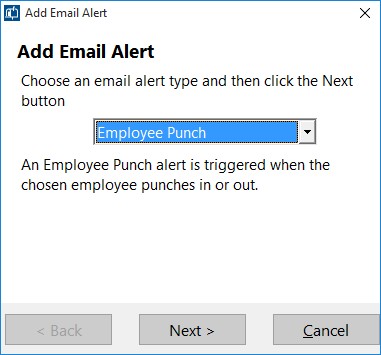
Figure 2 – Adding an Email Alert
Lets add an employee punch alert by choosing it from the dropdown and then click the Next button.
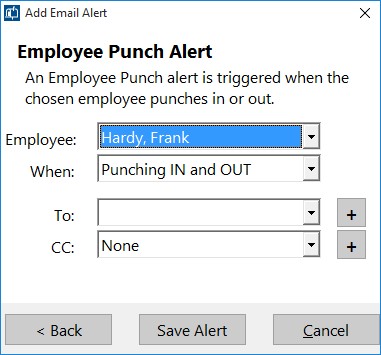
Figure 3 – Adding an Employee Punch Email Alert
3. Set Up the Employee Punch Alert
Above you can see the Employee Punch Alert configuration options. We can choose what employee should raise the alert, what action triggers the alert (punching in, punching out, or both) and two different emails we can send the alert to. In the above example we’ve chosen to raise an alert when Frank Hardy punches in or out but we still need to add a couple of email addresses to send the notifications to. This can be done easily from this screen by clicking the + buttons. If you don’t see the + buttons then you’ll need to update your software to the latest version. Once you’ve added an email address you won’t need to do it again. It’ll always be available to be selected from the dropdown list. Don’t forget though that emails can be added and managed from the Manage Emails screen.
In this case we’re going to add an email for the To field and one for the CC field. The first will be a department supervisor and might look something like this:
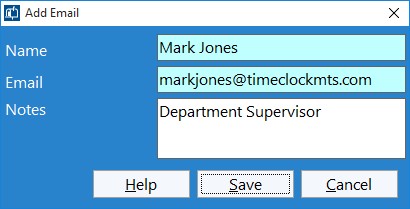
Figure 4 – Adding Department Supervisor Email
And the second is our payroll supervisor:
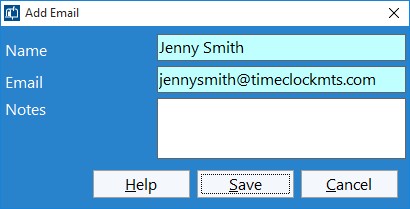
Figure 5 – Adding Payroll Supervisor Email
Note that once they are added they’ll be automatically selected in the corresponding email dropdown box.
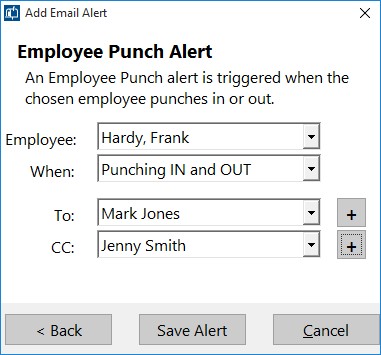
Figure 6 – The Completed Email Alert
4. Save the New Email Alert
When you’re happy with the alert we can save it by clicking the Save Alert button and we’ll be returned to the Manage Alerts screen which should now display it.
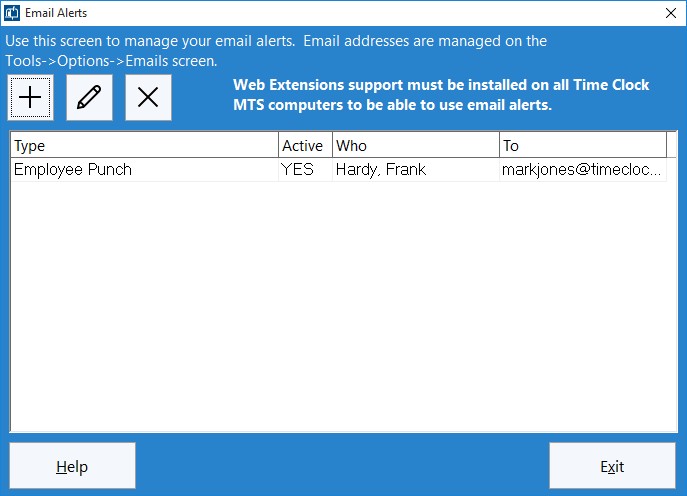
Figure 7 – New Alert on Manage Alerts Screen
5. Install Web Extensions Support
Any computer that has Time Clock MTS on it that needs to create email alerts must have the Time Clock MTS Web Extensions Support installed on it. You can learn what this means and how to install it in this blog article about web extensions.
6. You’re Done!
That’s all there is to it. Now when our employee Frank Hardy punches in or out of any computer our two email addresses will receive a notification of the event via email.
by Mark Nemtsas | Jan 29, 2014 | How To, Tips and Tricks
Time Clock MTS has allowed you to define the labels for almost every button on the employee clock in screen for a while now. You can do it via the Display Settings screen. Just select the “Main Screen Labels” drop down and enter some text for each different label. This is particularly useful if your workforce speaks a different language or your business uses different terminology (for example you punch in and out rather than clock in and out). However, a problem arises when you want to provide two different label sets to different groups of employees. For example, you might want one employee time clock terminal in Spanish and another in English. With the release of Time Clock MTS Version 5 this is now possible.
Here’s how to do it:
- On the computer with Time Clock MTS that you want to have custom labels open up the timeclock.ini file in Windows Notepad. This file can be found in this folder:
c:\Program Data\Time Clock MTS\
Note that you might have to show hidden files and folders to see this location
- Towards the bottom of the file you should see a section that looks like this:
[LocalLabels]
ClockInLabel=1
ClockOutLabel=1
SearchForEmployeeLabel=1
ViewInformationLabel=1
EmployeesLabel=1
ActionTypeLabel=1
TimeNoteLabel=1
ActionDateLabel=1
ActionTimeLabel=1
JobLabel=1
EmployeesInLabel=1
EmployeesOutLabel=1
- Enter a new label next to each setting if you want the local client to display that label in preference to your global labels. So, for example, if you wanted to display “Punch In” and “Punch Out” in preference to your global labels then you”d change the above to something that looks like this:
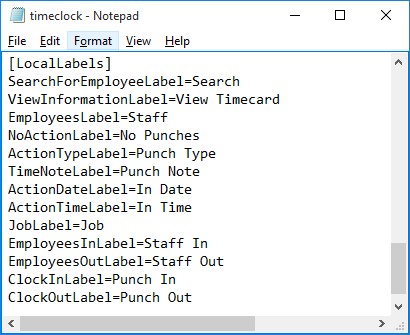
Edited timeclock.ini file
- Any labels you don’t want changed from your global settings should just be left blank or at the default setting of 1. Once you’re happy with your new set of labels save the timesheets.ini file and re-start the software and you should see your new labels in action. See the image below.
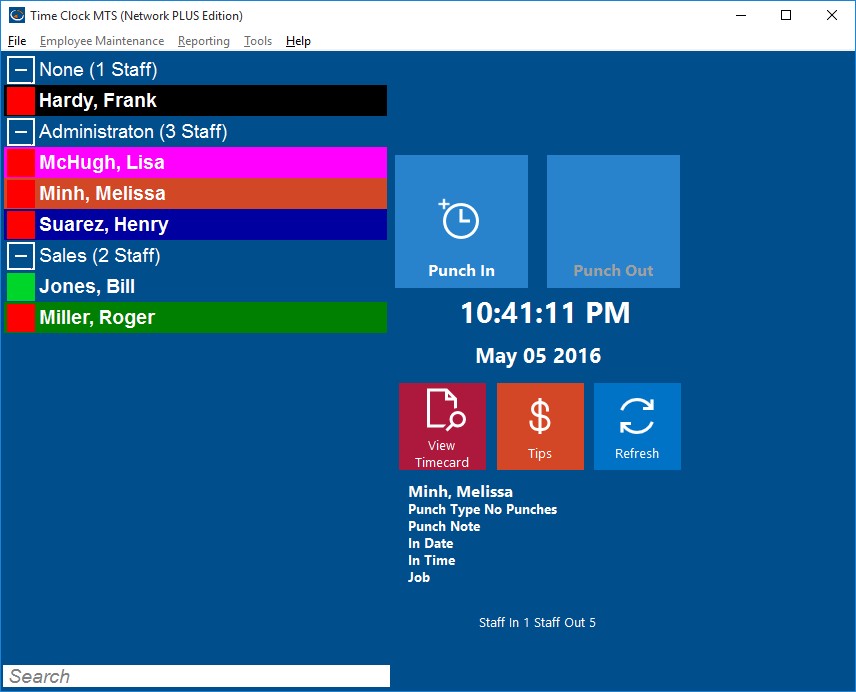
Time Clock MTS with New Labels
by Mark Nemtsas | Dec 9, 2013 | How To, Tips and Tricks
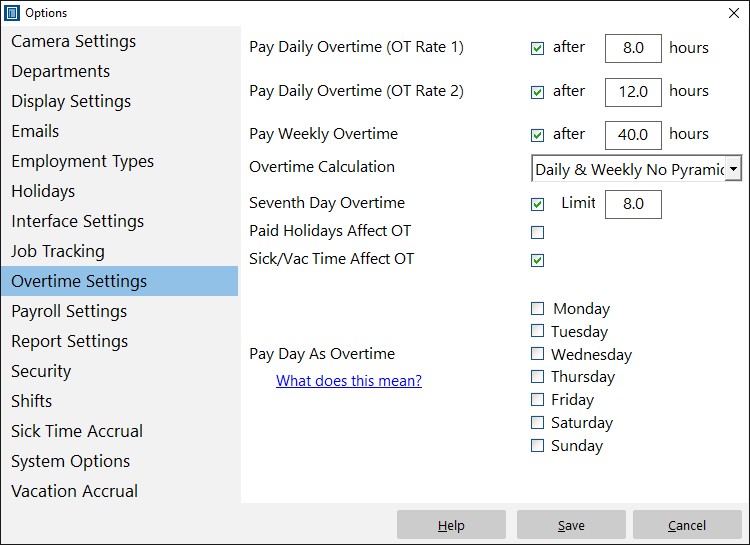
The Overtime Settings Screen
Above you can see the Overtime Settings screen. At the bottom of the screen are 7 checkboxes called the “Pay Day as Overtime” checkboxes. When one of these checkboxes is ticked ALL TIME PUNCHES on that day will be recorded as overtime (at overtime rate 1) for all employees who record times on that day. So, let’s say your local region has a requirement for ALL hours on Sundays to be paid as overtime then you’d want to check the box next to Sunday.
You do not need to check these boxes unless you want to pay all time punches on the given day as overtime.
by kathryn@timeclockmts.com | Oct 23, 2013 | How To
Does your Time Clock software help you to comply with mandatory sick leave laws and requirements? The mayor of Jersey City, New Jersey has signed legislation requiring that businesses in the city with 10 or more employees must offer 5 paid sick days (40 hours) per year. The legislation comes into force on January 24 2014, for detailed information about the law see Jersey City Earned Sick Time Law. Other cities and states that have mandatory paid sick time rules include Connecticut, Seattle in Washington, San Francisco, Washington DC, and Portland, Oregon.
With these types of mandatory paid sick leave laws coming into play it’s important that a business has a system for tracking and accruing sick time in place. A good time clock system like Time Clock MTS has built in tools to allow you to both record sick time taken, accrue sick time, and tell you how much sick time an employee has left. The Jersey City Sick Leave Ordinance requires 1 hour of paid sick leave to be offered for every 30 hours worked with a cap of 40 hours (5 days) per year. The sick leave accrual begins at the hire date but employees cannot take this paid sick time until 90 days or 3 months after the hire date (unless allowed by the employer). I thought it would be good to look at how you’d set up Time Clock MTS to comply with the new Jersey City paid sick time laws.
1. Create a Sick Leave Employment Type
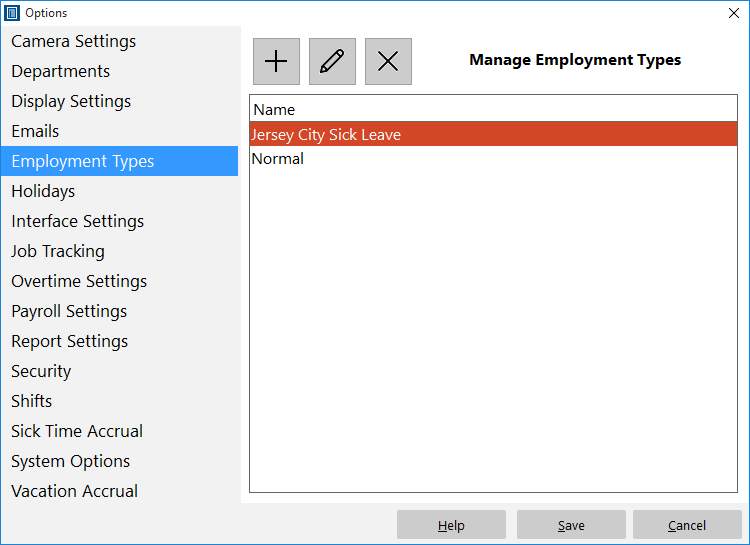
Creating an Employment Type
The first step of the process is to create an Employment Type that will accrue sick time as required by the new law. New employment types can be created by the Time Clock MTS Administrator on the Tools->Options->Employment Types screen. In the image above I’ve created an employment type and for this sake of this example I’ve called this “Jersey City Sick Leave”.
2. Create the Sick Leave Accrual Scheme

Setting Up the Accrual Scheme
Sick leave accrual schemes are managed on the Tools->Options->Sick Leave Accrual screen. In our example you’ll want to setup the accrual scheme for our new “Jersey City Sick Leave” employment type to look like that shown in the image above. Key things to note are:
- The Accrues Sick Leave checkbox is ticked.
- Start Accruing Hire Date Plus is set to zero.
- Accrual rate is set at 1 hour per every 30 hours worked.
- Accrual is capped at 40 hours.
- The accrual balance is carried forward annually.
- The anniversary of the hire date is used for accrual start date not the fiscal year.
3. Assign Employees to the Sick Leave Employee Type
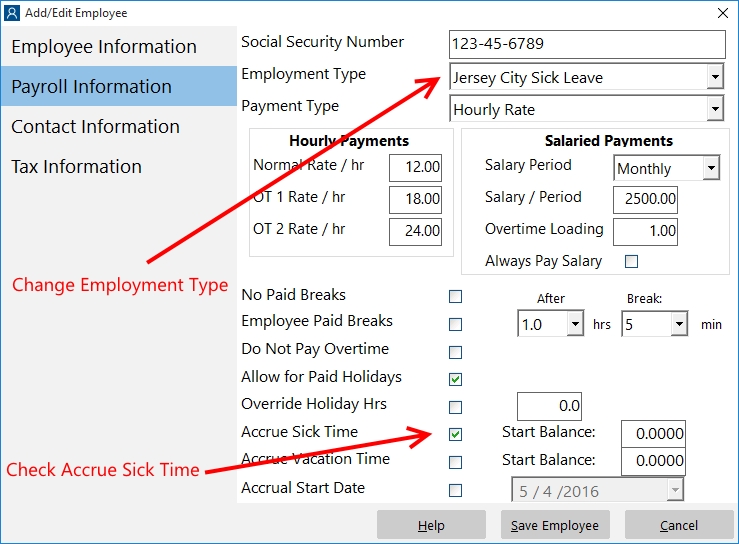
Setting the Employment Type for Employees
The next step in the process is to assign employees to the correct employment type. This can be done from the main screen of Time Clock MTS by clicking on the employee you want to change and choosing the Employee Maintenance-> Edit Employee menu. On the Payroll Information screen of the employee, change the Employment Type dropdown to our new employment type and check the Accrue Sick Time checkbox. Save the employee and you’re done!
Conclusions
Employers and employees can (and will) argue about the merits of paid sick time and associated accruals. But, if a law is in place requiring paid sick time then you should make sure your time clock system can handle it quickly and easily. You do not want to be burdened down with secondary tracking systems nor do you want to be doing the calculations manually. Time Clock MTS makes complying with mandatory paid sick leave like that introduced into Jersey City, N.J. a breeze. So if you’re in the market for a new time clock system why not give it a try?
Page 5 of 16« First«...34567...10...»Last »