by Mark Nemtsas | Feb 14, 2018 | New Releases, News
We’re uploading version 6.1.6 of Time Clock MTS as this blog post is being written. This version contains a few minor fixes and performance enhancements as detailed below:
- Deleted employees are no longer checked when updating the status of employees on the employee list.
- Employee count is now gathered during the main employee status query rather than separately when updating the employee list status.
- The query that gets the status of a single employee now works correctly if there is more than one time note assigned to the most recent time punch.
- The grouped employee status query now groups time notes by time rather than returning all notes.
- Fixed a long standing problem with the selected employee not updating correctly on the employee list when department folders were displayed.
- Tie breaker sort criteria added to the grouped employee status query to stop it returning more than one record from a sub query. Of course, there should NEVER be two most recent time punches but in the case of database corruption it can happen. This tie breaker criteria will stop an ugly error being thrown.
by Mark Nemtsas | Feb 13, 2018 | Tips and Tricks, Using the Software
This Time Clock MTS How-To guide explains how to restrict the employees displayed on the Time Clock MTS Client Software to a single department. This is useful if you do not want employees from one department seeing employees from another department when punching in and out. It’s even possible to create a department per employee and restrict display to a single employee per time clock computer. Here’s the steps to follow to restrict the employees displayed on the time clock client software to one department:
Create Departments and Assign them to Employees
To learn how to create and assign employees to departments take a look at this how to guide.
Show Department Folders
The next step is to display department folders on the time clock employee list. To learn how to do this take a look at this how to guide.
Configure the Time Clock Client Software to Display a Single Department
On the computer where you want to restrict display of employees to a single department start up the Time Clock MTS Client program. You’ll see that all employees and departments are displayed as per the image below:
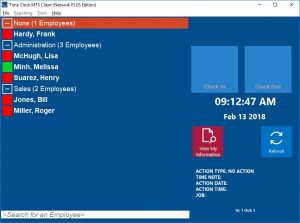
All Departments Visible
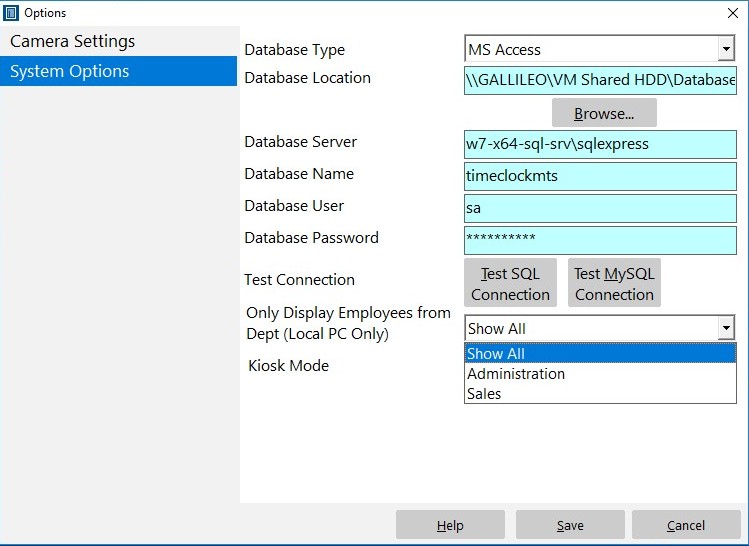
To select a department to display Log in as the Administrator and go to the Tools->Options->System Options screen. Toward the bottom of the screen is a drop down labelled Only Display Employees from Dept (Local PC Only). Click that and select a department to display. See the image below for a visual explanation:
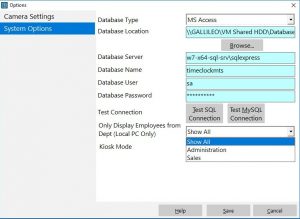
The System Options Screen
Once a department is selected click the Save button and log out of the administrator account using the File->Log Off of Administrator Account menu. The list of employees will refresh and you’ll see that only the employees from the selected department are displayed. See the image below.
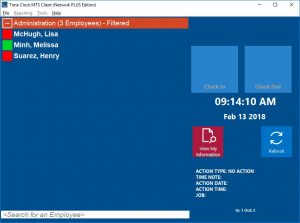
Only One Department Visible
Note that the parent department on the display has Filtered next to it to remind you that you’re seeing a filtered display of employees. Note also that the filtering ONLY takes place when you’re not logged into the Administrator account.
by Mark Nemtsas | Feb 6, 2018 | New Releases, News
Today sees the release of Version 6.1.5 of our time clock software. This version has a number of performance improvements as we continually seek to provide a better experience when using Time Clock MTS with a remote database server like MySQL or SQL Server. Here’s a detailed list of the changes:
- Code for filling the employee list has been greatly improved. Key changes are selection of employee status information via a single query and removal of queries that were selecting non vital data.
- Just two queries are used to generate the Employee Status Report, formerly a query per employee was required.
- Checking of compliance with license conditions has been greatly streamlined by combination of database queries into one grouped query.
- Checking for a live connection to the time clock data file is now only carried out every 10 seconds rather than with each and every new attempt to pull data from the data file.
- Removed a pointless check for duplicate time punch check when punching in or out.
- All parameterized queries have been removed when using a MySQL back-end with the Network PLUS Edition of Time Clock MTS.
- The View Release Notes button on the Check for Updates screen now displays the Release Notes page from the timeclockmts.com website.
- The warning about the Stand Alone Edition running on more than one computer now includes a link to a blog article that explains how to solve the issue.
- Two new time punch formats added to Event Based Data Export formats, HHNNSS and HHNNSS AMPM.
- Reminding of new users about Employee PINs is now done with a properly styled form with a link to the explanatory video on our website.
- The first administrator login prompt is now done via a properly styled window.
- Whenever the software tries to access our website it correctly tries to access the HTTPS version of the website rather than the old non-secure address.
- Fixed a problem with the crosstab query when loading a group of time punches and there was more than one time note recorded against a single time punch.
- Fixed a problem with the display of status icons on the Edit Times screen and the Dept. Folders on Employee List setting was switched on.
by Mark Nemtsas | Dec 28, 2017 | Tips and Tricks, Using the Software
This Time Clock MTS How-To guide was the result of this question by a Time Clock MTS User:
I have multiple companies under the same timeclock. How do I assign employees to a specific department? Employees are always in the same department. We do not mix the 2 departments at all.
So, how do you set up departments, assign them to employees and then report on those departments? This how-to-guide covers the entire process.
Managing / Creating Departments
The Tools->Options->Departments screen can be used to create and manage any number of departments in Time Clock MTS. Add, edit, or delete departments using this screen. The Manage Departments screen can be seen below in the process of adding a new department called “Manufacturing”.
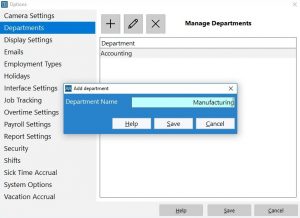
Adding a New Department
Assigning an Employee to a Department
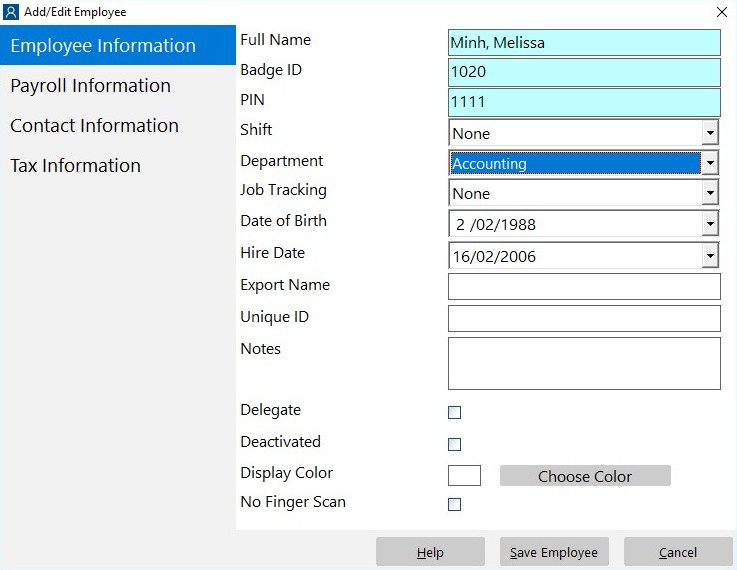
Assign your employees to the correct department once you’ve created your company department list. This is easily accomplished by selecting the employee you want to edit and going to the Employee Maintenance->Edit Selected Employee->Employee Information screen. On this screen towards the top is a dropdown box containing each of your departments. Just select the department you want your employee to work in from this drop down and click the Save Employee button. Below you can see what this screen looks like while we’re assigning an employee to the “Accounting” department.
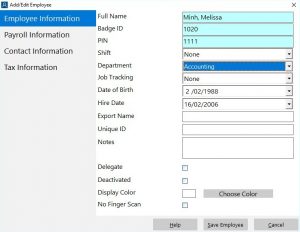
Assigning the Employee to the Department
Running a Payroll Report for a Department
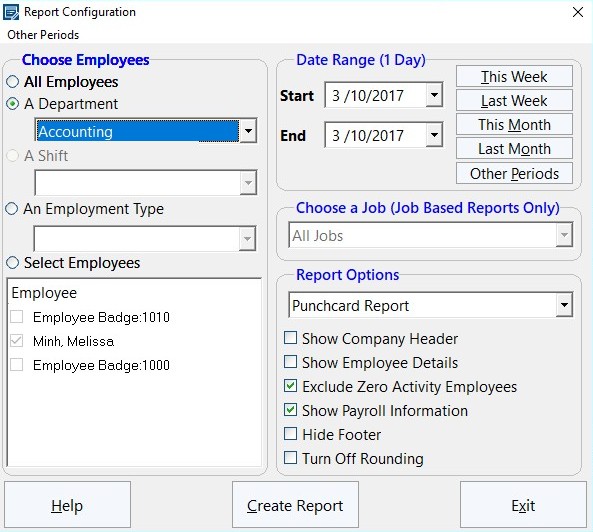
You’re going to want to report on their activity once you’ve got employees assigned to a department and they are punching in and out of Time Clock MTS every day. This is usually done by running a payroll report from the Reporting->Payroll Reports menu. Select a department from the Department drop down box at the top left of the Report Configuration screen (see image below). Making a selection from this drop down allows you to filter any report by department.
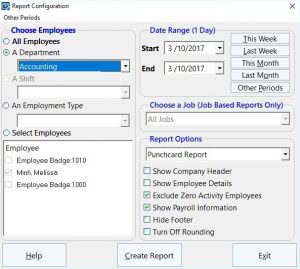
Running a Departmental Payroll Report
Some payroll reports are specifically designed to create departmental information. These include the Departmental Wages Report and the Simple Wages (Departmental) Report.
That concludes this how-to article. It should be noted that this method will only work if your employees always work in one department. If your employees split their time between departments then you’d want to use the Time Clock MTS Job Tracking System. If, for example, you’re a restaurant and your employees split their time between front-of-house and the bar then you could create a job called “front-of-house” and one for “bar” and have your employees punch in and out each job as required. But that is really the subject of another how-to article!
by Mark Nemtsas | Dec 7, 2017 | User Testimonials, Using the Software
We were recently happy to donate a license of Time Clock MTS to the the Central New York Society for the Prevention of Cruelty to Animals. Fred Legawiec, a volunteer for the Society has been kind enough to write a few works about how they’ll be using the software. You can find Fred’s words below:
First and foremost, Thank you very much and I gladly accept the terms of the donated license. Here are the plans for the stand alone time clock in regard to the Central New York Society for the Prevention of Cruelty to Animals. (CNYSPCA):
As a volunteer for the CNY SPCA, I was asked to bring the hour logging of volunteers into the 21st century. Presently the SPCA uses three large binders that volunteers sign in their time in and time out hours on individual sheets! Not fun compiling the hours used! I looked at dozens of PC time clock programs but almost all were lacking in detailed reports. I read a review of MTS time clock program and downloaded the trial version! Perfection Personified!! It was exactly what we were looking for. Very simple to use, point and click clock in and clock out functions, fantastic report functions that allow for detailed reports by job function, flexibility that allows for main screen label changes. Our goal is to be totally PC functional by 1-1-2018 and thanks to MTS, it is within our reach!! With over 250 volunteers, the productivity just increased threefold for our organization. Great program for volunteer non-profit organizations that hope to utilize their volunteers to the maximum. Thank you MTS!! Fred Legawiec, Central New York Society for the Prevention of Cruelty to Animals.