Sick Time Accruals in Time Clock MTS
Time Clock MTS is capable of doing your sick time accruals for your employees who are entitled to it. Here’s a short tutorial showing you how to configure the software to do your sick time accrual calculations for you, and a brief explanation of how Time Clock MTS carries out the calculations involved.
Add an employment type
Sick time accruals are associated with employment types. This saves you time by allowing you setup one sick time accrual scheme to cover a group of employees. It also allows you infinite flexibility by having one employment type per employee and having a unique sick time accrual scheme per employee. Firstly let’s log into Time Clock MTS and go to the Tools->Options->Employment Types screen.
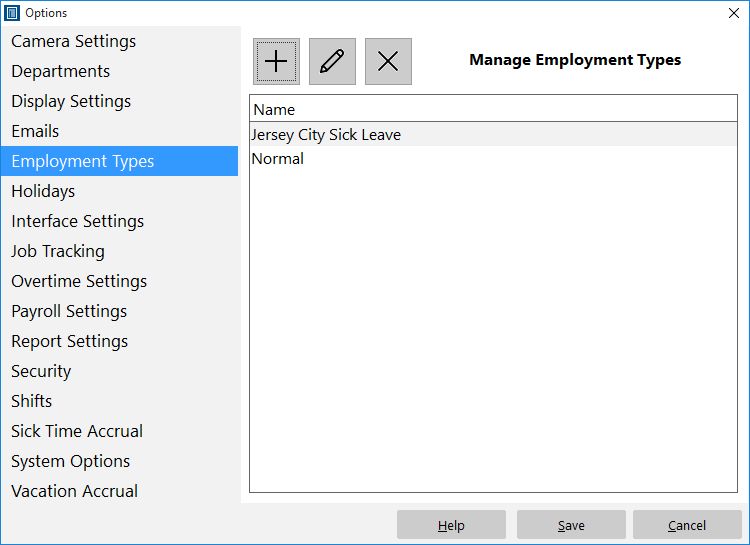
Manage Employment Types
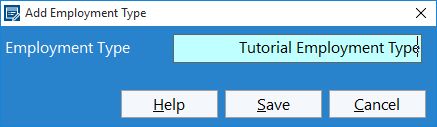
Click the  button to add a new employment type and let’s add new employment type. Just call the new employment type anything you like, but in our case we’ll call it the tutorial employment type
Adding an Employment Type
The Sick Time Accrual Screen
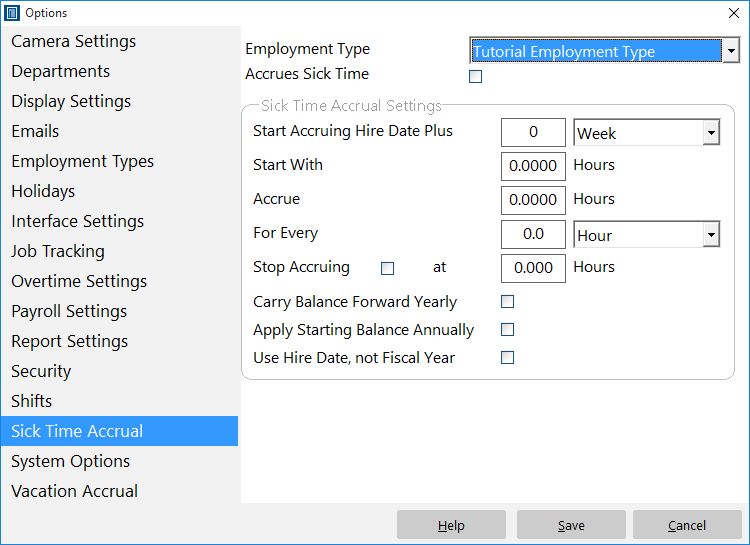
Time Clock MTS allows you to setup a sick time accrual scheme for each employment type. You access the sick time accruals from the main options area of Time Clock MTS.
Adding a Sick Time Accrual Scheme
Let’s take a look at this screen. You can select which employment type you wish to apply the sick time accrual scheme to in the drop down box at the top. You now have several main settings to configure for you to calculate your employees sick time accruals.
- Start Accruing Hire Date Plus – this specifies the delay (if any) after the employee is hired that Time Clock MTS will start accruing sick time
- Start With – this allows the employee to start with a non-zero balance of available sick time. This may be useful for workplaces that give employees sick time time in advance (ie before they have earned it).
- Accrue – this is the number of hours the employee will accrue for each time unit specified in the next setting.
- For Every – this is the time unit at which the sick time accrues. Allowable units are hours, weeks, and months. When set to hour Time Clock MTS will accrue for each hour worked. When set to week Time Clock MTS will accrue for each week of elapsed time since the employee was hired. When set to month Time Clock MTS will accrue for each calendar month of elapsed time since the employee was hired.
- Stop Accruing – this allows you to set an absolute limit on the amount of sick time that the employee can accrue.
- Carry Balance Forward Yearly – when set the employees sick time owing at the end of one fiscal year will roll over into the next fiscal year. The fiscal year is determined by the date set on the Payroll Settings page.
- Apply Starting Balance Annually – if the scheme is set to reset annually this balance will be applied at the start of the period. Useful if your employees accrue sick time in advance.
- Use Hire Date, Not Fiscal Year – check this box and the date that the accrual scheme is reset will be the anniversary of the employee hire date rather than the start of the fiscal year.
Setting up a sick time Accrual Sample
We’ll now go ahead and setup a sample sick time accrual scheme for the purposes of this tutorial. Firstly select the Tutorial Employment Type from the drop down list. Then setup the parameters as shown in the image below. Note that you must check the Accrues Sick Leave checkbox to setup the parameters for the sick time accrual scheme.

Sick Time Accrual Complete
In our example:
- The employee starts accruing sick time immediately on their hire date
- The employee starts with a zero balance
- The employee accrues 6.25 hrs of sick time for every month elapsed after hire date. This equates to 2 full weeks of sick time per year for a 37.5 hour week worked.
- The employee has a maximum balance of 75 hours or 2 full 37.5 hour weeks.
- The balance at the end of one fiscal year carries forward to the next fiscal year. So if an employee ends the year with 37.5 hours of leave owing then they will start accruing at this amount in the next year.
Assigning the Employee Type
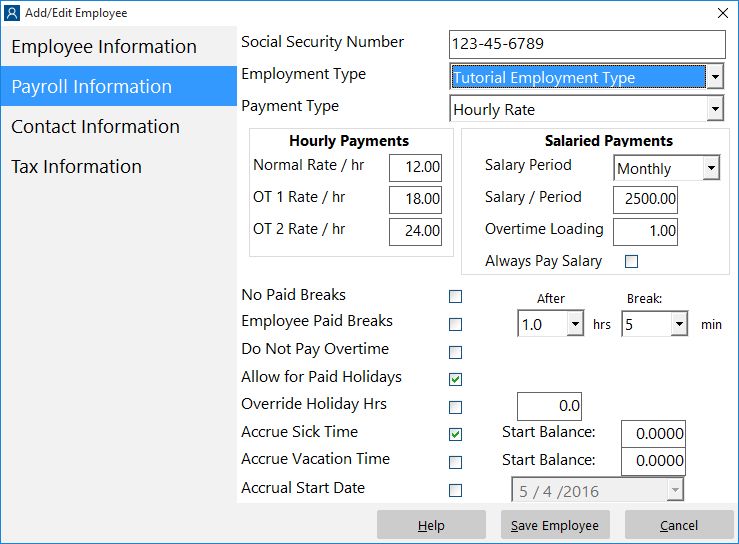
The last step in the process is to assign the employee to the employment type and to make sure the employee is setup to actually accrue sick time . Click the Save button on the options page to save the changes to the sick time accrual scheme. Then select an employee from your employee list and select the Employee Maintenance->Edit Employee menu. When on the Edit Employee screen select the Payroll Information page.
Setting the Employment Type
On this screen all we need to do is to set the employment type in the drop down box to the tutorial employment type. Then make sure the Accrues Sick Time checkbox is ticked. When this is done click the Save Employee button and our employee is now ready to accrue sick time.
Conclusions
All we have done here is setup an employee to accrue sick time. We still need to be able to report on sick time owed and taken. Obviously we still need to enter sick time as taken by the employee. You can learn how to do that in this tutorial.
Time Clock MTS
The Easy Time Recording System
Time Clock MTS
The easy to use time recording software with a fully functional 30 day trial.
Buy Time Clock MTS
Purchase a registration key from our online shop. Only buy once, no monthly fees.